Blueberry Lemon Shortcakes with Lemon Whipped Cream

If I was asked which baked breakfast good I would not want to live without, I think it would be a tie between cinnamon buns and scones.
.
And that’s serious business because I love breakfast and all of its choices so very much. But…scones. They are just perfect little breakfast packages, whether made sweet or savory. You can eat them as is, slather them with butter or jam, or sandwich them around eggs and cheese and bacon. Scones are just a breakfast dream, waiting to happen.
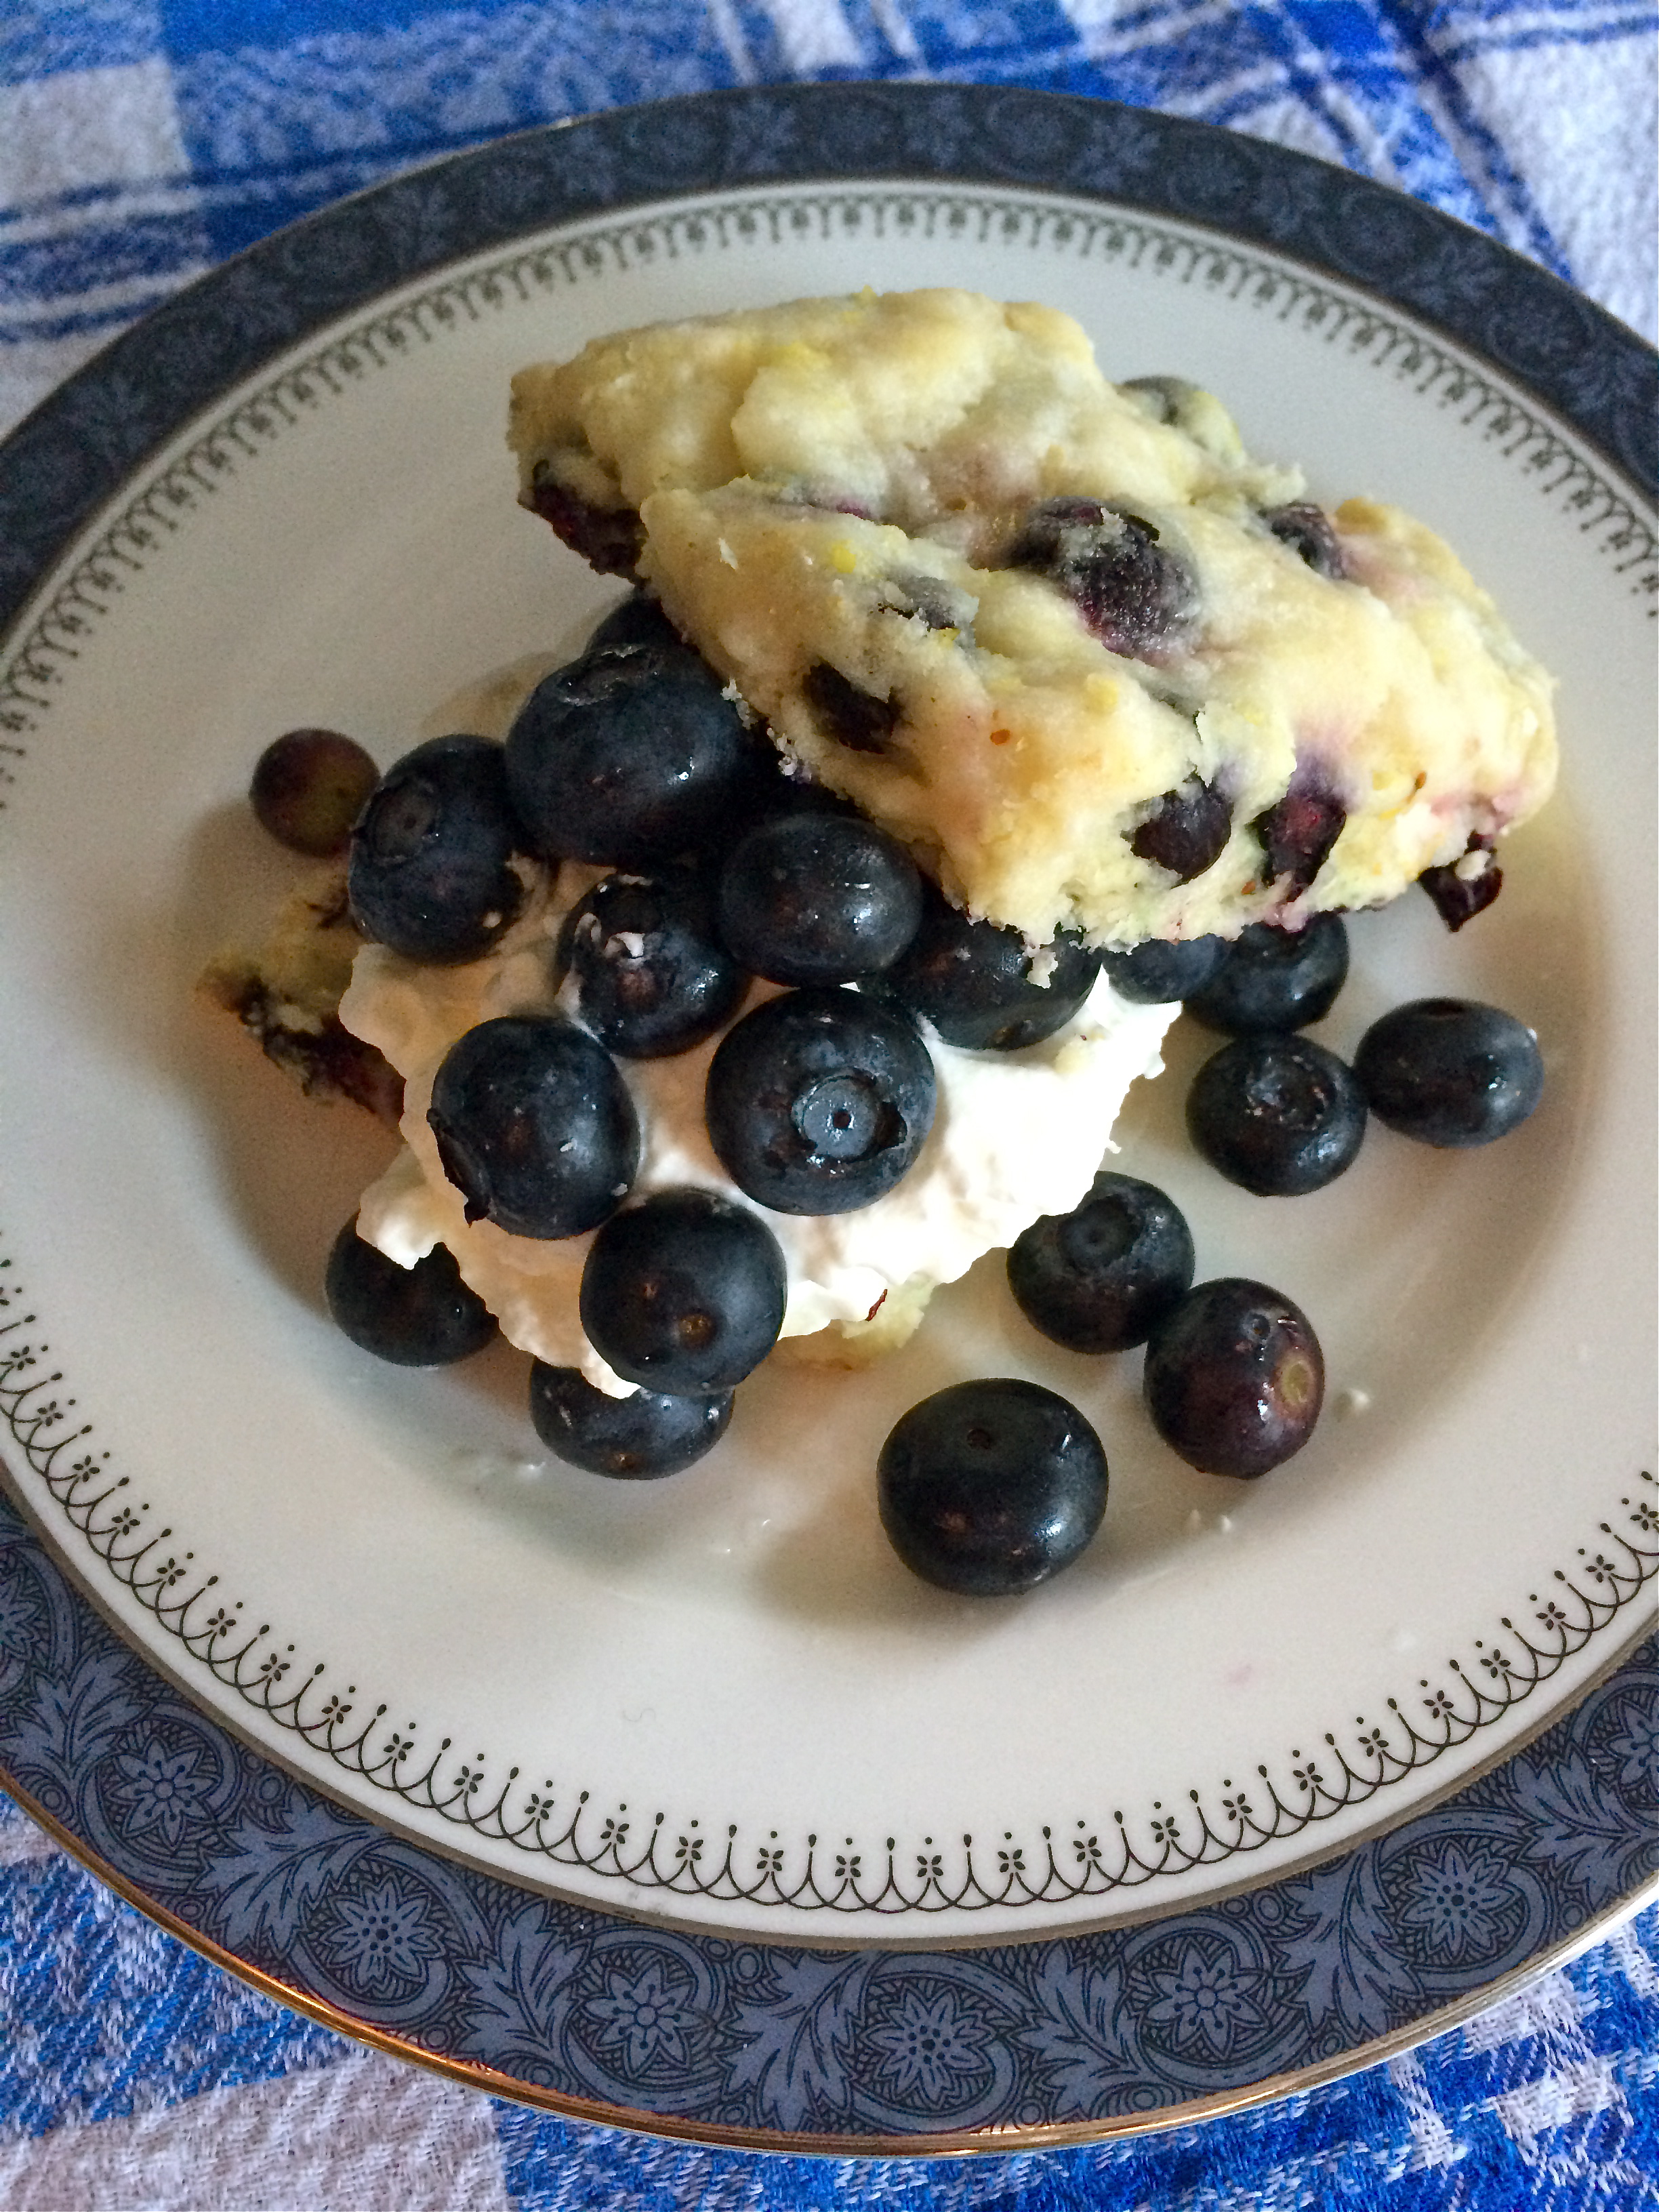
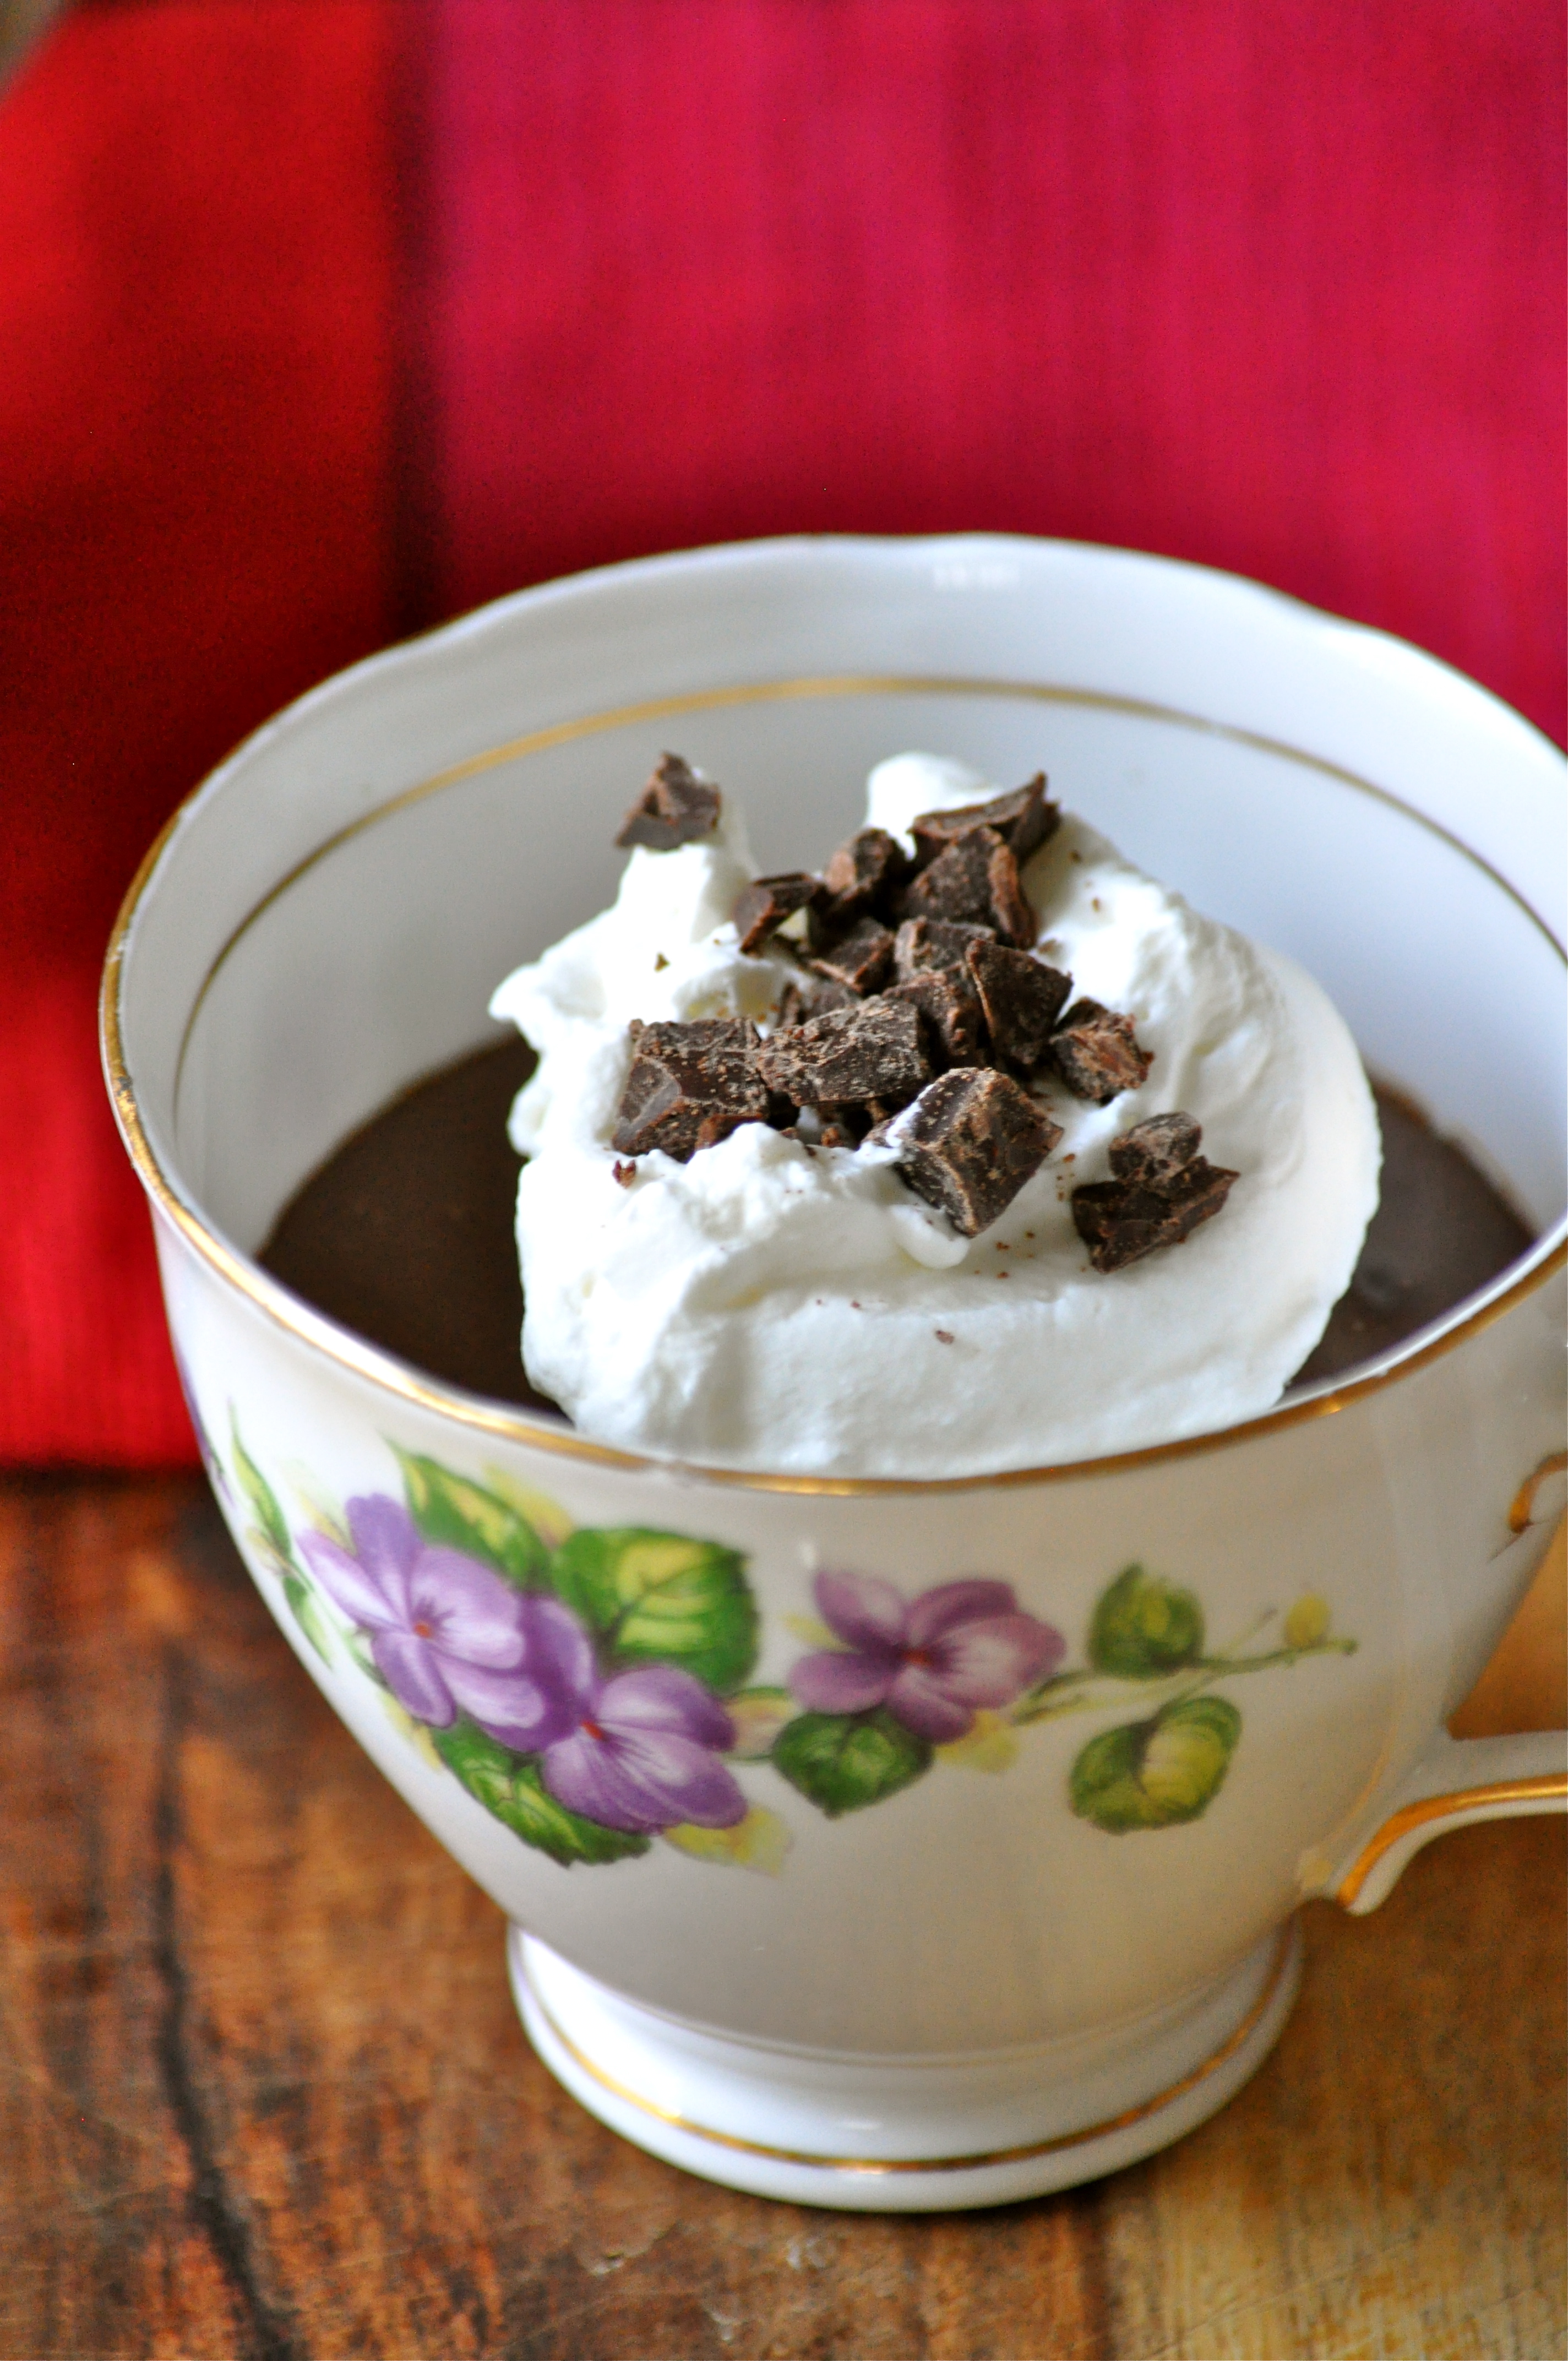
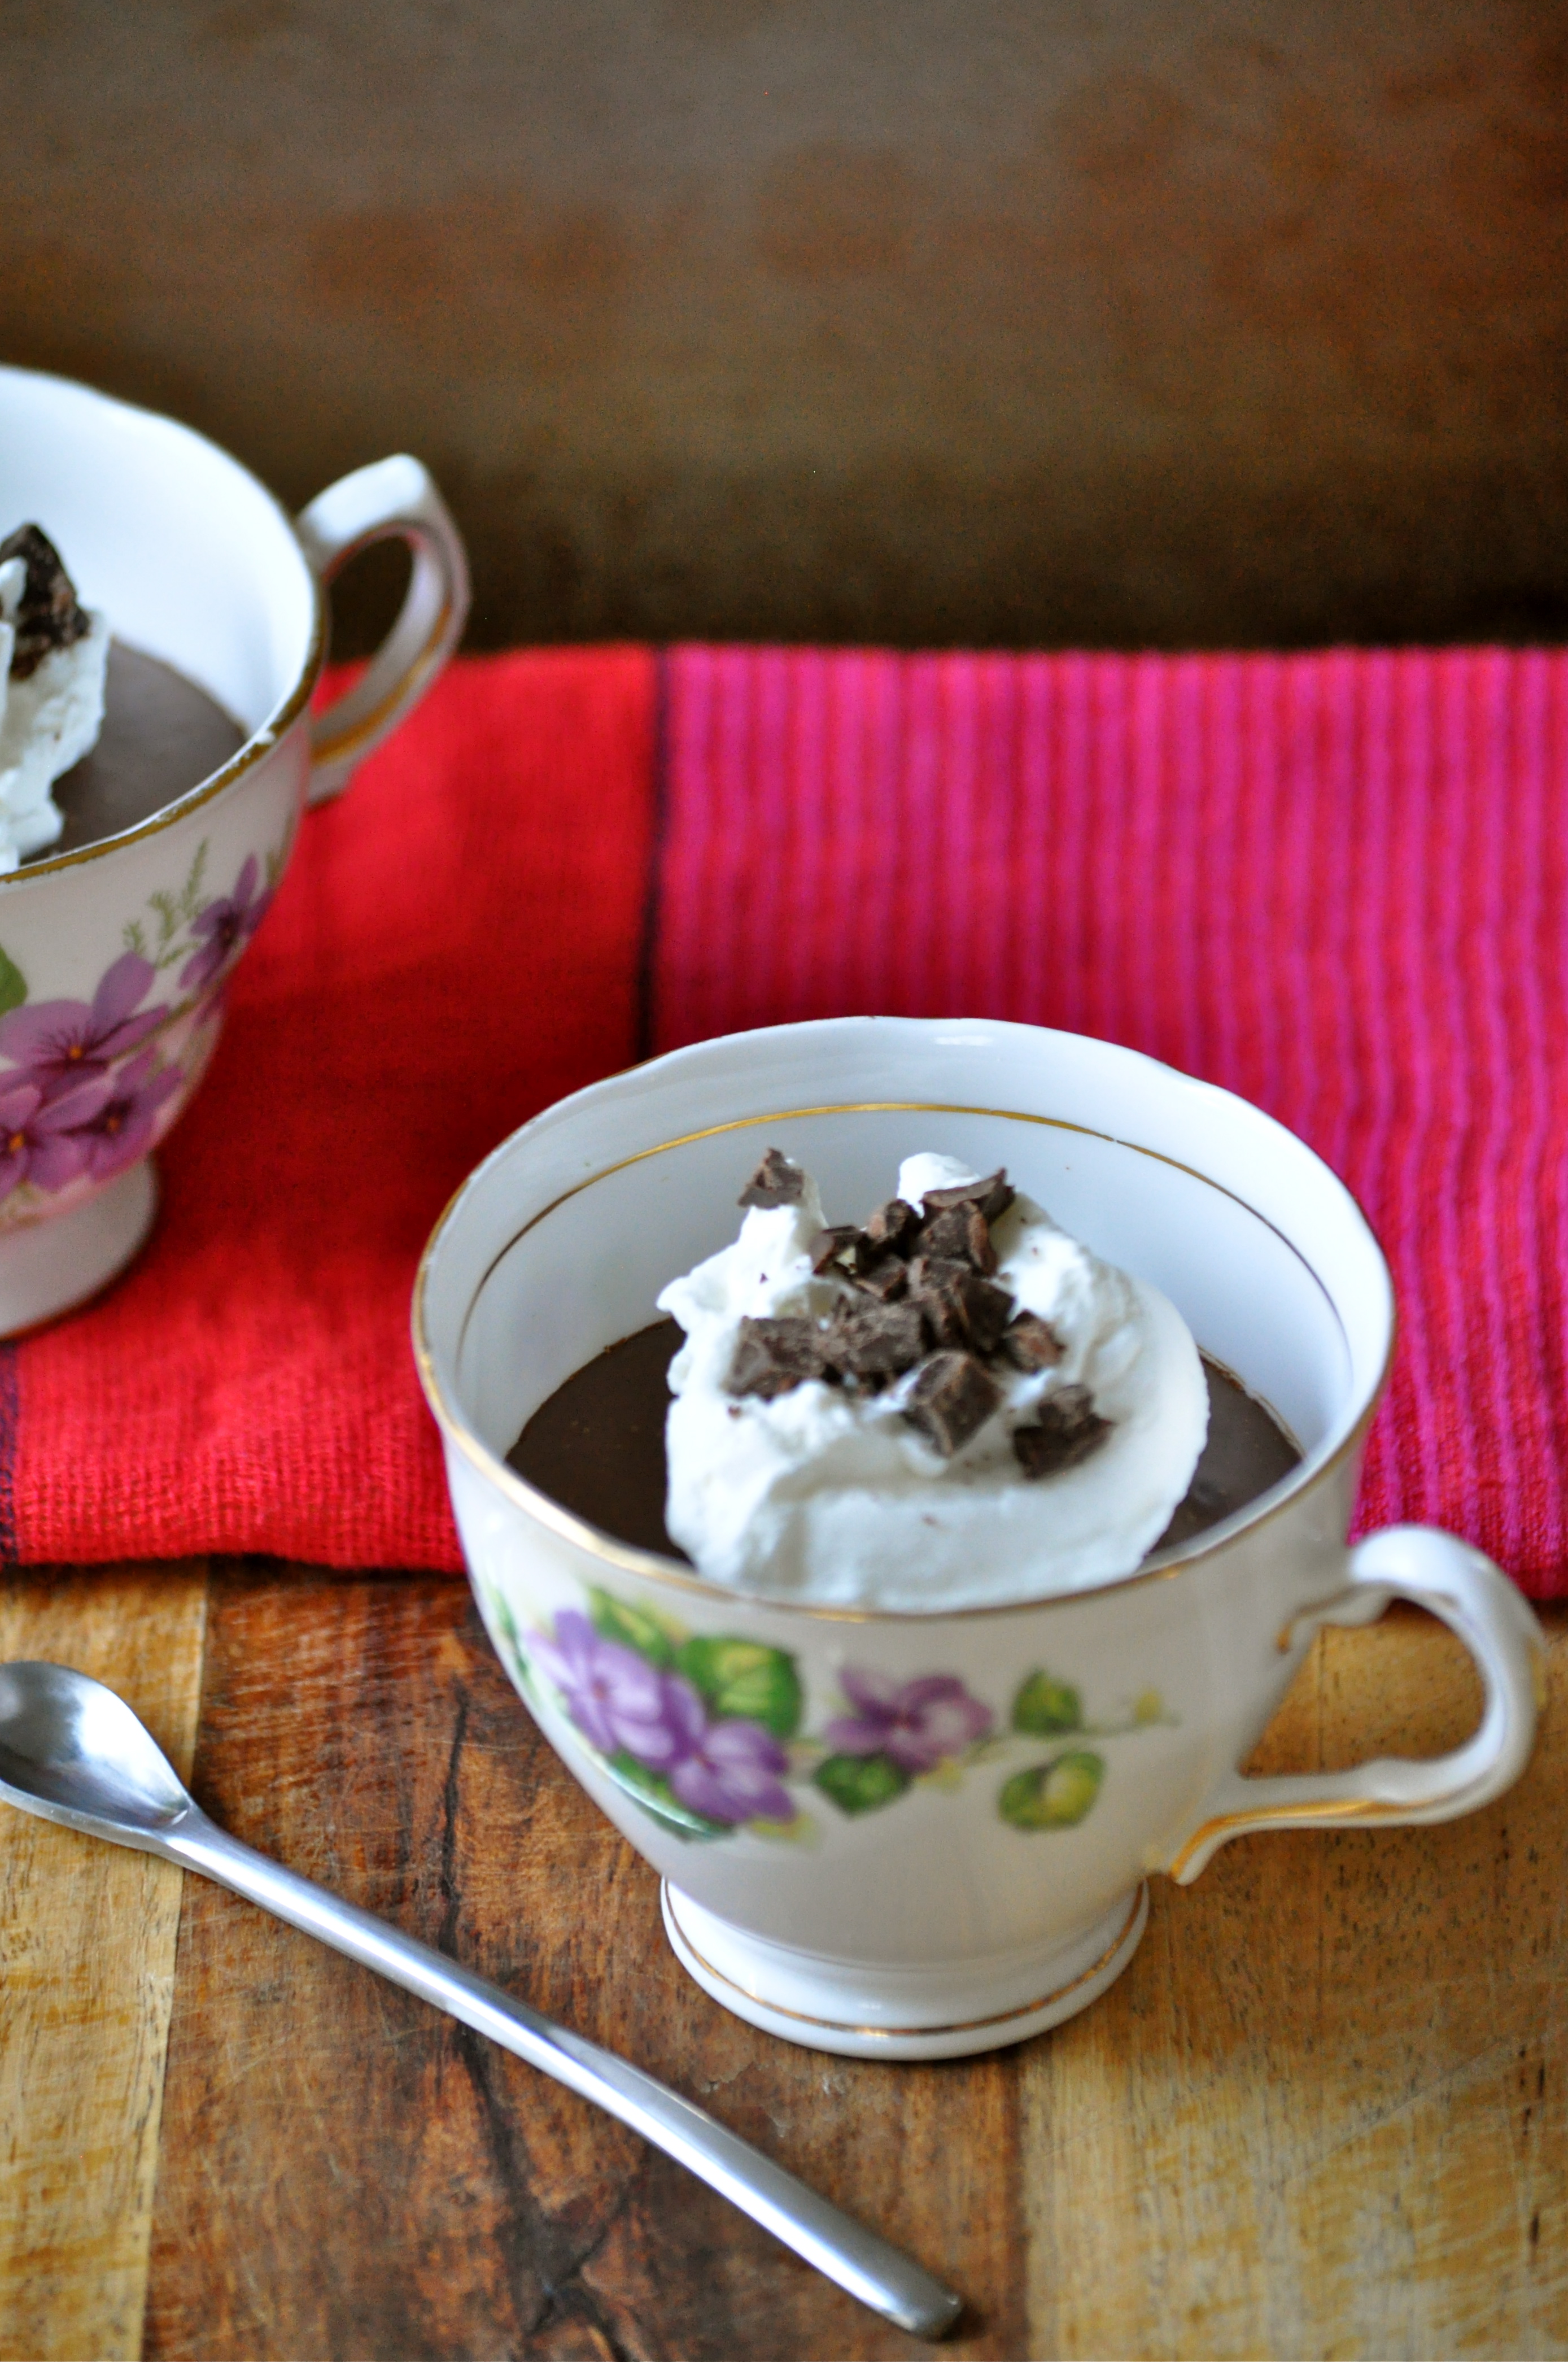
And if you want to make a scone decidely breakfast-inappropriate, you could serve it alongside a cloud of freshly whipped cream and a pile of berries. (Although I totally wouldn’t judge you if you ate it for breakfast. In fact, I’d probably high-five you).
.
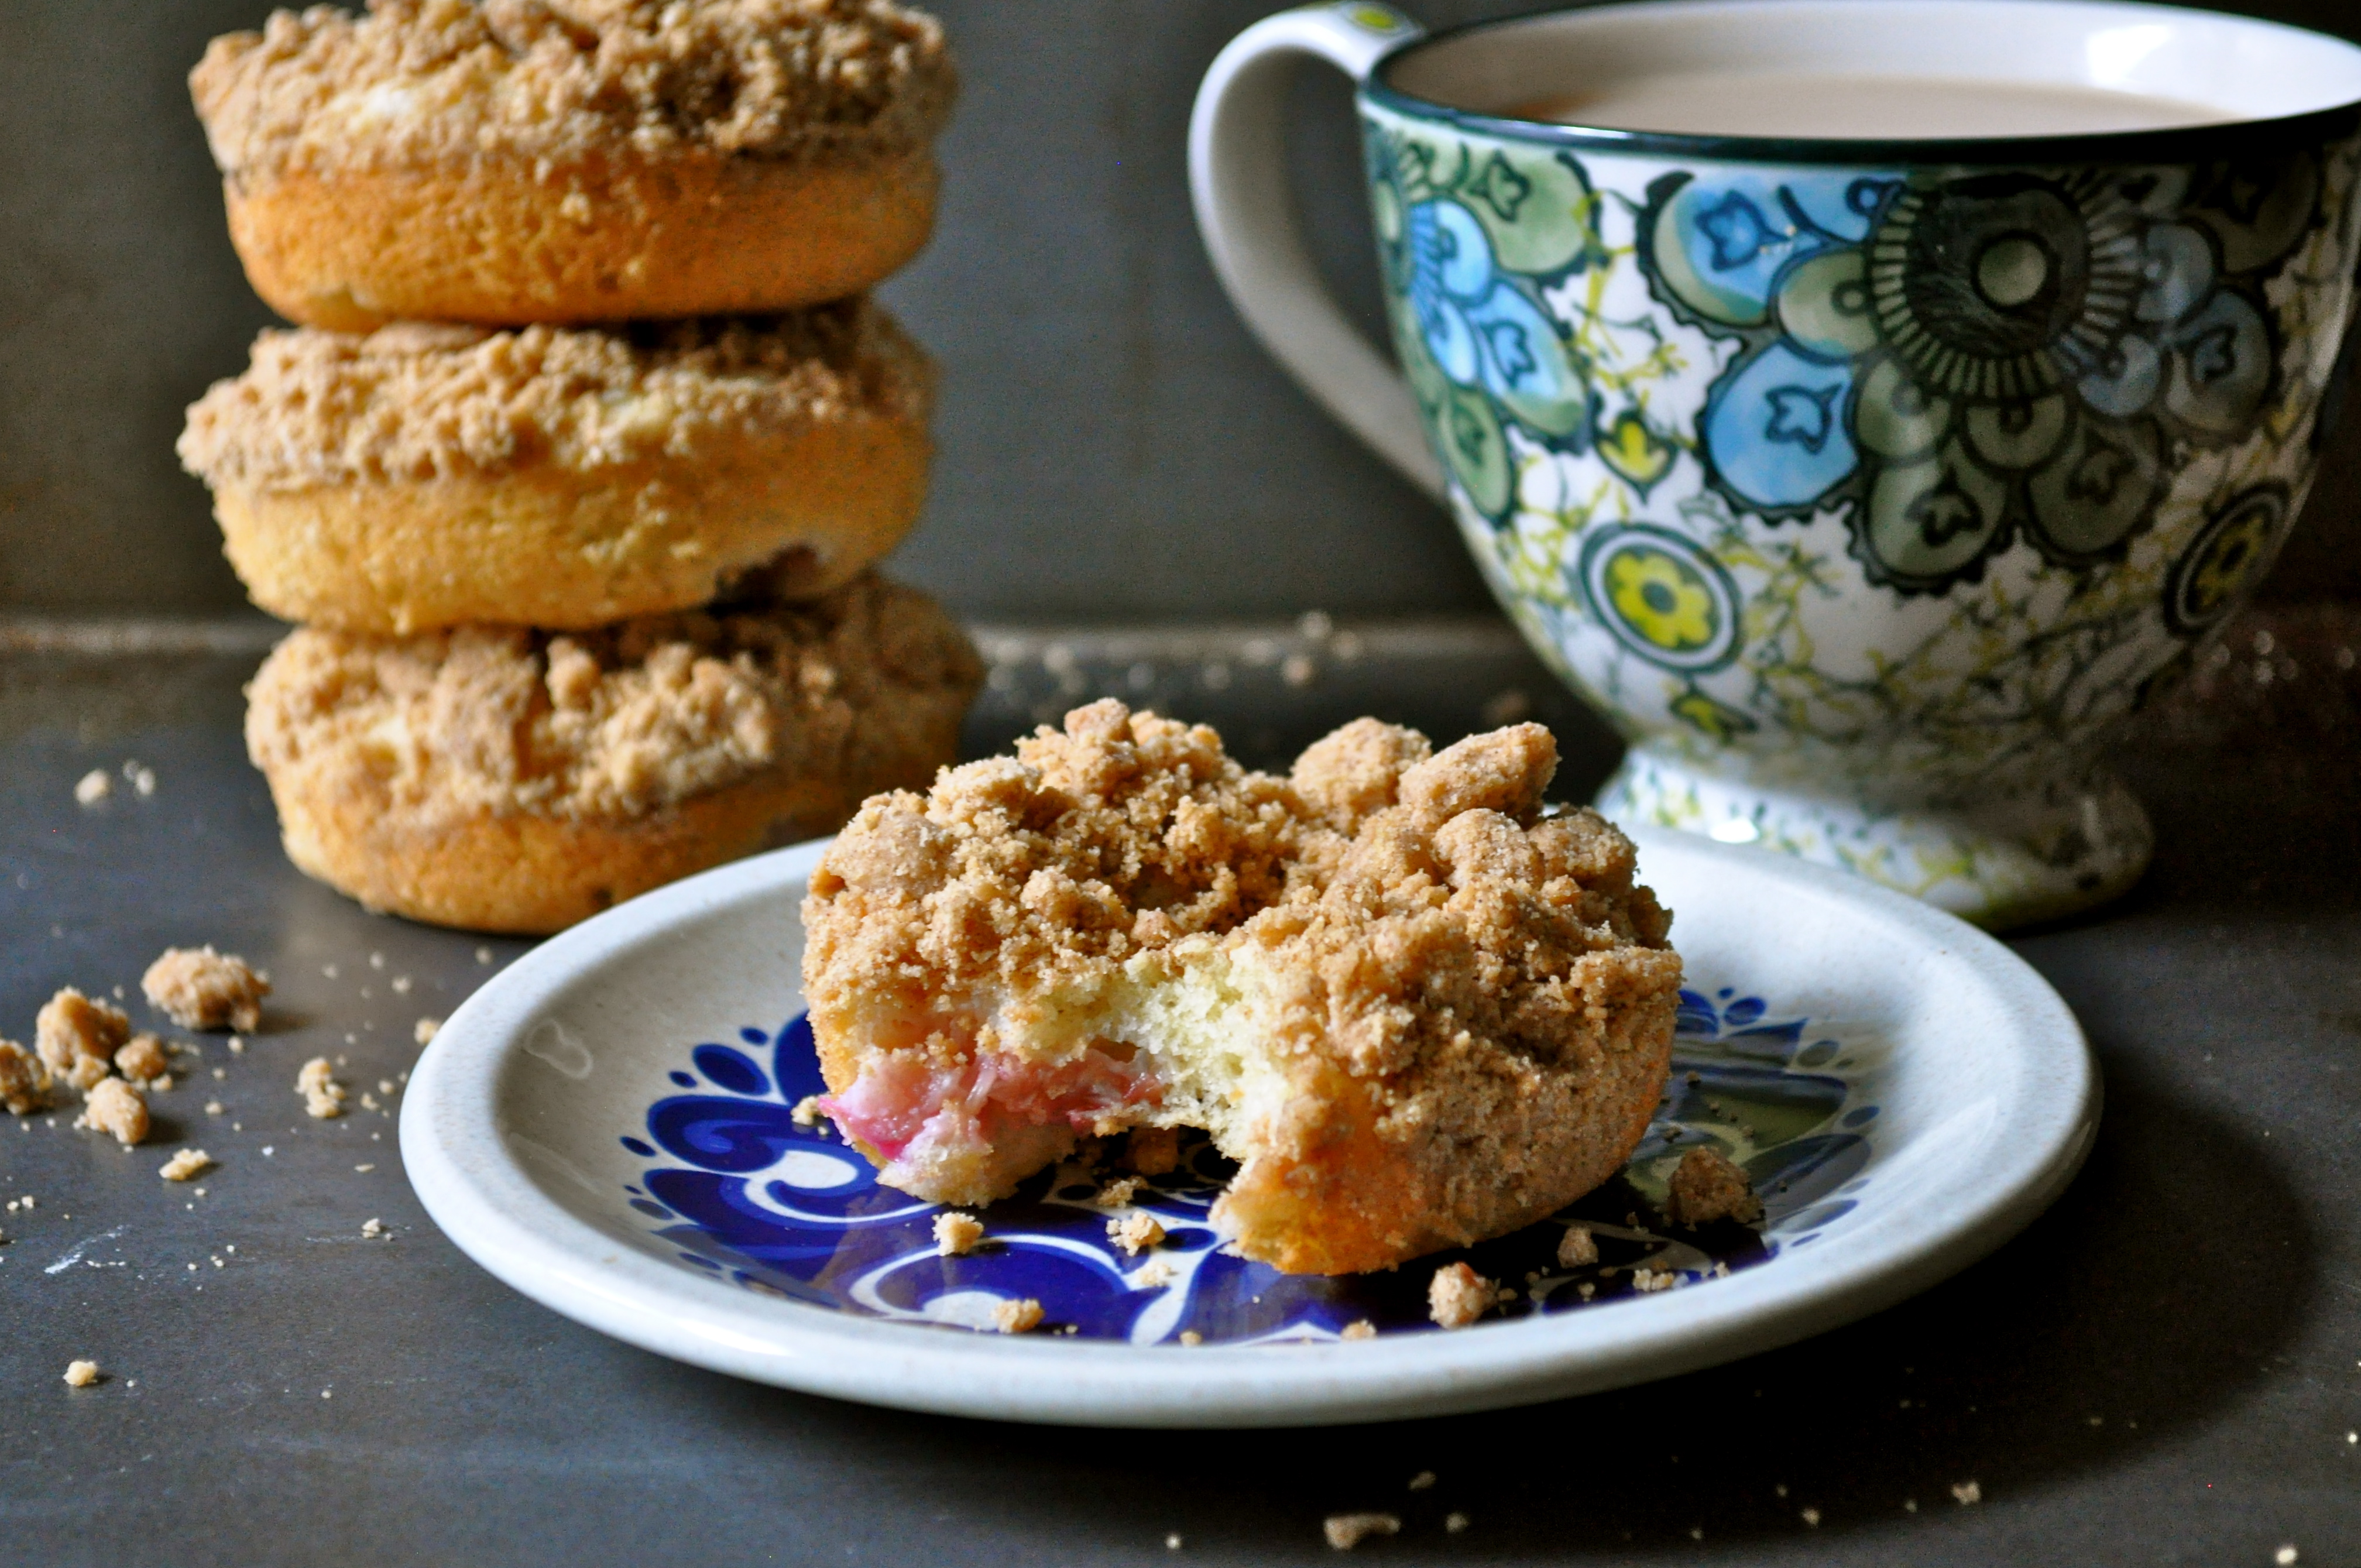
Last week I had a bunch of blueberries that were about to go past their prime. I had also bought a giant bag of lemons the week before. Sidenote: I never seem to have a lemon on hand when I really need one, so I decided that it would be a great idea to buy a huge bag of them and use lemon in everything (fresh lemon water, homemade salad dressings, etc.). And of course, once I had a copious amount of lemons I failed to use them in all the ways I had imagined. Why does the world work this way? Anyways…so there I was with blueberries and lemons that needed a good home. The idea of fresh blueberry scones with a little lemon zip got me started. As the scones were baking in the oven, I got an invite to dinner that evening and offered to bring dessert. It was divine intervention, really. The only solution was to make the scones even better by turning them into shortcakes!
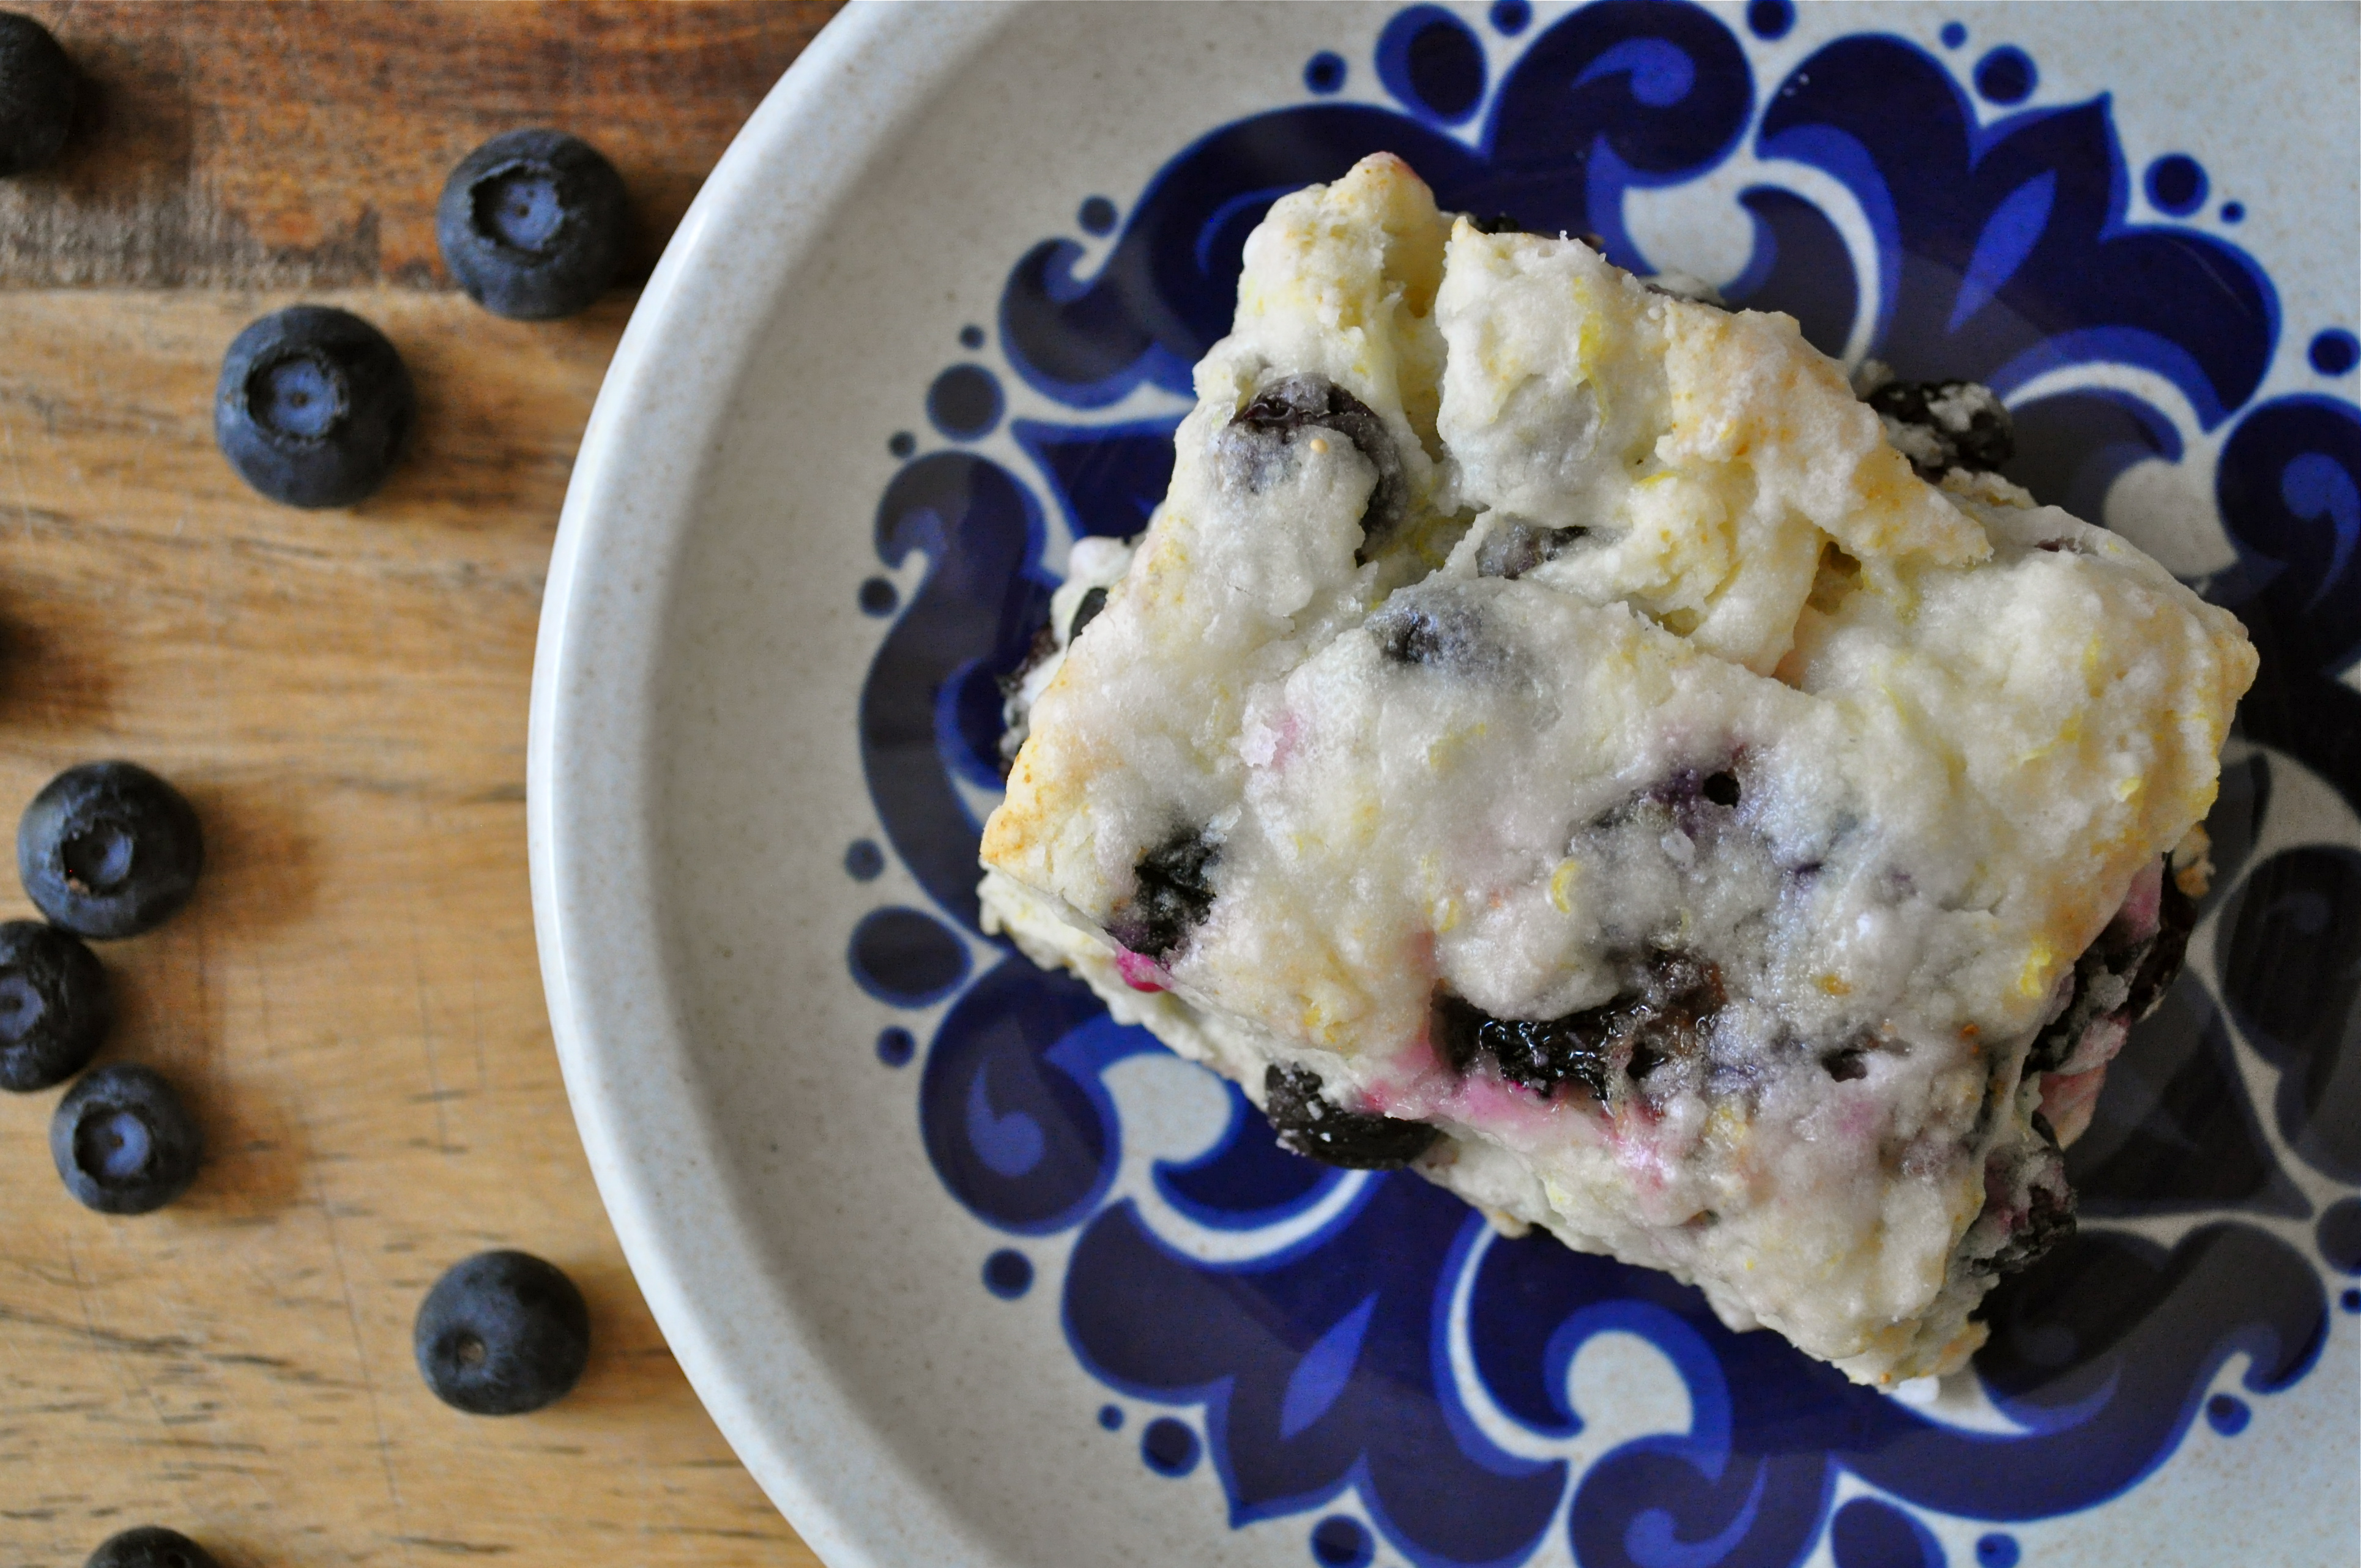
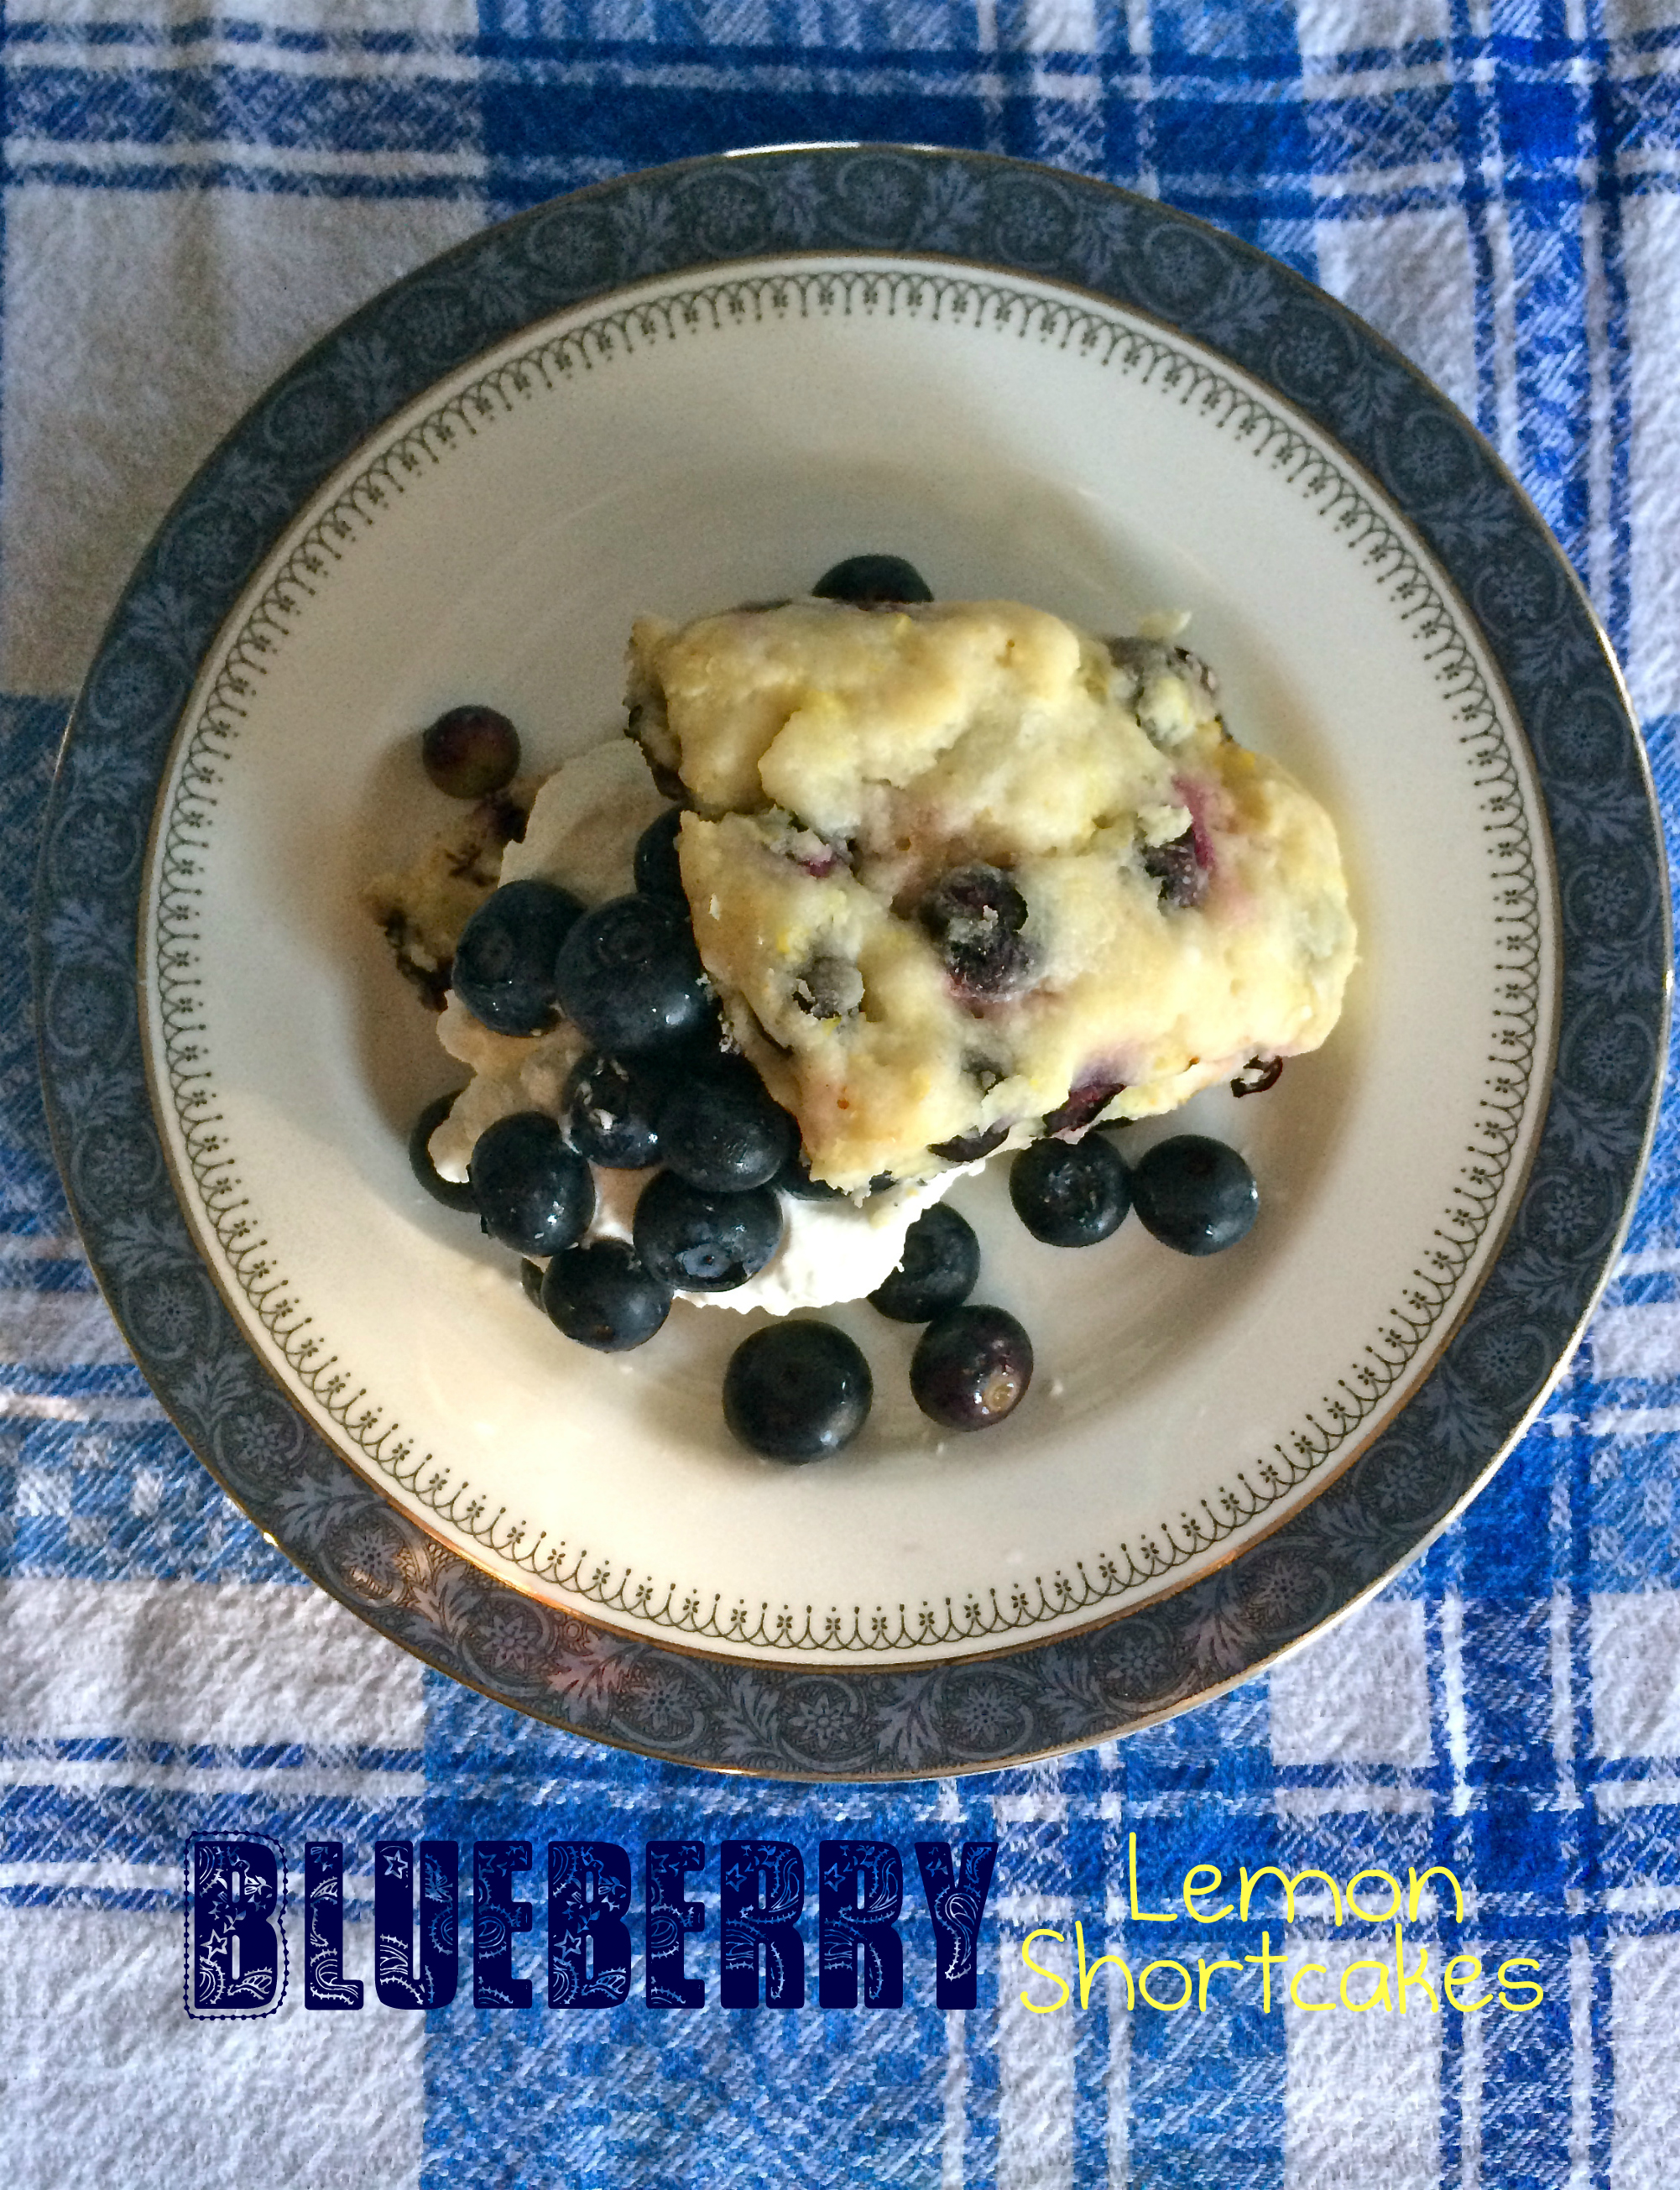
And dang, they did not disappoint. I added a little more lemon zest to the freshly whipped cream, which really brought out the lemon flavor in the scones themselves. These little shortcakes were the perfect summer evening dessert and were so easy to put together. They’re pretty too! I am envisioning many blueberry shortcakes in my future this summer! Maybe even for breakfast.
Blueberry Lemon Shortcakes with Lemon Whipped Cream 
.
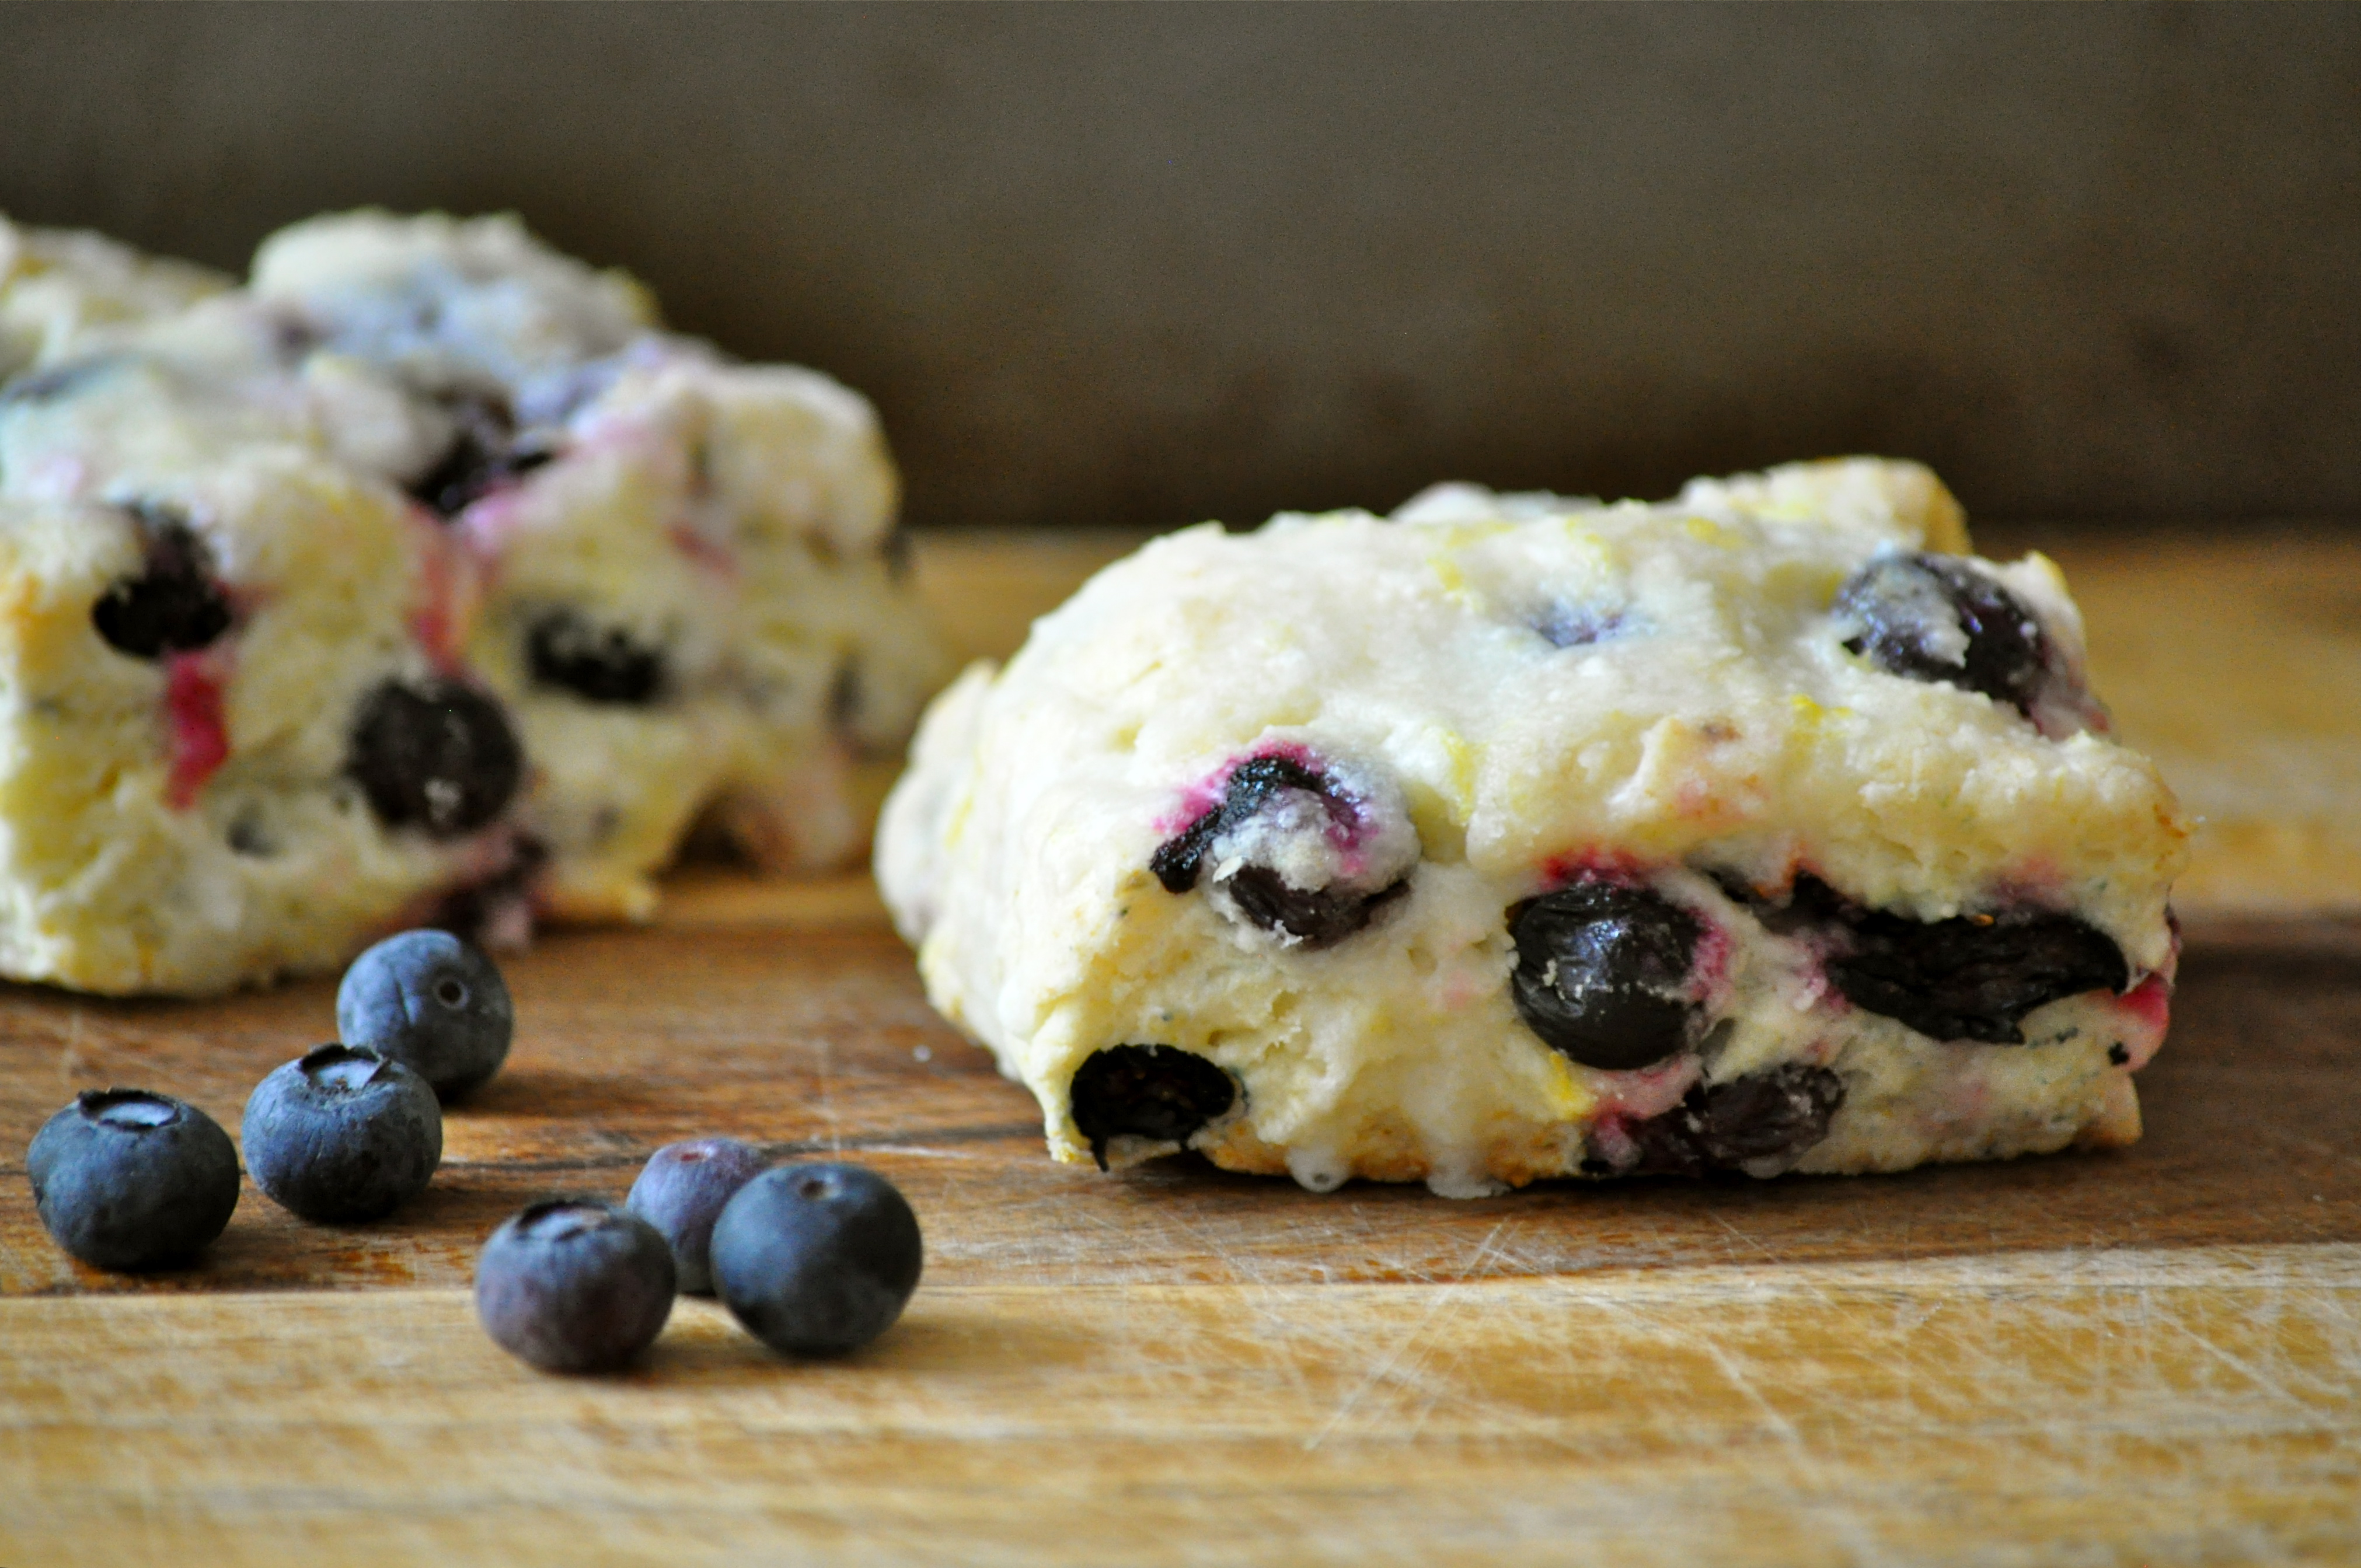
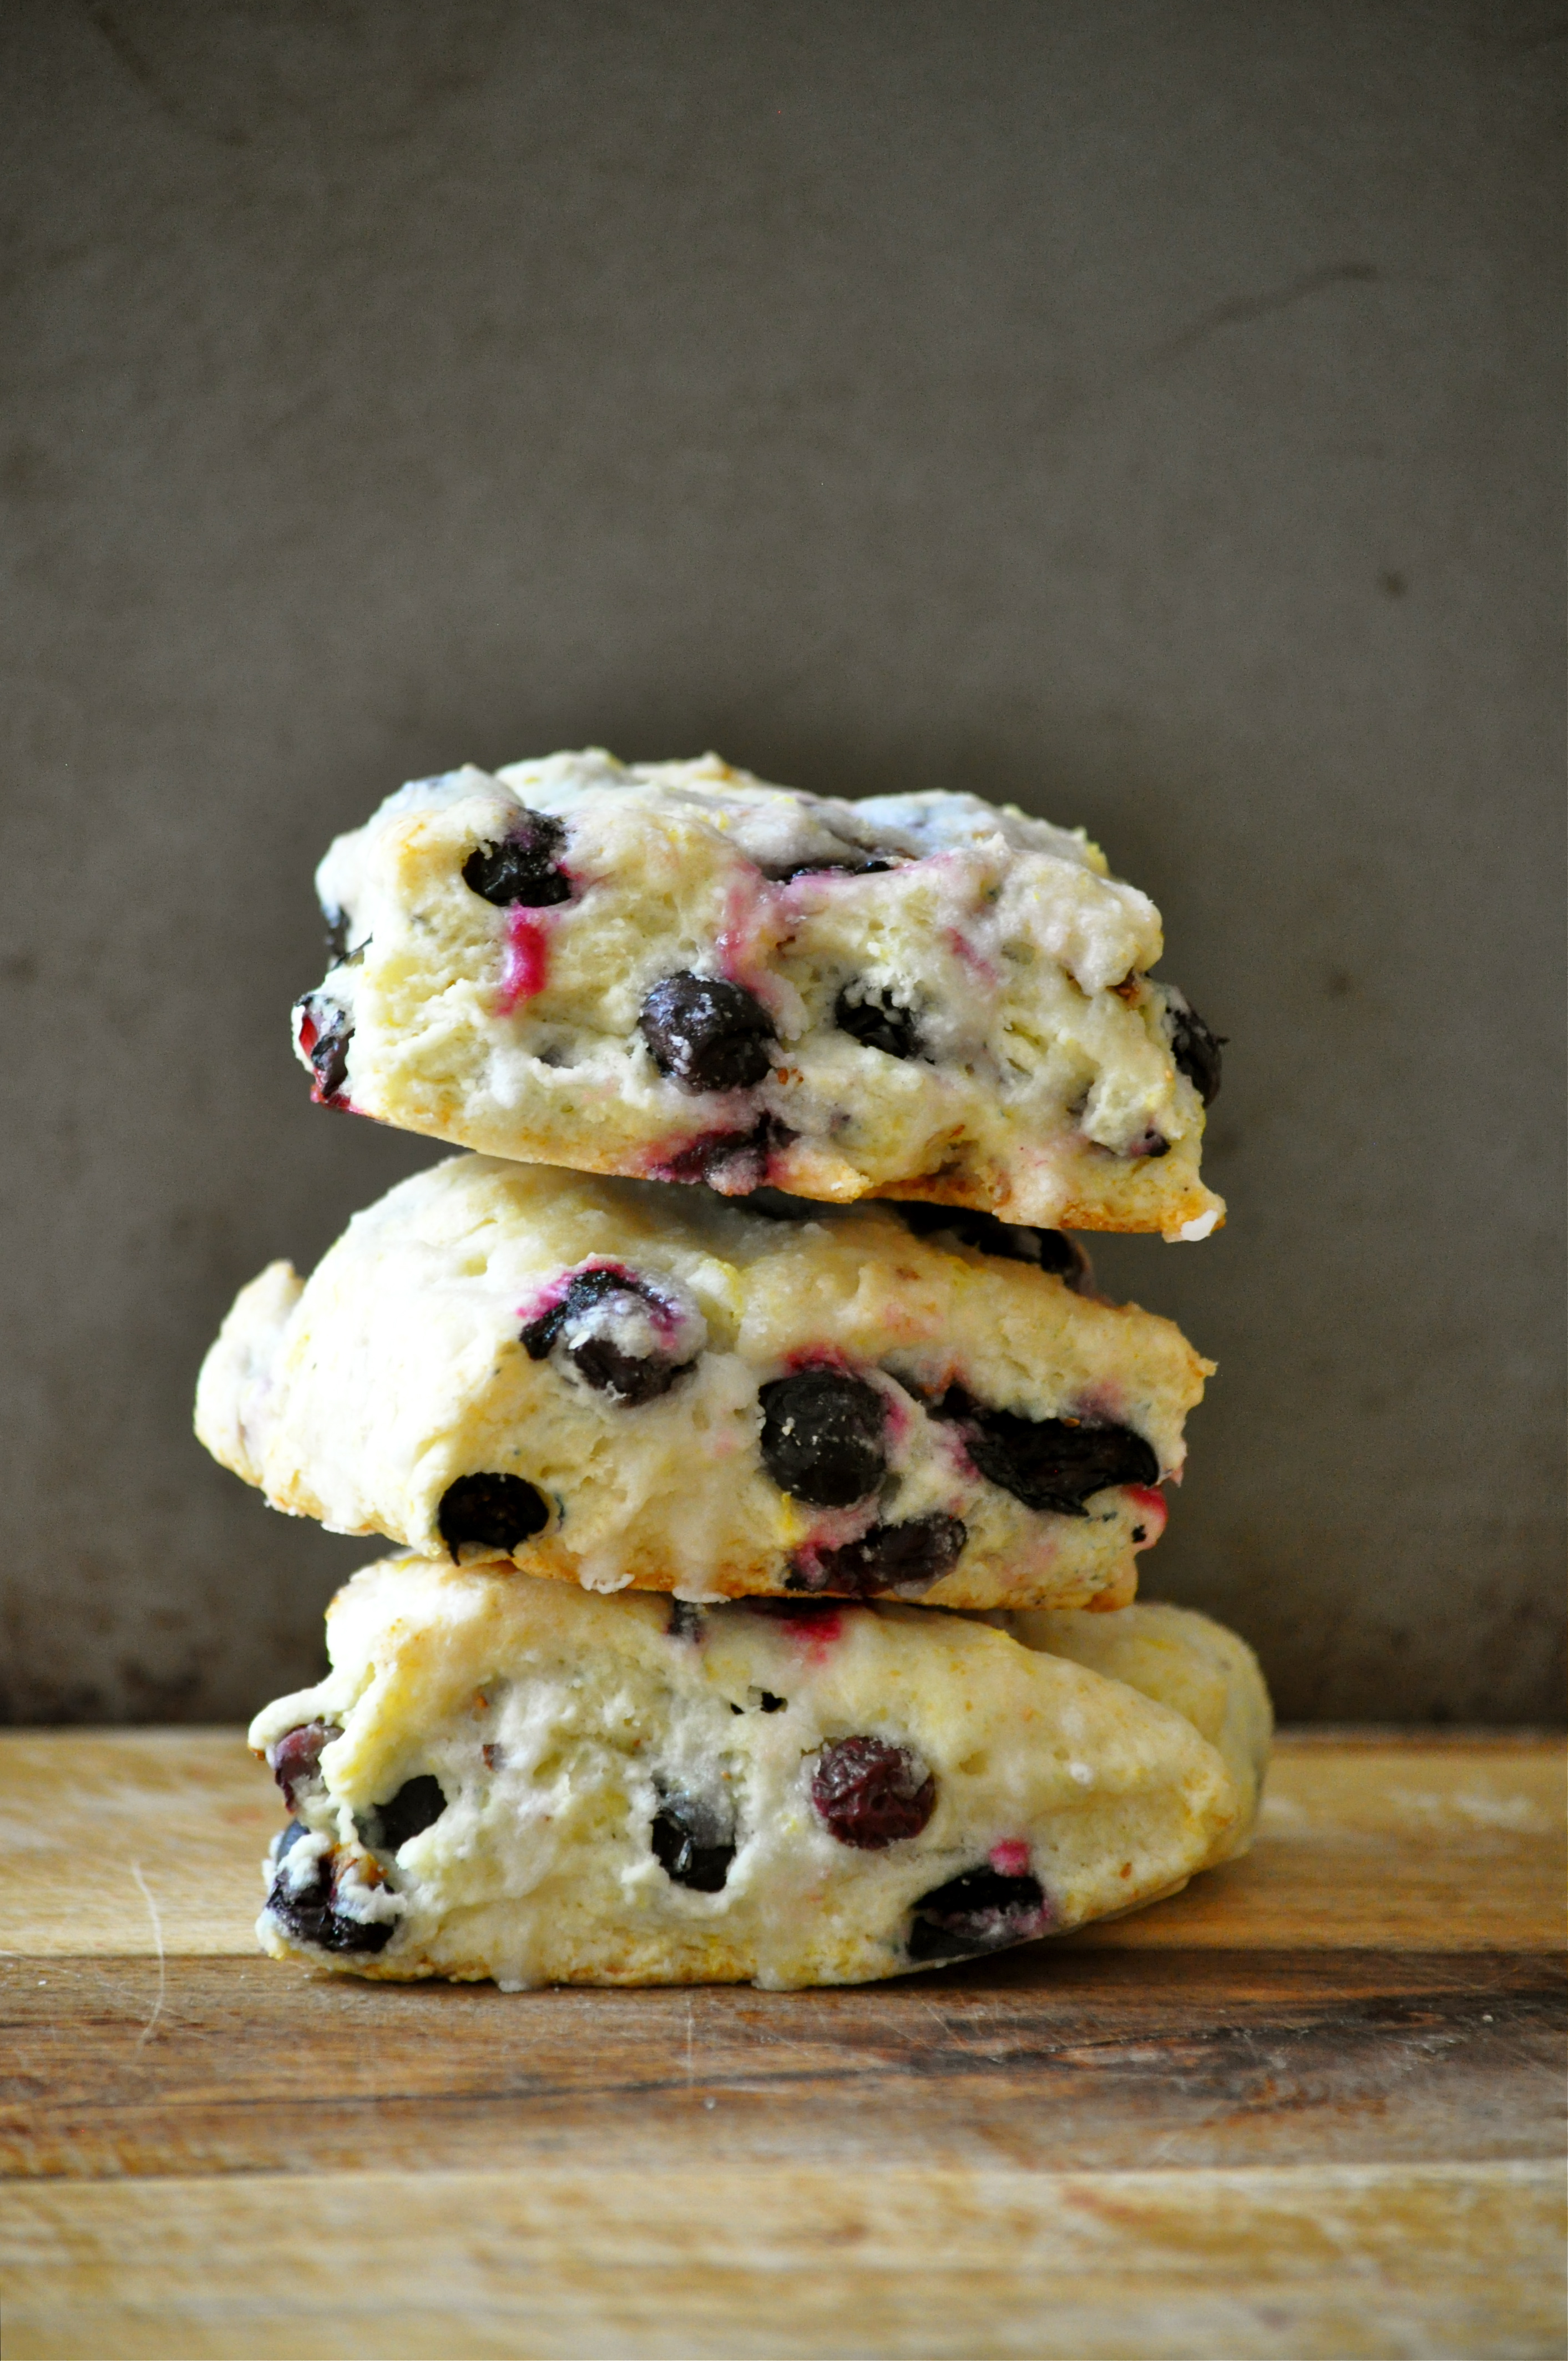
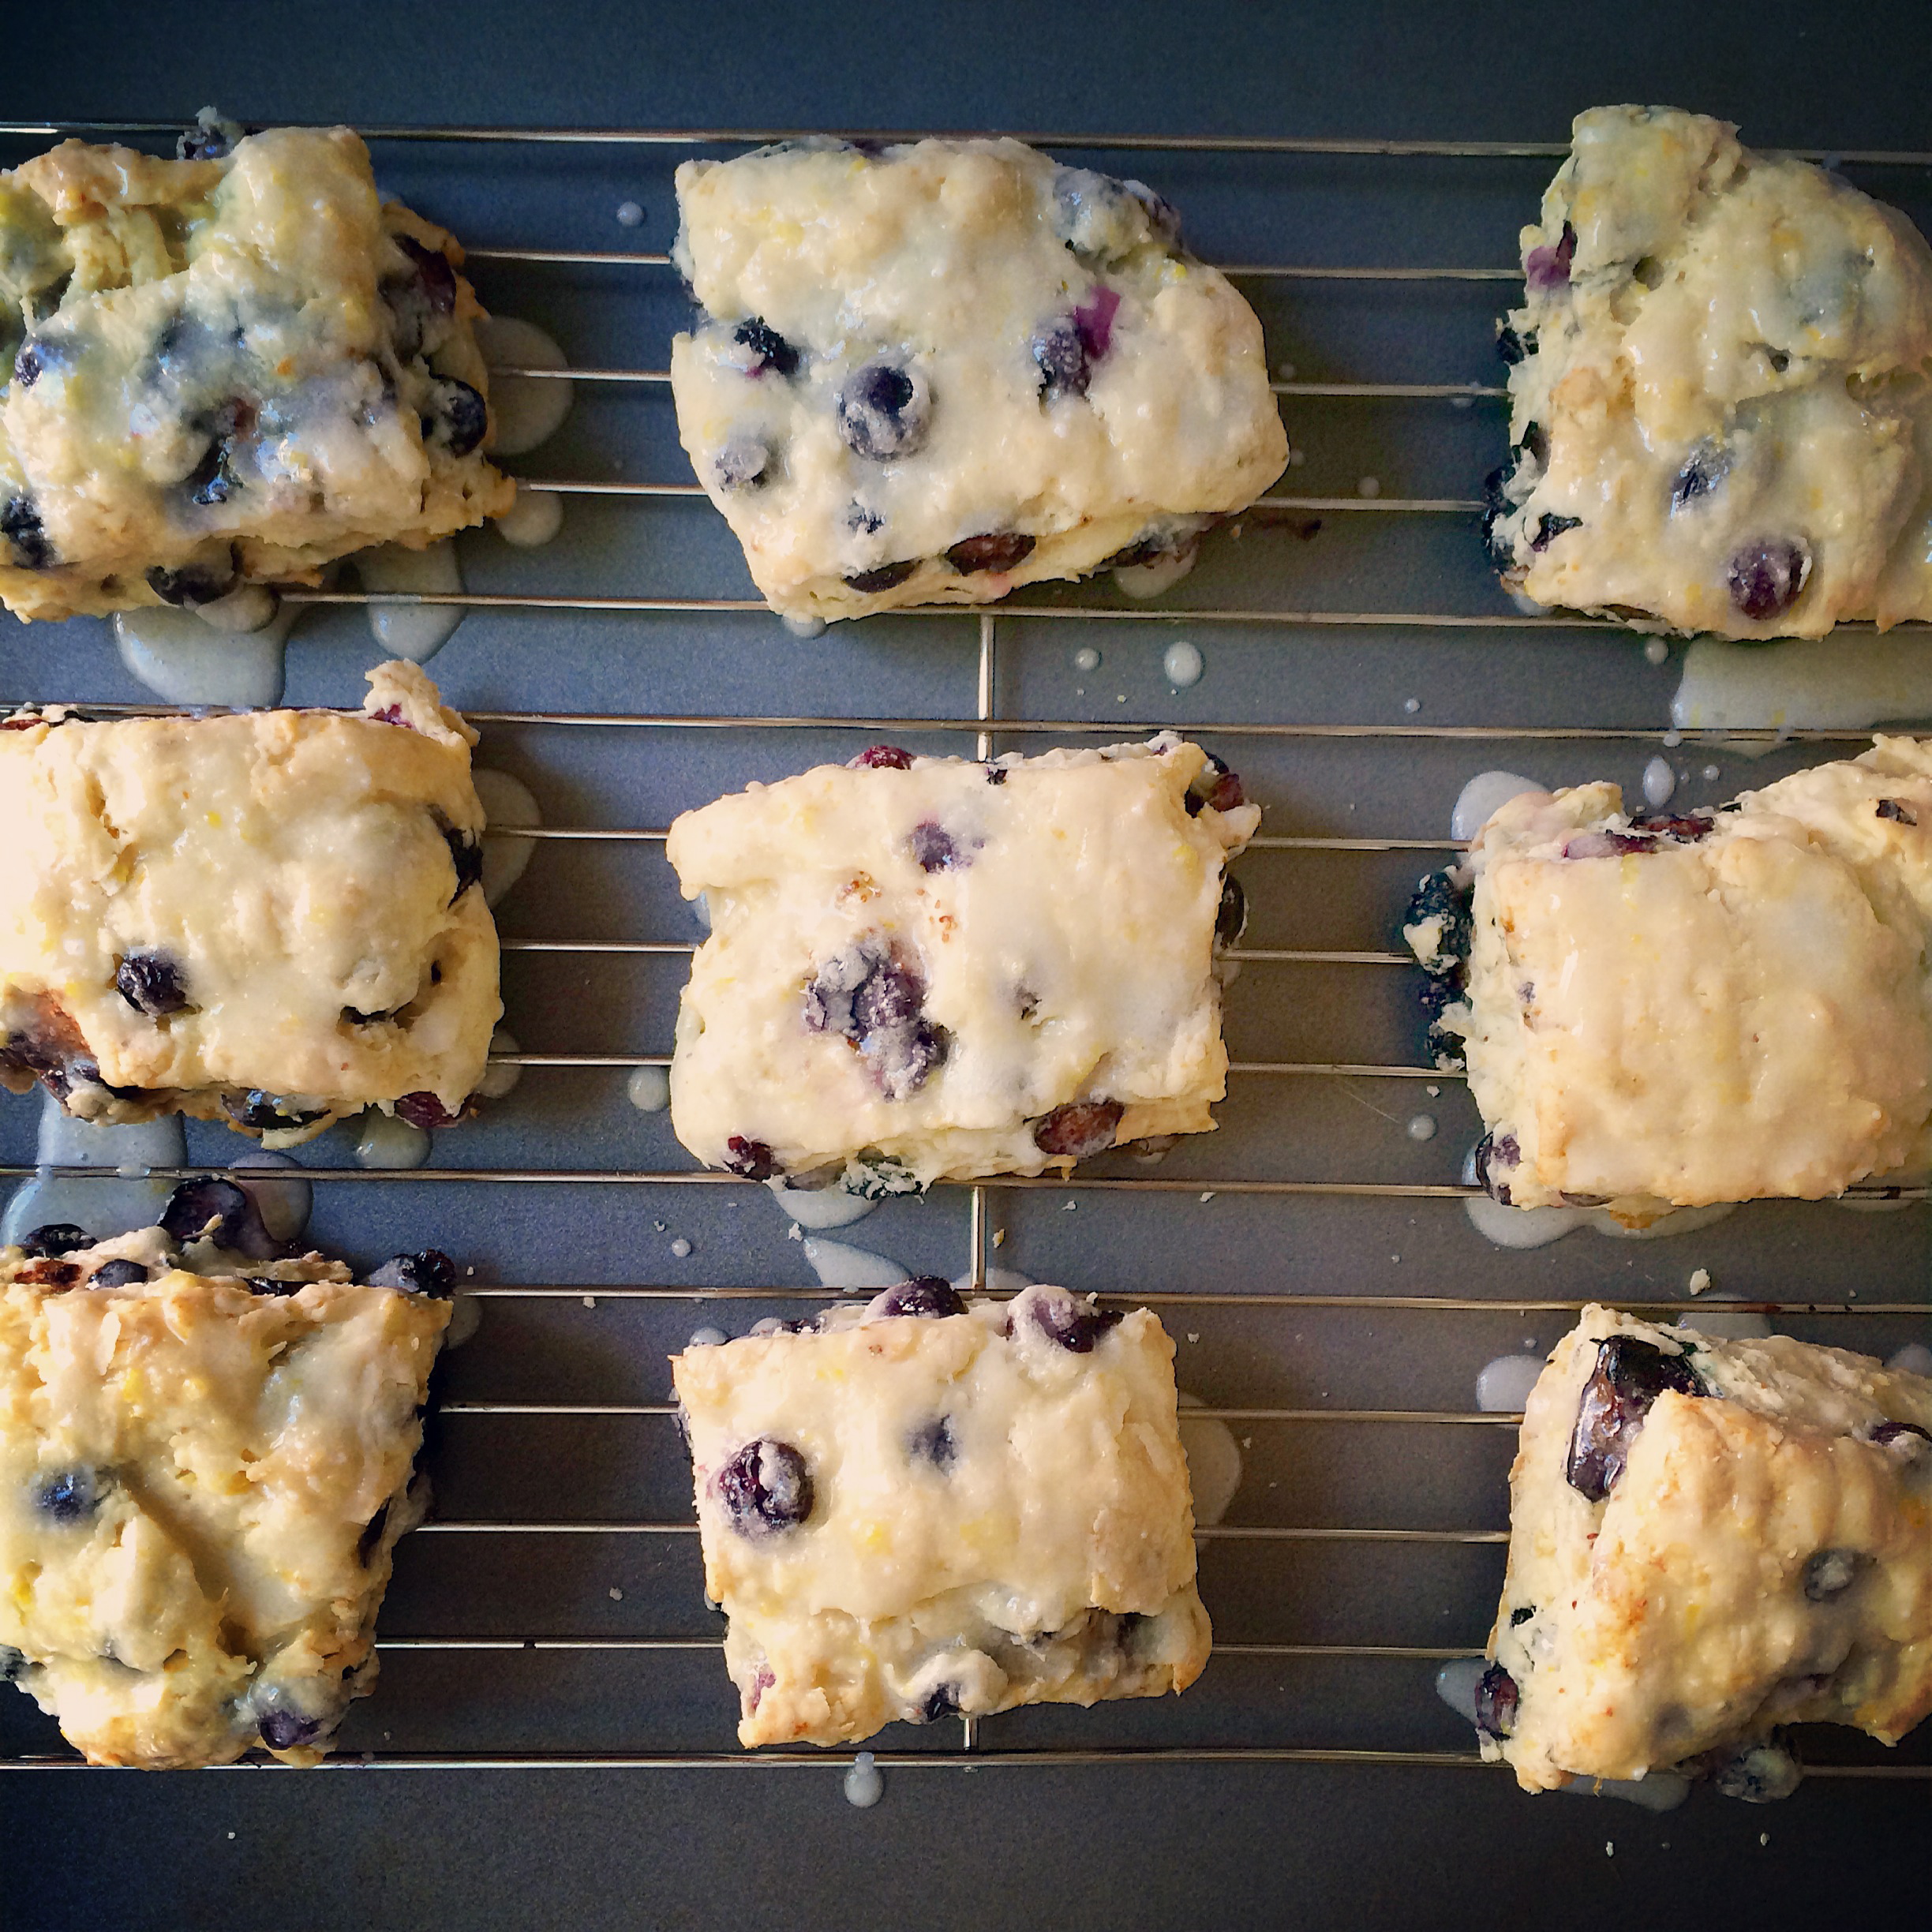
These scones are lovely on their own with a cup of coffee or tea, but the whipped cream and extra blueberries take them to a whole other level. Either way, try to enjoy them on the same day that they are made. Makes 9 scones/shortcakes.
.
For the Blueberry Lemon Scones (adapted from Kitchen Trial and Error):
1 3/4 cup flour
2 TBSP. sugar
1 1/2 TBSP. baking powder
pinch of salt
1/2 cup (1 stick) unsalted butter, cold
1 1/2 cups blueberries, fresh or frozen
1/2 cup whole milk
1 tsp. vanilla extract
Zest from one lemon
.
For the glaze:
1/4 cup freshly squeezed lemon juice
1 cup icing sugar, sifted
1 TBSP. unsalted butter, melted
Zest from one lemon
.
Preheat the oven to 375°F. Line a large baking sheet with parchment paper or a silicone baking mat. In a large bowl, whisk together the flour, sugar, baking powder, salt, and zest. Cut the butter into the flour mixture using a pastry blender until the mixture resembles coarse crumbs.  Add the blueberries. Add the milk and vanilla and bring the dough together. Turn out onto a floured surface and shape it into a square. Cut into 9 pieces. One thing I did not do here but will the next time I make these is to brush to the tops of the scones with more milk (to help the tops brown a little bit more in the oven). Bake for 15-20 minutes or until lightly browned. Whisk the glaze ingredients together in a small bowl and drizzle over the scones while they are still warm. Cool completely on a wire rack.
.
To make the shortcakes:
1 cup whipping cream
1 TBSP. sugar
Zest from two lemons
1-2 cups fresh blueberries
.
Whip the cream until soft peaks form. Fold in the sugar and zest. Slice each scone in half. Top the bottom half with a couple spoonfuls of the whipped cream, sprinkle with blueberries, and top with the other half.

Mango Coconut Chia Pudding Pops (Vegan)

Mango Coconut Chia Pudding Pops | Once Upon a Recipe

Frrrrrriiiiiieeeeennnnnddddssss!

Oh, how I’ve missed you! I had not intended to be gone this long, but despite the fact that I jetted home from Thailand over two weeks ago, it’s taken just as long for my brain to return from vacation mode. Plus I was rather preoccupied with ridding myself of wicked jet lag, seeing all of the faces I’d missed while I was away, catching up on Game of Thrones, and getting my froyo fix (obvi). But I’ve finally returned to the kitchen and I couldn’t be happier. I bought a wok and some fun spices in Thailand and I took a cooking class there, so expect some Thai recipes very soon.

Mango Coconut Chia Pudding Pops | Once Upon a Recipe

Thailand was amazing! However, I’m going to save those stories for another post. Right now it’s time for popsicles!

When I left for my trip, Spring was just starting to make its presence known, and Summer still seemed to be eons away. But over a month later, I think we’re getting there. The weather may not be epic and wonderful (yet), but I am craving all the Summer things. BBQ. Watermelon. Ice cream. Picnics. Corn on the cob. Cherries. And popsicles!

Mango Coconut Chia Pudding Pops | Once Upon a Recipe

These popsicles were a bit of an experiment. I wanted to create a frozen treat that would take care of my sweet cravings, yet still remain somewhat healthy. And these little gems are just that. Chia seeds are a great source of healthy omega-3 fats and are very high in fibre, and they can help boost your energy, stabilize blood sugar, help with digestion, and lower cholesterol. Why wouldn’t you want all of those things? Better yet, these pops are so easy to throw together, and are customizable depending on your favorite fruit. I think strawberries, peaches, or raspberries would be delicious substitutions for the mango.

These pudding pops are creamy and satisfying, with just the right amount of sweet. Let’s jump into Summer, shall we? Mango coconut chia pudding pops for all!

Mango Coconut Chia Pudding Pops | Once Upon a Recipe

Mango Coconut Chia Pudding Pops

These vegan pops are extremely customizable, fruit-wise. Just sub in your favorite! Makes about 10 popsicles, depending on the size of your popsicle molds. 

1 can light coconut milk, well shaken

1/4 cup chia seeds

2 TBSP. organic cane sugar

1 tsp. vanilla

2 large ripe mangoes, chopped small

Mix together the coconut milk, chia seeds, sugar, and vanilla. Cover and allow to chill in the fridge for 4 hours to allow the chia seeds to expand. Layer the chia pudding and the chopped mangoes in popsicle molds, and freeze until firm (overnight).

Mango Coconut Chia Pudding Pops | Once Upon a Recipe

Cherry Hazelnut Granola + Granola Rhubarb Yogurt Parfaits

Cherry Hazelnut Granola + Granola Rhubarb Yogurt Parfaits | Once Upon a Recipe

Friends, by the time you read this, I will be flying high in the sky en route to Thailand! I can’t believe this day is finally here! It all still feels surreal to me that I get to jet off for a whole month to enjoy sand, sun, and adventure.

But before I bid you adieu for a few weeks, I wanted to share my new favorite granola recipe with you. It comes from Megan Gordon’s Whole Grain Mornings cookbook (aka. my new favorite thing). I love breakfast and brunch recipes, and Megan’s book is packed with exactly that – and they’re all made with whole grains. Holla!

Cherry Hazelnut Granola | Once Upon a Recipe

Granola might just be my very favorite breakfast. I feel like I could eat it every day and never tire of it. So naturally, Megan’s recipe for making your own “signature granola” was first on my list to try.

This granola is good, friends. Like, really good. Amazing! The dried cherries and hazelnuts work so well together, and the sesame seeds give a little extra crunch that take this granola up a notch. I’ve already made this recipe three times in the past few weeks. A batch doesn’t last long around here, between sprinkling it on top of yogurt, eating it by the handful, and putting it into these yogurt parfaits.

Cherry Hazelnut Granola + Granola Rhubarb Yogurt Parfaits | Once Upon a Recipe

These parfaits were born out of necessity. You see, I had a bit of rhubarb sitting in my fridge just begging to be used before my departure to paradise. I decided to turn the rhubarb into a quick jam, layer it between Greek yogurt and this amazing granola, and baddabing baddaboom. Granola rhubarb yogurt parfaits, yo!

I was tempted to make a batch of this granola to take to Thailand (I love it that much) – however, I’m saving room for ALL THE THAI FOOD. Seriously friends, I am aiming for maximum pad thai/curry consumption. Wish me luck!

Cherry Hazelnut Granola + Granola Rhubarb Yogurt Parfaits | Once Upon a Recipe

Cherry Hazelnut Granola + Granola Rhubarb Yogurt Parfaits

The components of this recipe can be enjoyed together or separately. The granola tastes great as is or sprinkled over yogurt and fruit or with your favorite milk. The “jam” is lovely when spread onto toast or an English muffin, or stirred into plain yogurt. The granola makes about 8 cups. The jam makes about 1 cup. 

For the granola (adapted from Whole Grain Mornings: New Breakfast Recipes to Span the Seasons by Megan Gordon)

3 1/2 cups oats

1 cup hazelnuts, roughly chopped

1/2 cup sunflower seeds

1/2 cup sesame seeds

1 1/2 tsp. salt

1/2 tsp. cinnamon

1/4 tsp. ground cardamom

1/2 cup extra virgin olive oil

1/2 cup maple syrup

3/4 tsp. vanilla

1 cup dried cherries, roughly chopped

Preheat the oven to 350°F. Prepare a large baking sheet with parchment paper or a silicone mat. In a large bowl, combine the oats, nuts and seeds, salt, and spices. In a separate bowl, combine the olive oil, maple syrup, and vanilla. Add the oil mixture to the oat mixture and stir well.

Turn the granola out onto the prepared baking sheet and spread evenly. Bake until the mixture is lightly browned and fragrant, about 35-40 minutes. Stir the mixture every 15 minutes to ensure even cooking. Remove the granola from the oven and cool completely. Add the dried cherries and mix well. Store in an airtight container. Enjoy!

For the Rhubarb “Jam” (from Gardenista)

1/2 pound rhubarb, chopped

1/2 cup sugar

1 TBSP. cornstarch

1/2 tsp. vanilla extract

Pinch of salt

Remove any leaves from the rhubarb and wash the stalks. Slice the rhubarb into 1/2 inch pieces and toss with the sugar and cornstarch. Put the mixture into a skillet and heat until gently boiling over medium heat (about 10 minutes). When the rhubarb has become soft and the mixture has thickened, remove from heat and add the vanilla and salt. Transfer to a small bowl (or mason jar) and put in the fridge to cool.

To assemble the parfaits: In a small glass or serving bowl, layer the granola and “jam” with plain Greek yogurt. You can even make these parfaits ahead of time (and refrigerate them), although the granola will soften up a bit.

Cherry Hazelnut Granola | Once Upon a Recipe

If you’d like to tag along on my Thailand adventures, you can find me on Instagram (@onceuponarecipe). Have a great month, loves!

Rhubarb Crumble Baked Donuts

Rhubarb Crumble Baked Donuts | Once Upon a Recipe

Hello friends!

Spring has sprung! Our Easter weekend started with a snowfall (yes, SNOW), but thankfully Mother Nature smartened up and we were rewarded with a couple of beautiful days of sunshine and warm temperatures. I went out in a t-shirt, soaked up some sun, and all felt right in the world. I ate my way through two Easter dinners and a brunch, swore I would never eat again, and then promptly broke that oath a couple of hours later. It was a glorious weekend, I tell you. How was your weekend? Did you eat all the things too?

These donuts were part of my glorious weekend. When I first spotted glorious red stalks of rhubarb at the grocery store a couple of weeks ago, I internally squealed with delight. I adore the stuff and enjoy baking with it so much. I knew immediately that I wanted to make some type of rhubarb coffee cake (among other things). The tart rhubarb pairs so well with the buttery and sweet crumble that tops most coffee cakes. But then came the idea to create these rhubarb crumble donuts. Quick to bake, and easy to stuff from hand to face – what more do you need in a baked good?

Rhubarb Crumble Baked Donuts | Once Upon a Recipe

Rhubarb Crumble Baked Donuts | Once Upon a Recipe

I played around with the recipe a few times in search of maximum rhubarb flavor. I’ve crammed a whole cup of rhubarb into these donuts, which was no easy feat considering how small the cavities of my donut tin are. And the donut to crumble ratio is pretty ridiculous, in the best way possible. I’m really pleased with the end result.

These little gems are the perfect lazy weekend breakfast, yet also make a great afternoon pick-me-up snack with a hot cup of coffee or tea. I suggest you get your hands on some rhubarb as quickly as possible and then make yourself some rhubarb crumble baked donuts. Cool?

Rhubarb Crumble Baked Donuts | Once Upon a Recipe

Rhubarb Crumble Baked Donuts | Once Upon a Recipe

Rhubarb Crumble Baked Donuts (donut recipe adapted from Offbeat + Inspired, crumble recipe adapted from The Sugar Hit)

These donuts taste best when still warm from the oven, but they will keep just fine for a couple of days in an airtight container. I do recommend sticking them in the fridge though, as I find that rhubarb tends to get a bit dodgy when it sits at room temperature after being baked. Makes 6 donuts. 

For the crumble:

1/3 cup brown sugar

1 tsp. cinnamon

Pinch of salt

1 cup cake flour

1/3 cup butter, melted

For the donuts:

3 TBSP. butter, softened

1/4 cup sugar

1 egg

1/2 tsp. vanilla

3 TBSP. plain Greek yogurt

½ cup + 2 TBSP. cake flour

¼ tsp. baking soda

Pinch of salt

1 cup rhubarb, chopped small

Preheat oven to 325°F. Spray a 6-count donut pan with non-stick spray. Combine the crumble ingredients in a small bowl and set aside. In a separate bowl, combine the sugar and butter and mix with a hand mixer until fluffy. Add the egg, yogurt, and vanilla and mix again. Add the dry ingredients and mix until just combined. Gently fold in the rhubarb.

Pipe the batter into the donut tins using a piping bag or Ziploc bag with the end cut off. Very generously top each donut with the crumble topping (like seriously pile that crumble on). Bake for about 20 minutes, or until a toothpick inserted into the donut comes out clean. Allow the donuts to cool in the pan for a good 15 minutes or so before carefully removing them from the pan. Cool completely on a wire rack – or preferably, enjoy while still warm!

Rhubarb Crumble Baked Donuts | Once Upon a Recipe

Enjoy your week! xo

Banana Wheat Germ Muffins with Nutella Swirl

Banana Wheat Germ Muffins with Nutella Swirl | Once Upon a Recipe

Friends, in exactly two weeks, I will be on a plane en route to Thailand. TWO WEEKS.

And I get to stay there for almost a month. That means no work, and lots of play, sun, Thai food (!!!), beach frisbee, and adventuring. I’ve had my travel vaccinations (they hurt. A LOT.), my bikinis are ready (they’re super cute), my appetite is building (for all that Thai food), and my brain is in vacation mode (already). I’m just so crazy excited!

Banana Wheat Germ Muffins with Nutella Swirl | Once Upon a Recipe

I’m not really sure what things will look like in this space while I’m gone. I had hoped to get a few posts ready in advance and have them all set to publish while I’m away, but so far my procrastination is winning at this planning game. BUT. I do have two weeks to work with, so maybe there will be a food blogging miracle and I will still get it all done. Just maybe.

Banana Wheat Germ Muffins with Nutella Swirl | Once Upon a Recipe

Banana Wheat Germ Muffins with Nutella Swirl | Once Upon a Recipe

In any case, today I have muffins! These muffins are my kind of muffin. Healthy and packed with nutrients, yet they still taste super amazing and not at all like you might think a “healthy” muffin should taste. They are incredibly moist (yep, I said it) and totally flavorful. The Nutella swirl was kind of an afterthought – it looks pretty and tastes super awesome (obvi), but it’s totally not necessary. These muffins are also great naked in all of their banana and wheat germ glory.

If you’re anything like me, you always have a surplus of ripe bananas and are constantly looking for new recipes to try in an effort to fend off banana boredom. You just can’t have too many banana recipes. This is my current favorite!

Banana Wheat Germ Muffins with Nutella Swirl | Once Upon a Recipe

Banana Wheat Germ Muffins with Nutella Swirl | Once Upon a Recipe

Banana Wheat Germ Muffins with Nutella Swirl (slightly adapted from Weelicious)

These muffins are made with whole wheat flour and wheat germ, and are sweetened only with honey. You can totally feel good about enjoying them for a convenient breakfast or a quick snack! Remember, the Nutella isn’t necessary if you want to make these a bit more virtuous. I bet peanut butter would taste great too! Makes 12 muffins. 

1 cup whole wheat flour

1 cup wheat germ

1 tsp. baking soda

1/2 tsp. baking powder

1/2 tsp. salt

3 very ripe bananas, mashed

1/2 cup honey

3 TBSP. vegetable oil

1 TBSP. vanilla

1 egg

4 TBSP. Nutella, for swirling (optional)

Preheat the oven to 350°F. Line a 12-count muffin tin with paper liners or spray with non-stick spray.

Combine the flour, wheat germ, baking powder, baking soda, and salt in a large bowl. In a separate small bowl, combine the bananas, honey, oil, vanilla, and egg. Whisk together until well mixed. Add the wet ingredients to the dry ingredients and gently mix until just combined. Divide the batter evenly between the muffin tins. Drop a teaspoon of Nutella into the top of each muffin and use a toothpick to create a swirl. Bake for 20-22 minutes, or until lightly browned and a toothpick inserted into the centre of the muffin comes out clean. Remove from the muffin tin and cool on a wire rack. Muffins can be stored in an airtight container for up to 3 days. They also freeze very well.

Banana Wheat Germ Muffins with Nutella Swirl | Once Upon a Recipe

Savory Spinach & Cheese Waffles

Savory Spinach & Cheese Waffles | Once Upon a Recipe

Friends, I am reeeeeeeally struggling to write this post. I mean, look at that pile of breakfast heaven right up there. It has everything. Carbs, cheese, meat, an egg. I am currently finishing up day 1 of a 3-day juice cleanse. The almond milk beverage that is my last “meal” of the day tastes much less like a milkshake than I’d worked it up to be in my mind. Yes, that’s right, give me a day of drinking vegetables and fruit and to my ears almond milk sounds like a straight-up milkshake. (Sadly, it doesn’t taste like one, not even after a day of juice).

And thus, editing these photos was a test in restraint and willpower.

Savory Spinach & Cheese Waffles | Once Upon a Recipe

These waffles are of the savory variety. And they are freaking delicious. Don’t run away, allow me to explain!

These waffles are packed with whole wheat flour and spinach. But I promise they don’t taste healthy! They crisp up all nice on the outside, but have such a tender interior. And that tender interior is made even more delicious by little pockets of cheese, some of which hit the waffle iron directly and get all crispy too. The first time I made these waffles, I enjoyed them straight off the iron, while still hot and crisp. I burnt my fingers and my mouth, and the pain was completely worth it.

Savory Spinach & Cheese Waffles | Once Upon a Recipe

But the second time around, I topped the waffles with a couple slices of black forest ham and a fried egg. Now we’re talking! Eating the waffles this way also forced me to use cutlery, which was perhaps a blessing in itself. I’m a lady, I swear.

Do not fear this savory waffle concept! Breakfast, brunch, brinner, a snack – whatever tickles your fancy. Get into it!

Savory Spinach & Cheese Waffles | Once Upon a Recipe

Savory Spinach & Cheese Waffles (slightly adapted from The Mrs. Writes)

This recipe will yield about 6 large waffles, depending on the size of your waffle iron. If you’re serving the waffles with toppings, one waffle is probably an adequate serving for the average person. However, if you’re serving them on their own, plan for two waffles per person (for hungry eaters). The recipe can easily be doubled, if needed. Feel free to experiment with different cheeses too, depending on what you have on hand. 

1 1/2 cups whole wheat flour
2 tsp. baking powder
1/2 tsp. sea salt
1 TBSP. sugar
1 egg, beaten
1 1/2 cups milk
1/3 cup vegetable oil
4 oz. Monterey Jack cheese, freshly grated
4 cups fresh spinach, chopped

Toppings (optional): black forest ham, a fried egg, avocado, salsa, hot sauce

Preheat your waffle iron. Again, the appropriate heat setting will vary for each different waffle iron (I used heat setting 4 out of 6).

Combine the flour, baking powder, salt, and sugar in a bowl and whisk to combine. In a separate bowl, combine the egg, milk, and oil. Add to the flour mixture and stir gently until the mixture comes together. Fold in the cheese and the spinach. Spray the hot waffle iron with non-stick cooking spray (between each waffle) and cook waffles according to your waffle iron’s directions. Serve with your choice of toppings or straight off the iron. If you’re cooking for a larger group, keep waffles warm in the oven as you go. But they do taste best hot and fresh! Leftovers also reheat very well in the toaster or in the oven.

Savory Spinach & Cheese Waffles | Once Upon a Recipe

Lemon White Chocolate Crème Brûlée

Lemon White Chocolate Crème Brûlée | Once Upon a Recipe

My love affair with crème brûlée started a few years ago. I was visiting my friend Sam, and her husband – Josh, being the dear (and very talented chef) that he is, had whipped us up a couple of pots of crème brûlée to enjoy with our wine. At the time, I wasn’t so sure that I liked crème brûlée, having only eaten it a few times before, and feeling less than impressed with what I had tried. But being one who rarely (if ever) turns down a sweet treat, I dug right into that pot of creamy goodness. It was insanely delicious, what with the perfectly torched sugar crust on top that gave way to the luscious perfection below. I distinctly remember saying to Josh that very night – “You must teach me how to make this.”

Lemon White Chocolate Crème Brûlée | Once Upon a Recipe

For I had tried to make crème brûlée once or twice before, but had encountered difficulty with getting everything to set up properly (crème brûlée soup, anyone?) and had never mastered that perfectly torched sugar topping. I didn’t have the tools or the know-how, and had ended up with an unevenly burnt top, courtesy of my oven’s broiler. It was never a pretty scenario.

Fast forward to several years later, and Josh and I finally made that lesson happen. I have made this recipe a few times since then, and it has turned out perfect every time. The recipe provides a great base for a variety of flavor combinations. Josh also made a dark chocolate raspberry version that was incredible. However, the lemon lover in me had to share this lemon white chocolate version.

Lemon White Chocolate Crème Brûlée | Once Upon a Recipe

Thank you Josh for sharing your crème brûlée know-how! Now, onto the recipe…

I’ve written the recipe in detail, just to ensure that it’s clear. Forgive me if this information or technique is not new to you. I’ve seen a variety of crème brûlée recipes out there, but this is my go-to. It’s foolproof!

Lemon White Chocolate Crème Brûlée | Once Upon a Recipe

Lemon White Chocolate Crème Brûlée

This recipe makes enough to fill 4 small ramekins. It can easily be doubled or tripled, according to the number you require. Just remember to stick to the ratio of 5 egg yolks for every cup of whipping cream. As I mentioned before, this recipe is a great base for other flavor combinations. For example, for a dark chocolate raspberry version, sub in dark chocolate for the white chocolate and omit the lemon. Drop spoonfuls of smashed raspberries into the ramekins pre-bake. Also, the most important step is the chilling process. Be sure to prepare this recipe the night before you wish to serve it, so that the crème brûlée has about 24 hours to chill thoroughly and properly set. 

1 cup whipping cream

5 egg yolks

1/4 cup granulated sugar + more for topping

1 TBSP. vanilla

1/2 cup white chocolate pieces

4 lemons, divided

Preheat the oven to 325°F. Place the four ramekins (or shallow jars) into a baking dish.

In a small saucepan, add the whipping cream, white chocolate pieces, 1 tsp. fresh lemon juice, and the rind* of two lemons. Place the saucepan over medium heat. Stir regularly, and remove from the heat just when the mixture begins to bubble around the edges. In the meantime, in a medium-sized bowl, whisk together the egg yolks, sugar, and vanilla until pale. Very gradually, add the cream mixture to the eggs, stirring constantly. Do not add the cream too quickly, as you are trying to temper the eggs (not scramble them!). Strain the mixture into a bowl (or a large measuring cup with a spout, for ease of pouring) and discard the pieces of lemon rind. Zest the remaining two lemons and add the zest to the cream, stirring to combine. Divide the mixture evenly between the four ramekins.

Place into the oven and then very carefully pour boiling water into the baking dish, until it reaches halfway up the sides of the ramekins. Be careful not to splash any water into the ramekins. Place a cookie sheet over top of the baking dish (to cover). This is optional, but will prevent the tops of the crème brûlée from browning. Bake for about 20-25 minutes, or until the ramekins are almost set, and only a wee bit jiggly in the center. Cool on the counter, and then cover and refrigerate overnight (about 24 hours).

Just before serving, sprinkle the top of each ramekin with about 1 tsp. of granulated sugar. Use a blow torch to carefully melt and brown the sugar on top. Enjoy!

*Using a sharp knife, remove the skin of the lemon in large pieces, avoiding the pith (the white part, which is bitter) as much as possible.

Lemon White Chocolate Crème Brûlée | Once Upon a Recipe

Hope you’re having a great week, friends!

Chocolate Peanut Butter Banana & Cookie Chunk Ice Cream

Chocolate Peanut Butter Banana & Cookie Chunk Ice Cream | Once Upon a Recipe

Friends! Hello! How are you?

Please forgive me for my absence over the past few weeks. Things got a little hectic there for a while, I got a little tired, and this ol’ blog was forced to the back burner for a wee time. But, I spent the weekend in the kitchen and I have a batch of recipes to share with you, so let’s get to it!

Chocolate Peanut Butter Banana & Cookie Chunk Ice Cream | Once Upon a Recipe

http://www.onceuponarecipeblog.com/2013/12/the-great-food-blogger-cookie-swap-nutella-and-rolo-stuffed-double-chocolate-chip-cookies/

This ice cream. Oh, this ice cream.

I’m no purist when it comes to ice cream. I like my ice cream trashy. Full of different flavors and textures, especially big chunks of chewy cookie. I may or may not dig around in the container in search of the chunky bits. Except that I totally do. This ice cream has a creamy chocolate base that gets all trashed up with swirls of peanut butter and chunks of banana and chocolate cookies. I mean?!

Chocolate Peanut Butter Banana & Cookie Chunk Ice Cream | Once Upon a Recipe

Chocolate Peanut Butter Banana & Cookie Chunk Ice Cream | Once Upon a Recipe

Let’s just say that after having my first taste of this ice cream, I promptly shared it with anyone who was willing to eat it, simply so that I wouldn’t devour the whole thing myself.

Despite the fact that we’re dealing with more cold temperatures and another round of snow, I know that Spring is around the corner somewhere. So I’m just going to keep making ice cream and margaritas and pretend that it’s already here. If we believe it, it will come!

Chocolate Peanut Butter Banana & Cookie Chunk Ice Cream

Chocolate ice cream base from The Kitchn, which was adapted from Jeni Britton. Makes just over 1 quart.

8 oz. good-quality semi-sweet chocolate, chopped
3 1/2 cups half and half
1 TBSP. plus 1 tsp. cornstarch
2 ounces cream cheese, softened (about 1/4 cup)
1/4 cup sugar
pinch salt

Mix-ins: 1 banana (chopped small), 1/2 cup chocolate cookies* (chopped), and about 1/2 cup peanut butter

*I used these cookies (minus the centers) because I had some left over, but you can use any homemade or storebought chewy chocolate cookies.

In a small bowl, mix 2 TBSP. of the half and half with the cornstarch. Set aside.

In a large saucepan, combine the remaining half and half with the sugar. Bring the milk mixture to a boil and cook over medium heat until the sugar dissolves, about 4 minutes. Remove from heat, and gradually whisk in the cornstarch mixture. Return to heat, bring to a boil and cook over medium high heat until the mixture is slightly thickened, about 1 minute.

In a separate bowl, combine the chocolate and cream cheese. Pour just enough of the hot milk over the chopped chocolate and cream cheese to cover it. Whisk until the chocolate is melted and the mixture is smooth. Add the salt. Gradually add the remaining hot milk mixture and whisk well. Cover the mixture and chill completely, preferably overnight.

Pour the ice cream base into an ice cream maker and freeze according to the manufacturer’s instructions. Stir in the banana and cookie chunks. Layer in a container, along with spoonfuls of the peanut butter (I microwaved my peanut butter for about 20 seconds to make it thinner and easier to work with), then swirl with a knife. Freeze for an additional four hours (or more) in an airtight container. Scoop and serve!

Chocolate Peanut Butter Banana & Cookie Chunk Ice Cream | Once Upon a Recipe

Fresh Citrus Margaritas

Friday, Friday, gotta get down on Friday,
Everybody’s lookin’ forward to the weekend, weekend.
Friday, Friday,
Gettin’ down on Friday…
.
Eeeeeeeeeeeeeeeeeeeeeee! We made it, the weekend is here! And what better way to celebrate than with Rebecca Black and a fresh citrus margarita? I tell ya, watching that music video pretty much requires an alcoholic beverage, so let’s get to it!
.
Fresh Citrus Margarita | Once Upon a Recipe   Fresh Citrus Margarita | Once Upon a Recipe
I’ve spoken of my love for juicing a couple of times now, and I’ve shared a fresh juice cocktail once before (beet lemonade, anyone?). BUT. This one is my new favorite. I started by making a fresh citrus juice, which was inspired by one of the juices at Glow Juicery, a relatively new and totally amazing juicery here in Edmonton. (Seriously, if you live in Edmonton, check it out – the website lists their store location and other spots where you can find their juice). Their citrus glow juice is one of my favorites, and when I saw the big display of beautiful citrus fruit at my grocery store the other day, I knew I had to try to recreate it at home.
.
Fresh Citrus Margaritas | Once Upon a Recipe   Fresh Citrus Margaritas | Once Upon a Recipe
Fresh Citrus Margarita | Once Upon a Recipe
.
And then I decided to add a little booze. You know, just for kicks. The result? A wickedly delicious cocktail that packs a nutritional punch! Plus, how pretty?!
.
Fresh Citrus Margaritas | Once Upon a Recipe   Fresh Citrus Margaritas | Once Upon a Recipe

Fresh Citrus Margarita

The first time I made these margaritas, I rimmed the glass with sea salt. However, because the margarita itself is not super sweet (no simple syrup here!), I found the sea salt to be too much. However, because the margarita is quite tart, the sugar complimented it perfectly. The margaritas pictured were made with sea salt. In any case, do whatever floats your boat! Makes 4 margaritas.

For the fresh citrus juice:

Makes about 24 ounces, depending on the size of your fruit and your juicer.

4 oranges, skins removed (I used Cara Cara)

3 lemons, skins removed

1 small knob of ginger

8 oz. coconut water

Juice the oranges, lemons, and ginger. Mix together with the coconut water.

For the margaritas:

6 oz. fresh citrus juice

1.5 oz. tequila

0.5 oz. triple sec

Pinch of sea salt

Granulated sugar

Combine in a cocktail shaker with ice (or just mix by hand if you don’t have a cocktail shaker). Rim your class with an orange slice and dip into the sugar. Fill your glass with ice, then add the cocktail mixture. Garnish with an orange slice. Enjoy!

Pair these margaritas with a big bowl of guac and your favorite tortilla chips and you’ve got yourself a happy hour to start the weekend off right. Happy Friday, loves!
.
PS. Friday parody. I laughed so hard.
.

Super Easy Velvety Chocolate Pots

Velvety Chocolate Pots | Once Upon a Recipe

Happy Love Day, lovers!

Here we are again, February 14, Valentine’s Day, the day of L-O-V-E! As promised, I’m sharing another chocolate recipe today. Behold these velvety chocolate pots! They taste just like they sound: rich and chocolate-y and oh. so. smooth. Like buttah, baby!

Velvety Chocolate Pots | Once Upon a Recipe

Velvety Chocolate Pots | Once Upon a Recipe   Velvety Chocolate Pots | Once Upon a Recipe

Maybe you’re still undecided about your Valentine’s Day menu with your honey. Maybe you’re a big procrastinator (like me) and waited until the big day to pick a sweet and decadent treat to celebrate the occasion. Or maybe you don’t give a flying fart about Valentine’s Day, but you have a chocolate craving that you just can’t curb. Whatever the reason, or even if there is no reason at all, let’s all enjoy these velvety chocolate pots together, mmmk? They’re super easy to whip up – we’re talking less than 5 minutes – and mega delicious.

Velvety Chocolate Pots | Once Upon a Recipe   Velvety Chocolate Pots | Once Upon a Recipe

I’ll bring the chocolate, you bring the wine, and let’s all just celebrate the wonderful thing that is love. I’m grateful to call you all my valentines. Now go tell your favorites how much you love them! <3

Super Easy Velvety Chocolate Pots (adapted from The Pioneer Woman)

Makes 4. This recipe is easy to halve or double, depending on the number of servings you require. You can also switch up the flavor by using flavored coffee, different liqueurs, and different kinds of chocolate (ie. milk vs. dark). I used Madeira wine for my liqueur and vanilla macadamia nut coffee. Experiment away!

6 ounces dark chocolate (~70% cocoa), chopped

2 eggs

A pinch of salt

1 TBSP. liqueur (optional)

1/2 cup very hot coffee

In a food processor or blender, combine the chocolate, eggs, salt, and liqueur (if using). Blend until well mixed. With the food processor or blender still running, slowly add the coffee and blend until smooth. Pour the mixture into four 4-ounce ramekins (or tea cups, if you want to get fancy), and refrigerate until cold and set (about 4 hours). Top with whipped cream and more chopped chocolate. Dive in!

Velvety Chocolate Pots | Once Upon a Recipe

%d bloggers like this: