Brown Butter Cornflake Marshmallow Skillet Cookie

Brown Butter Cornflake Marshmallow Skillet Cookie | Once Upon a Recipe

Friendssssss! Happy October!

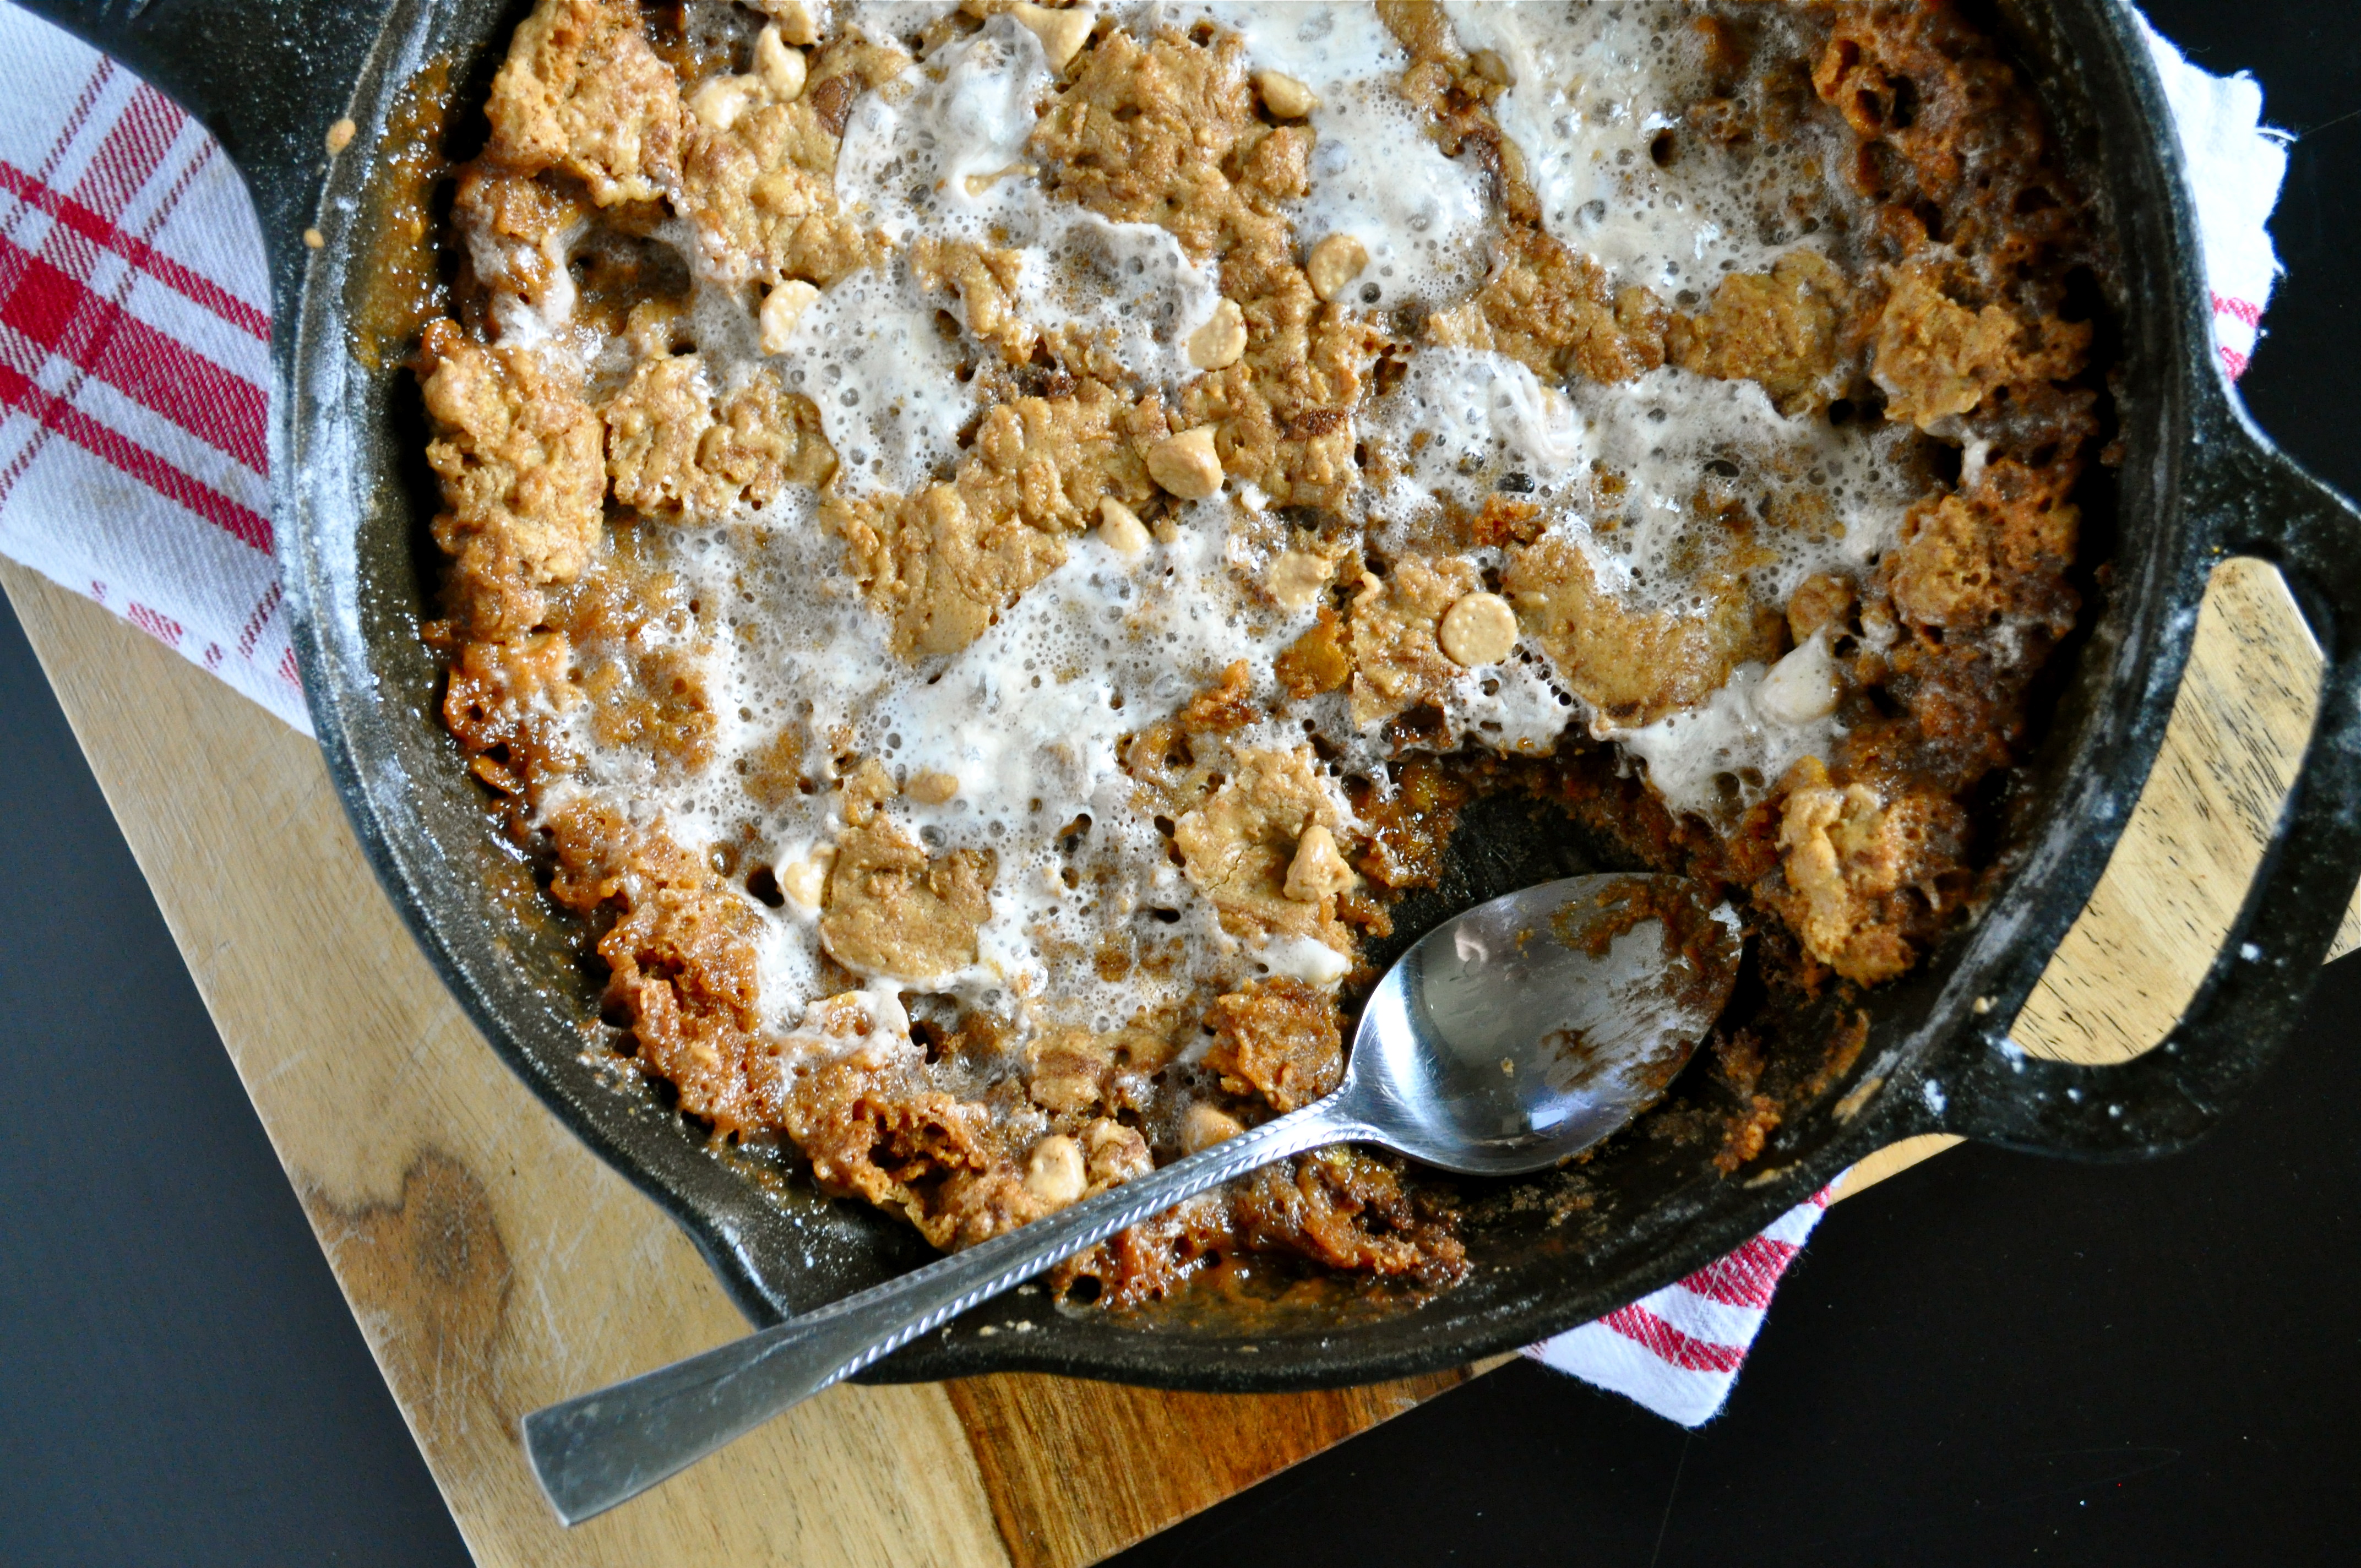
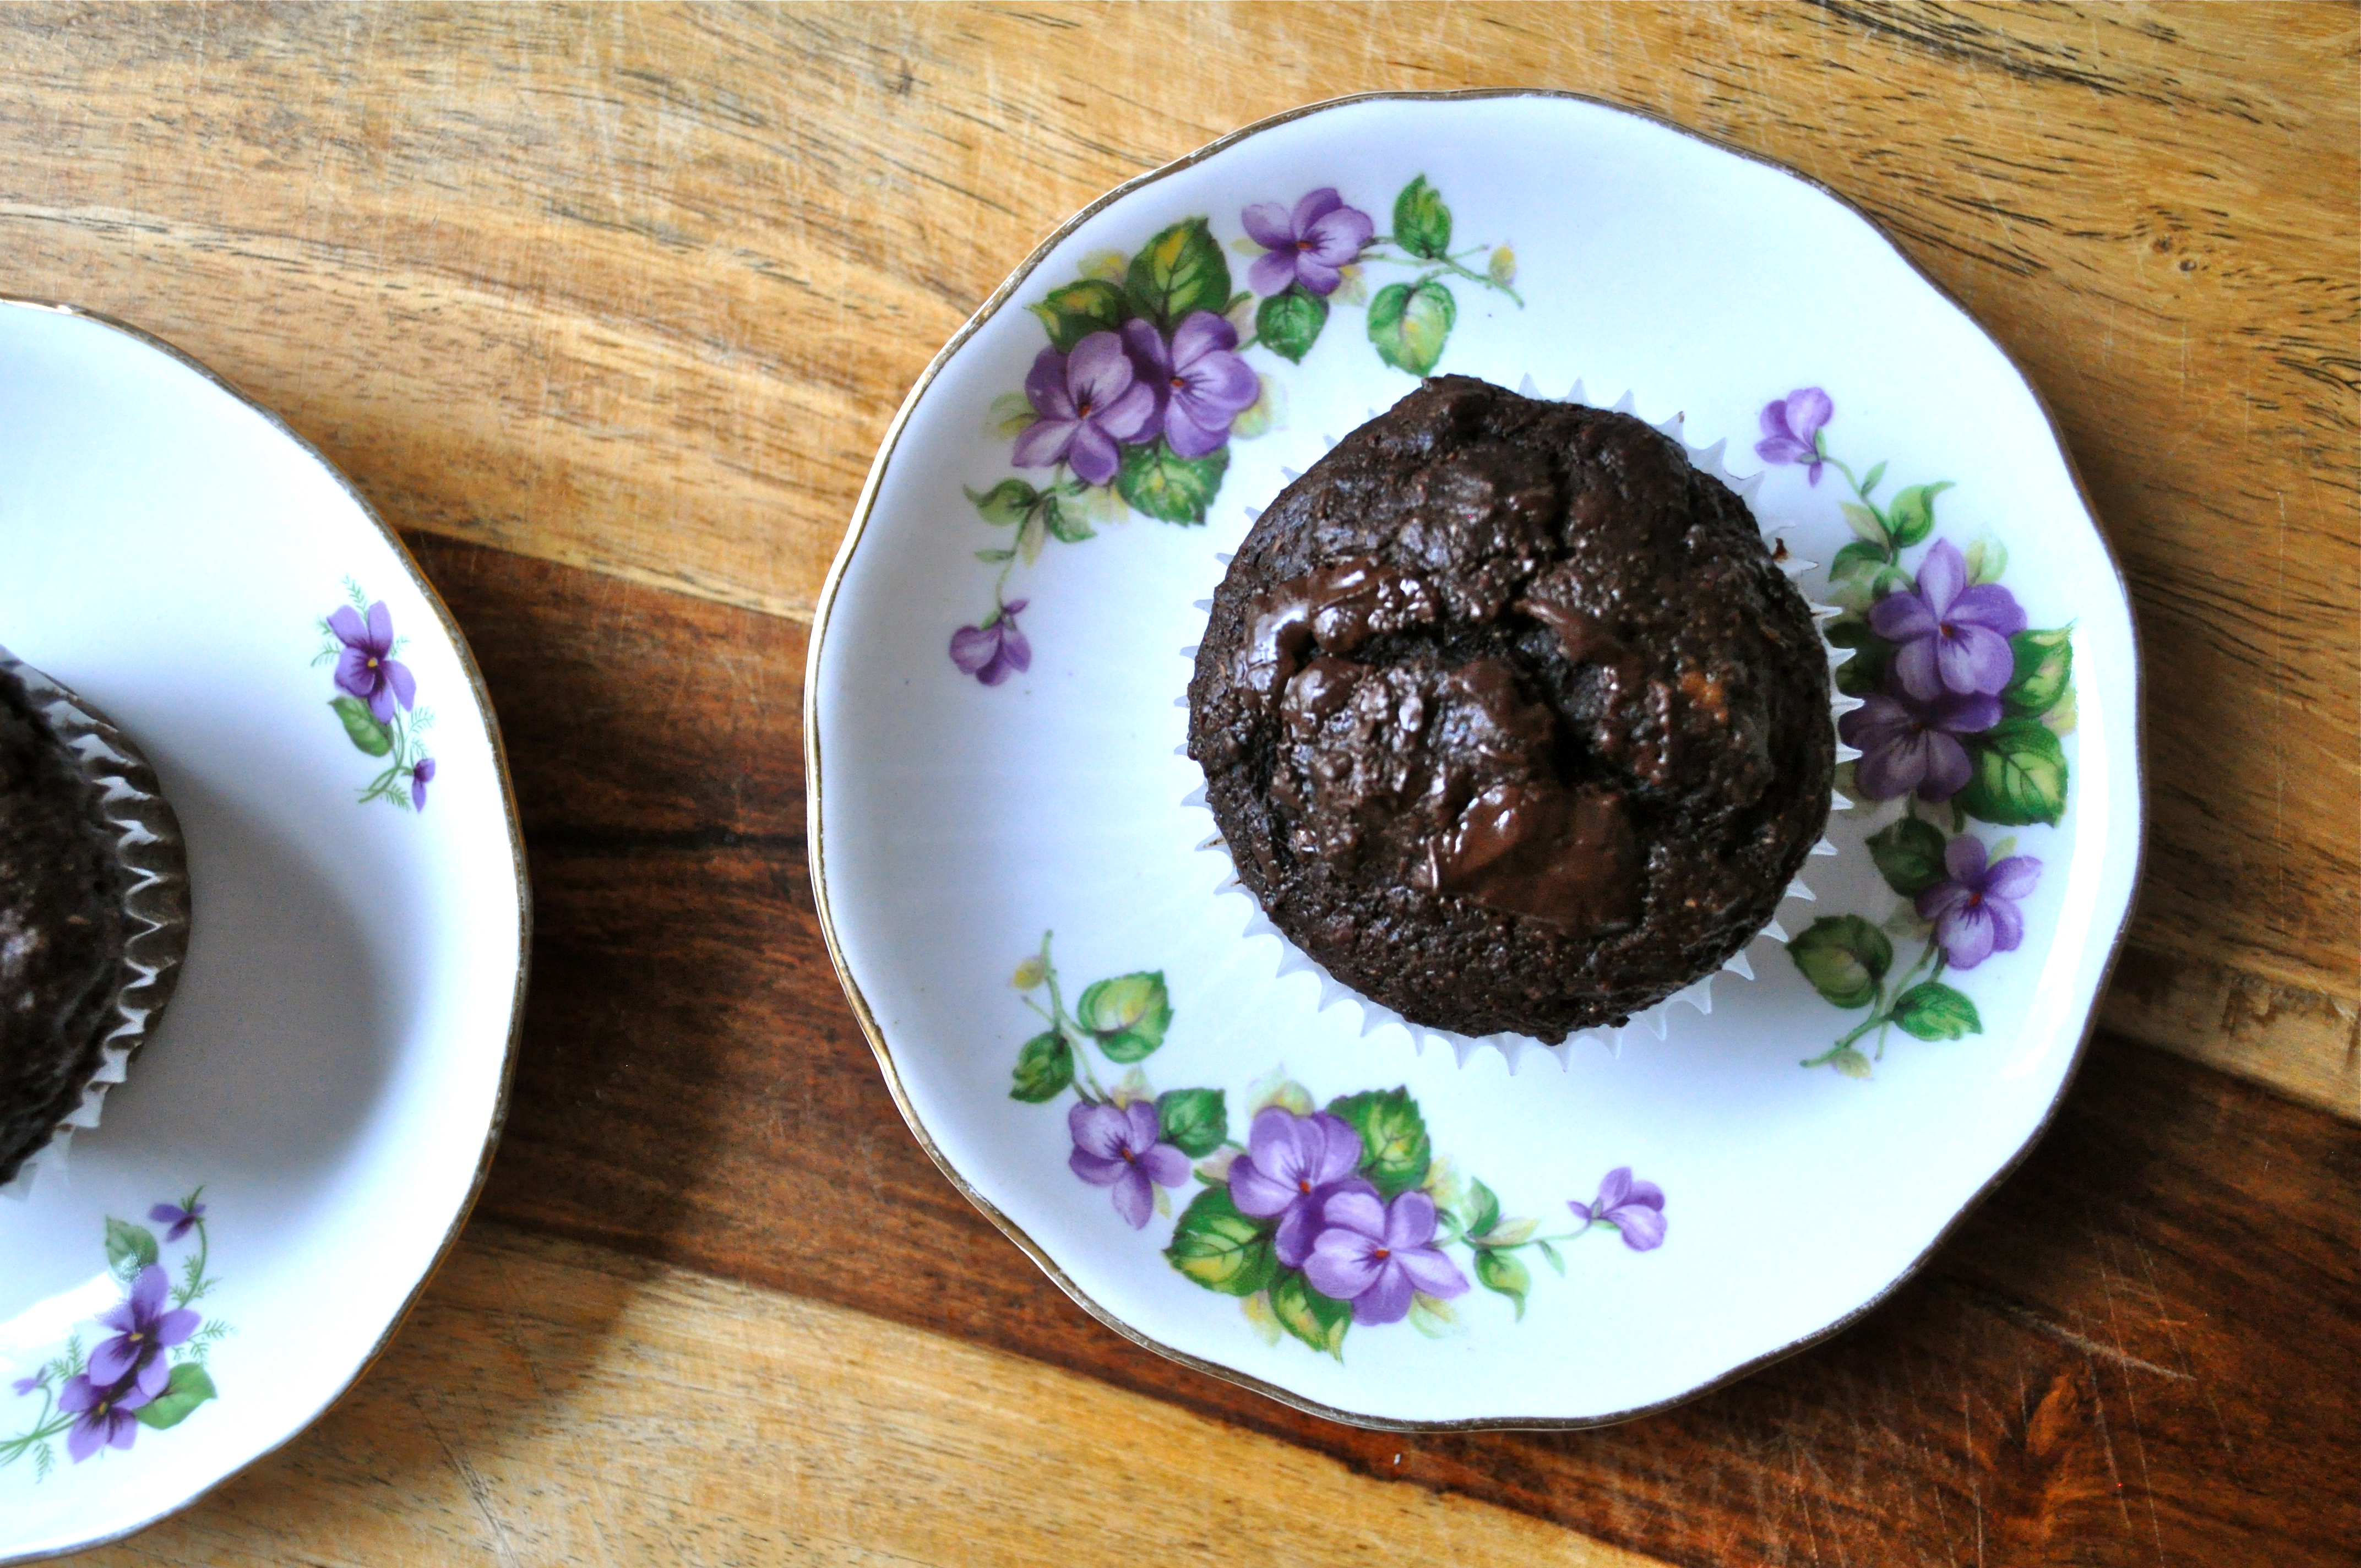
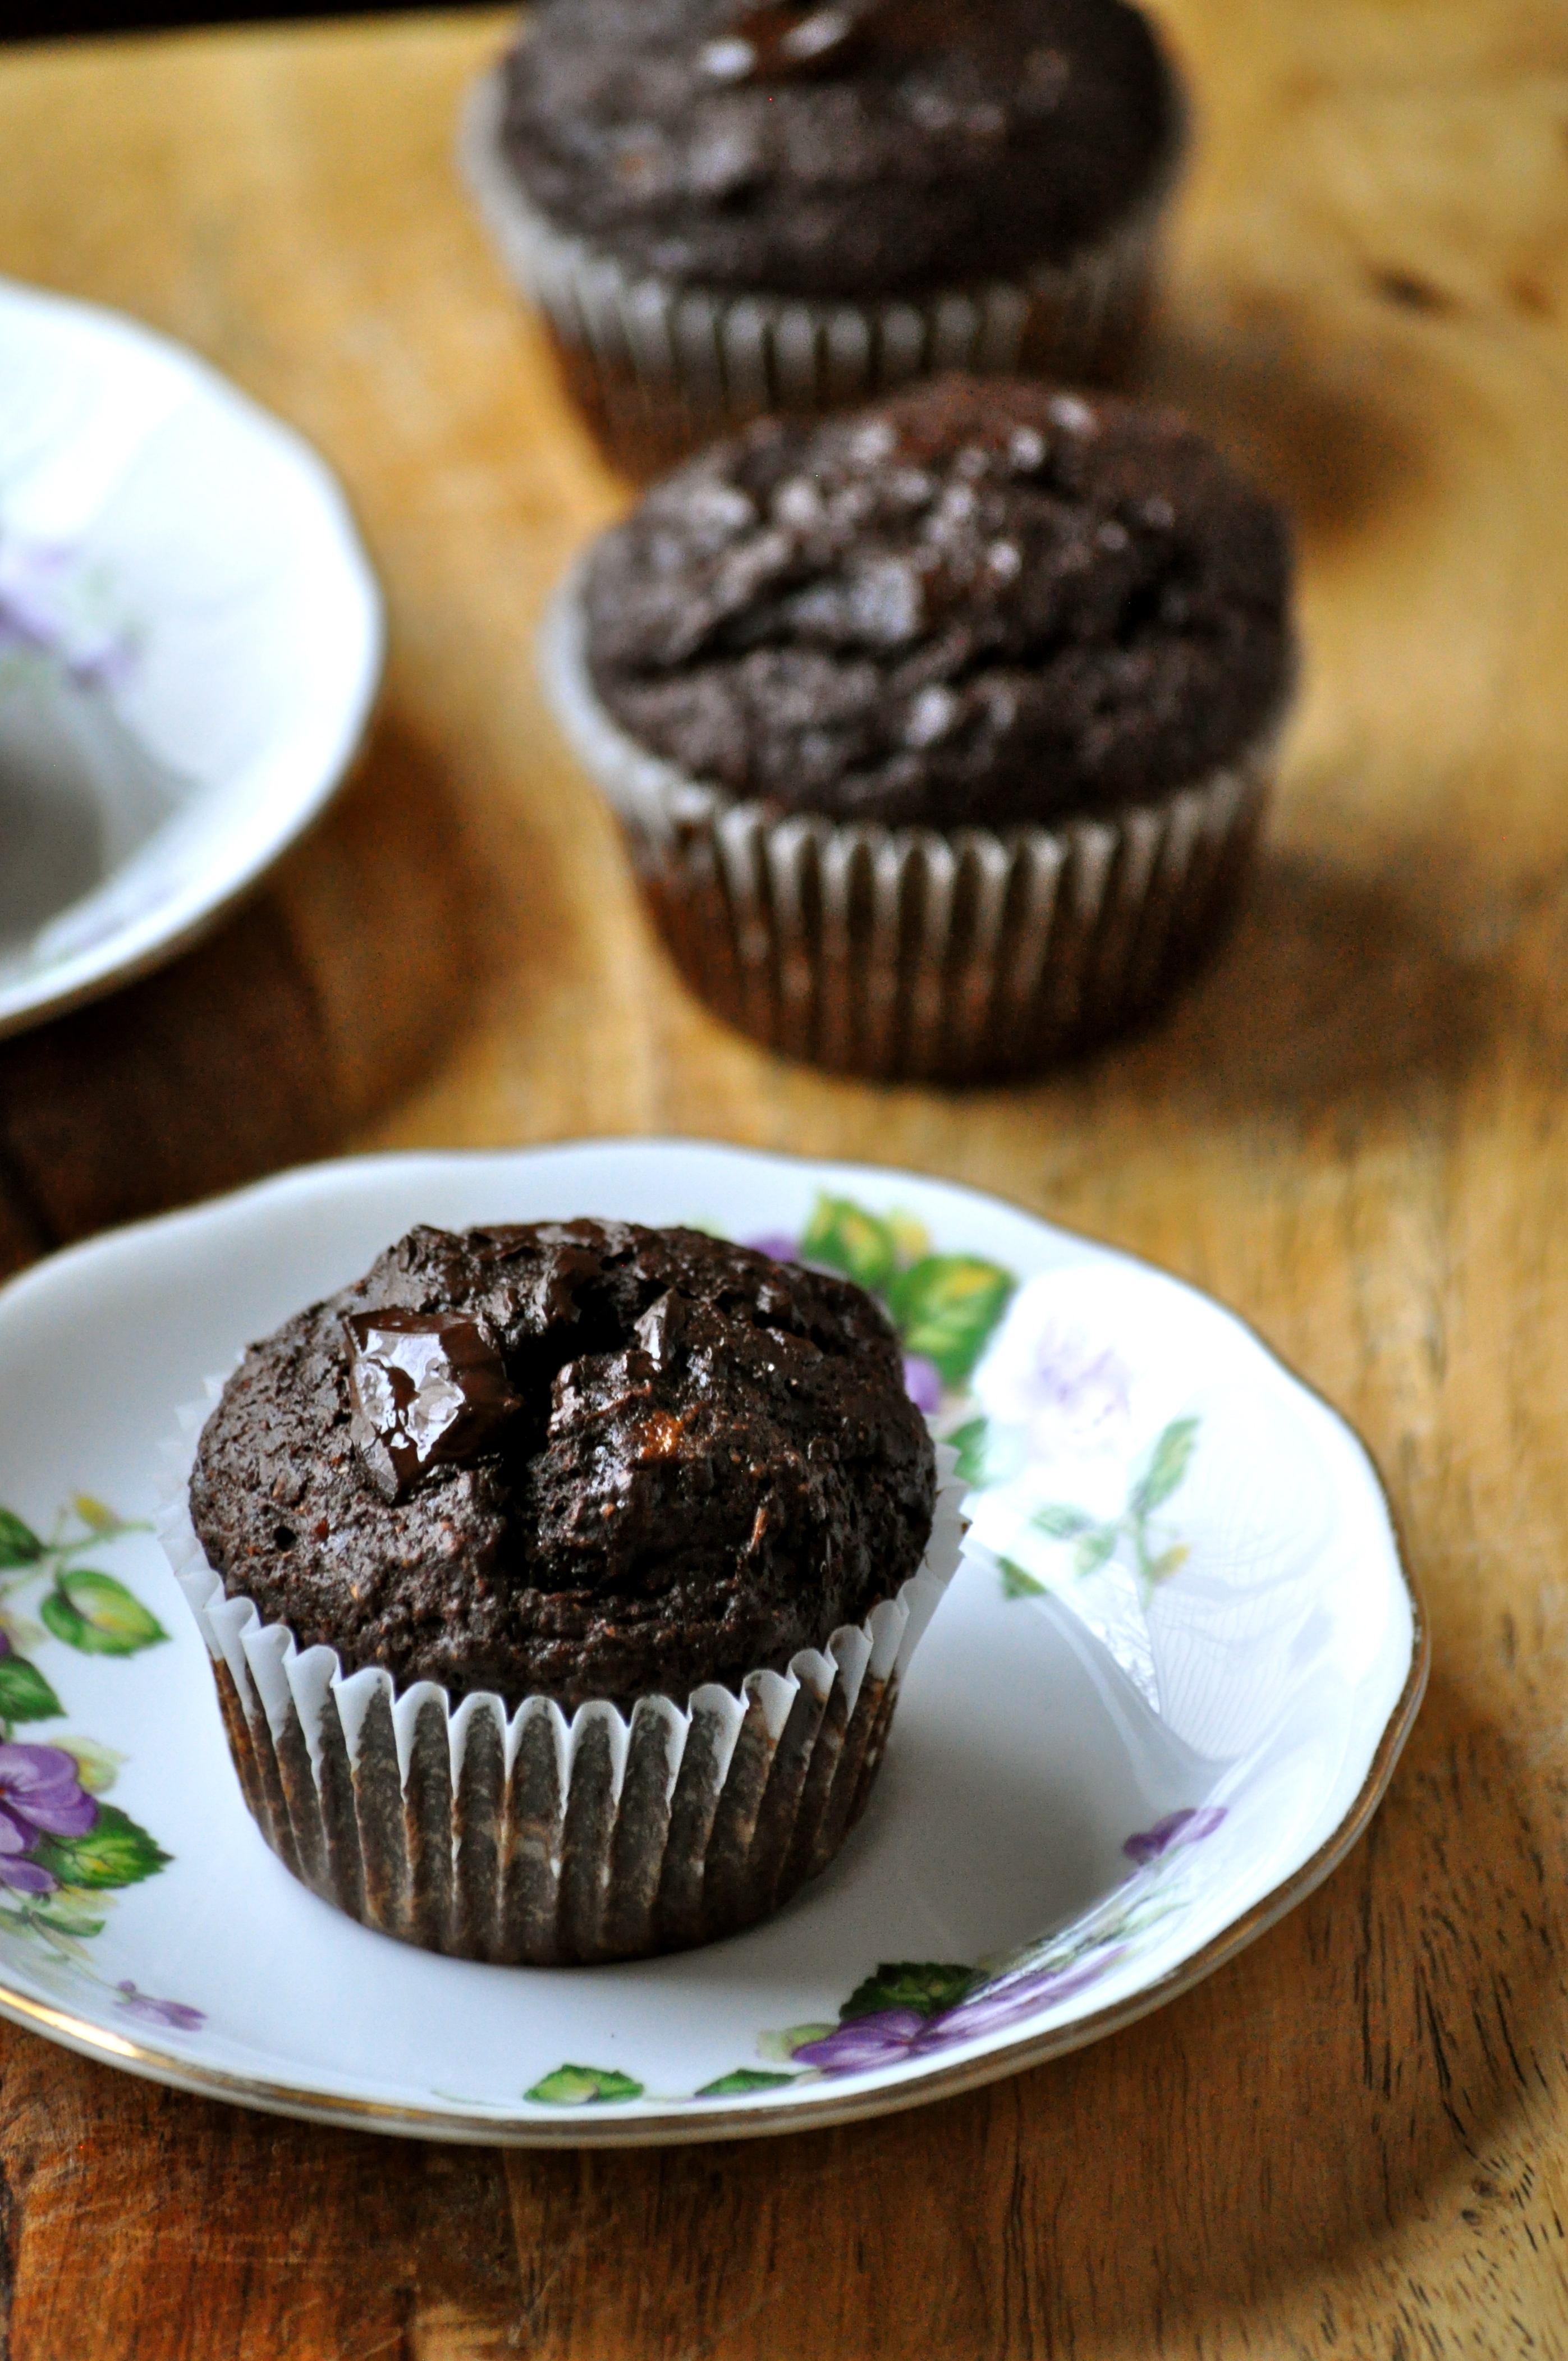
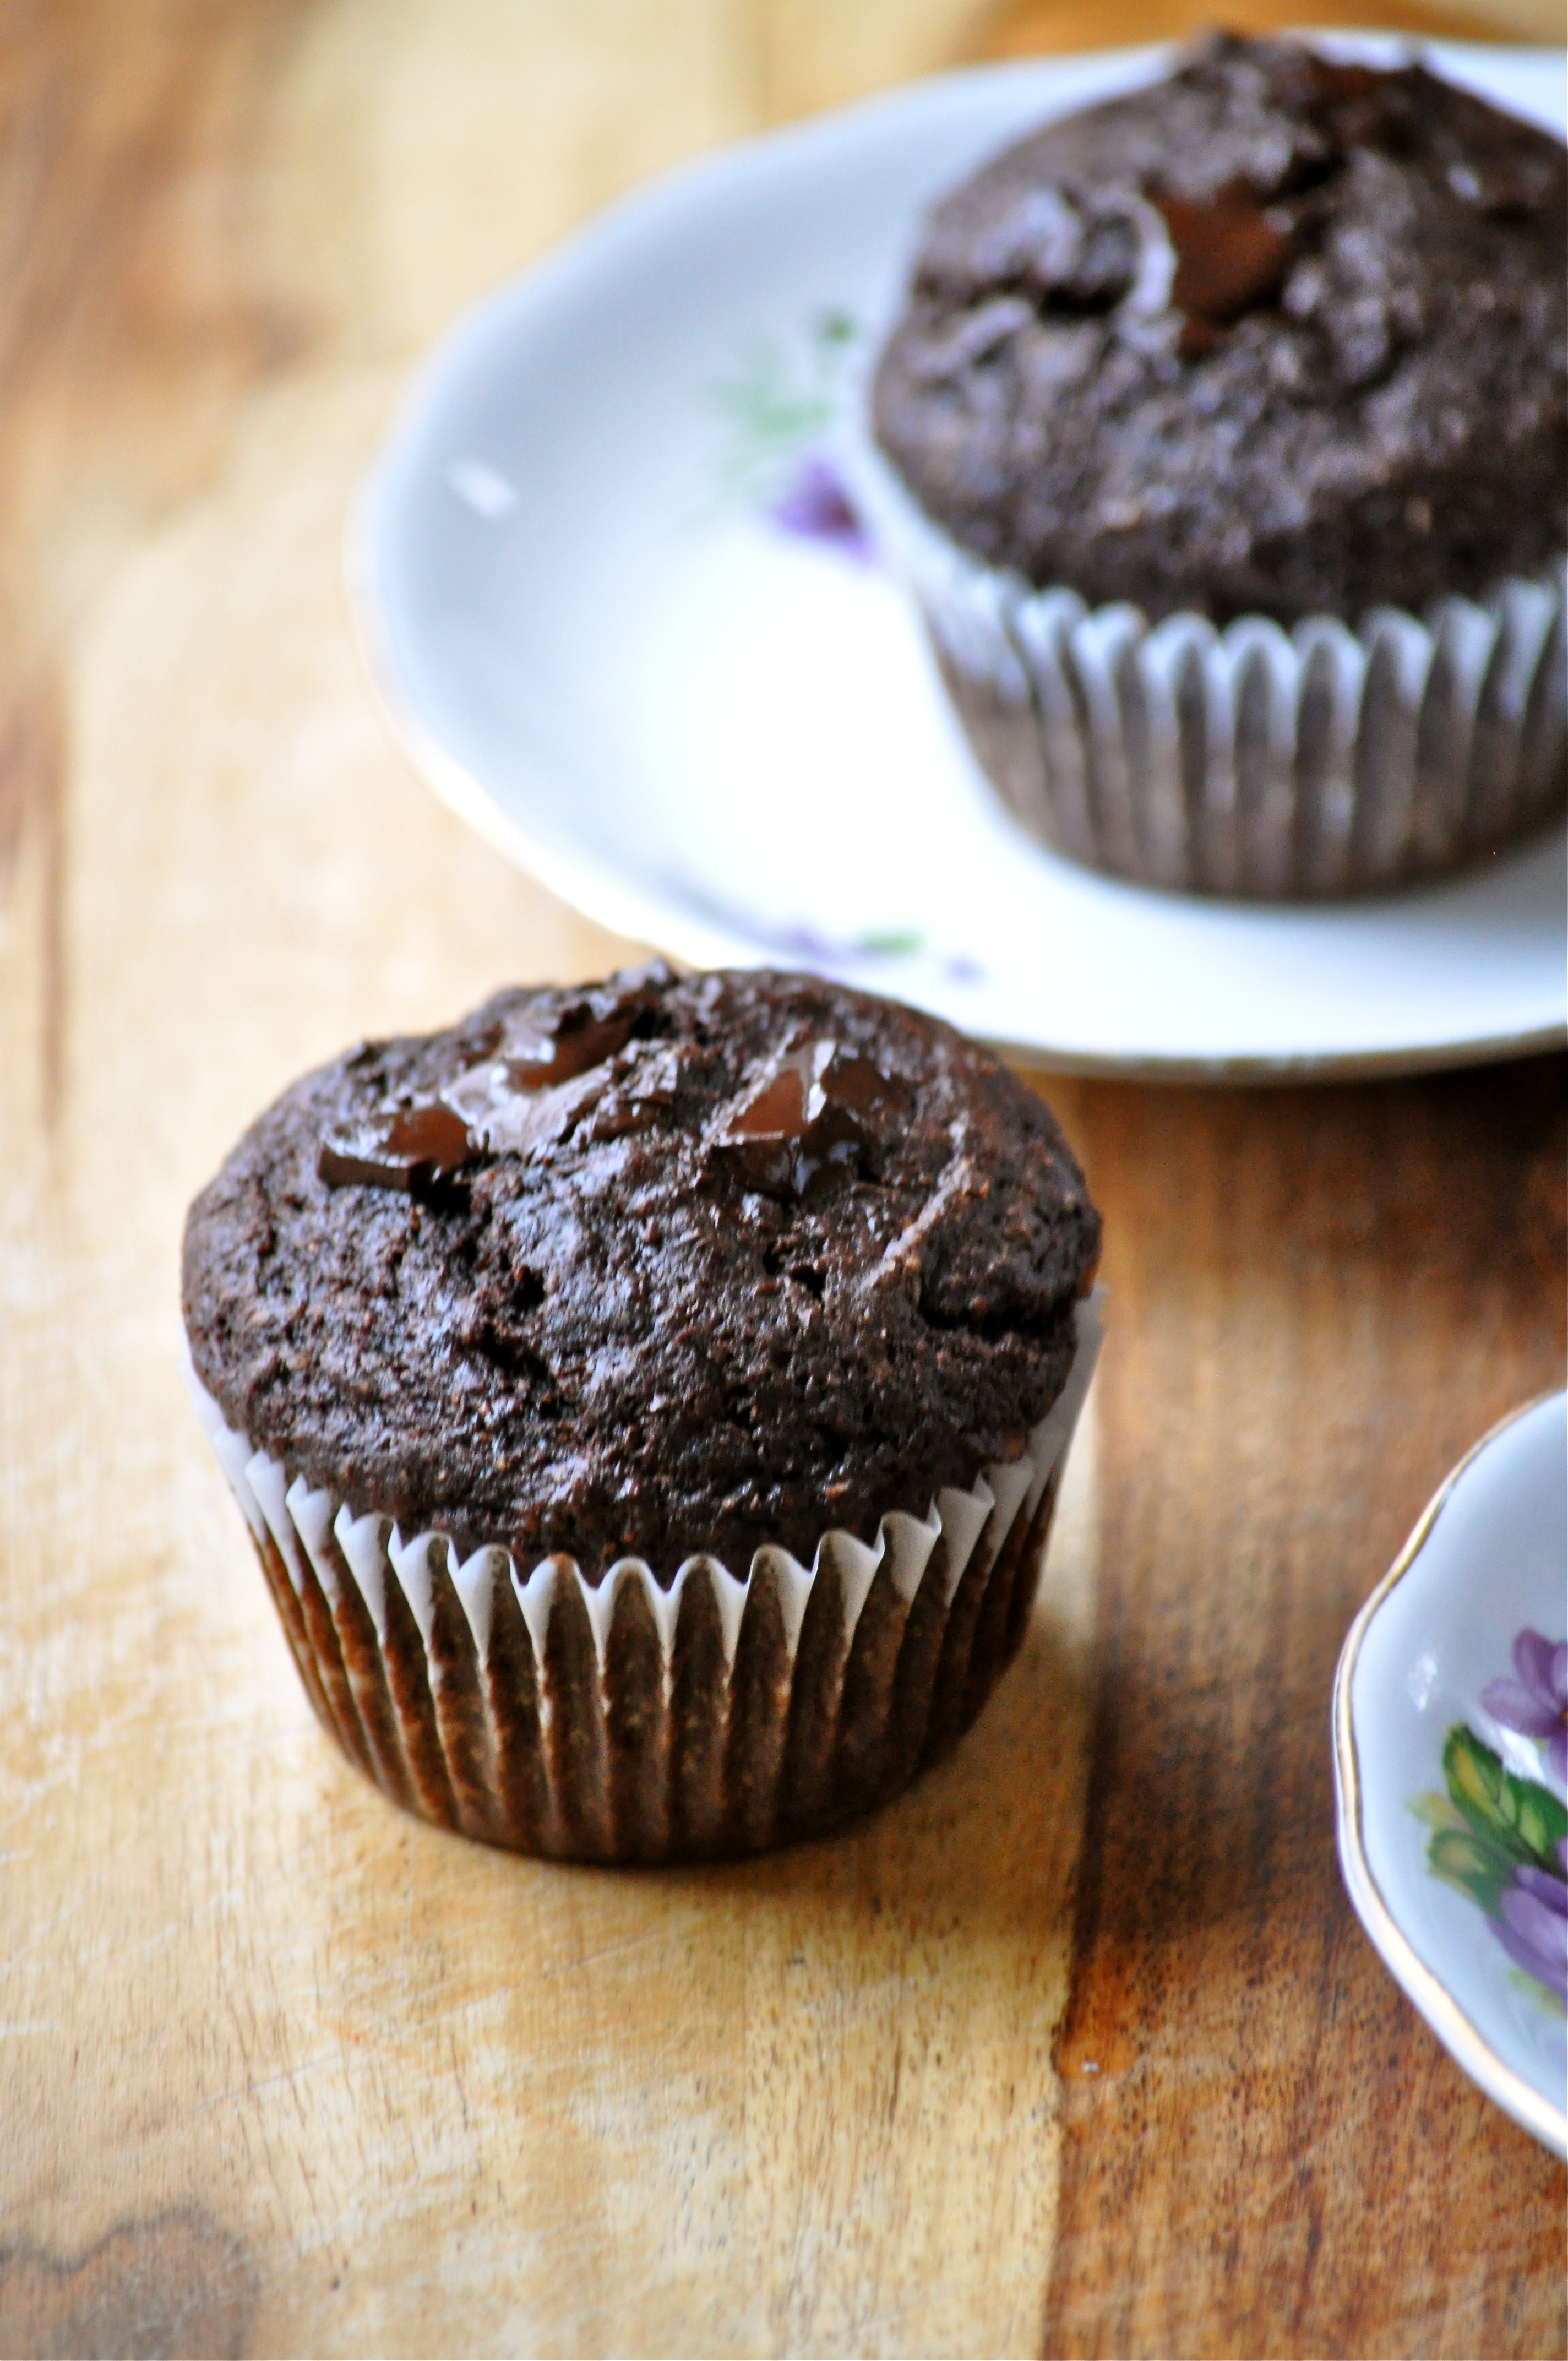
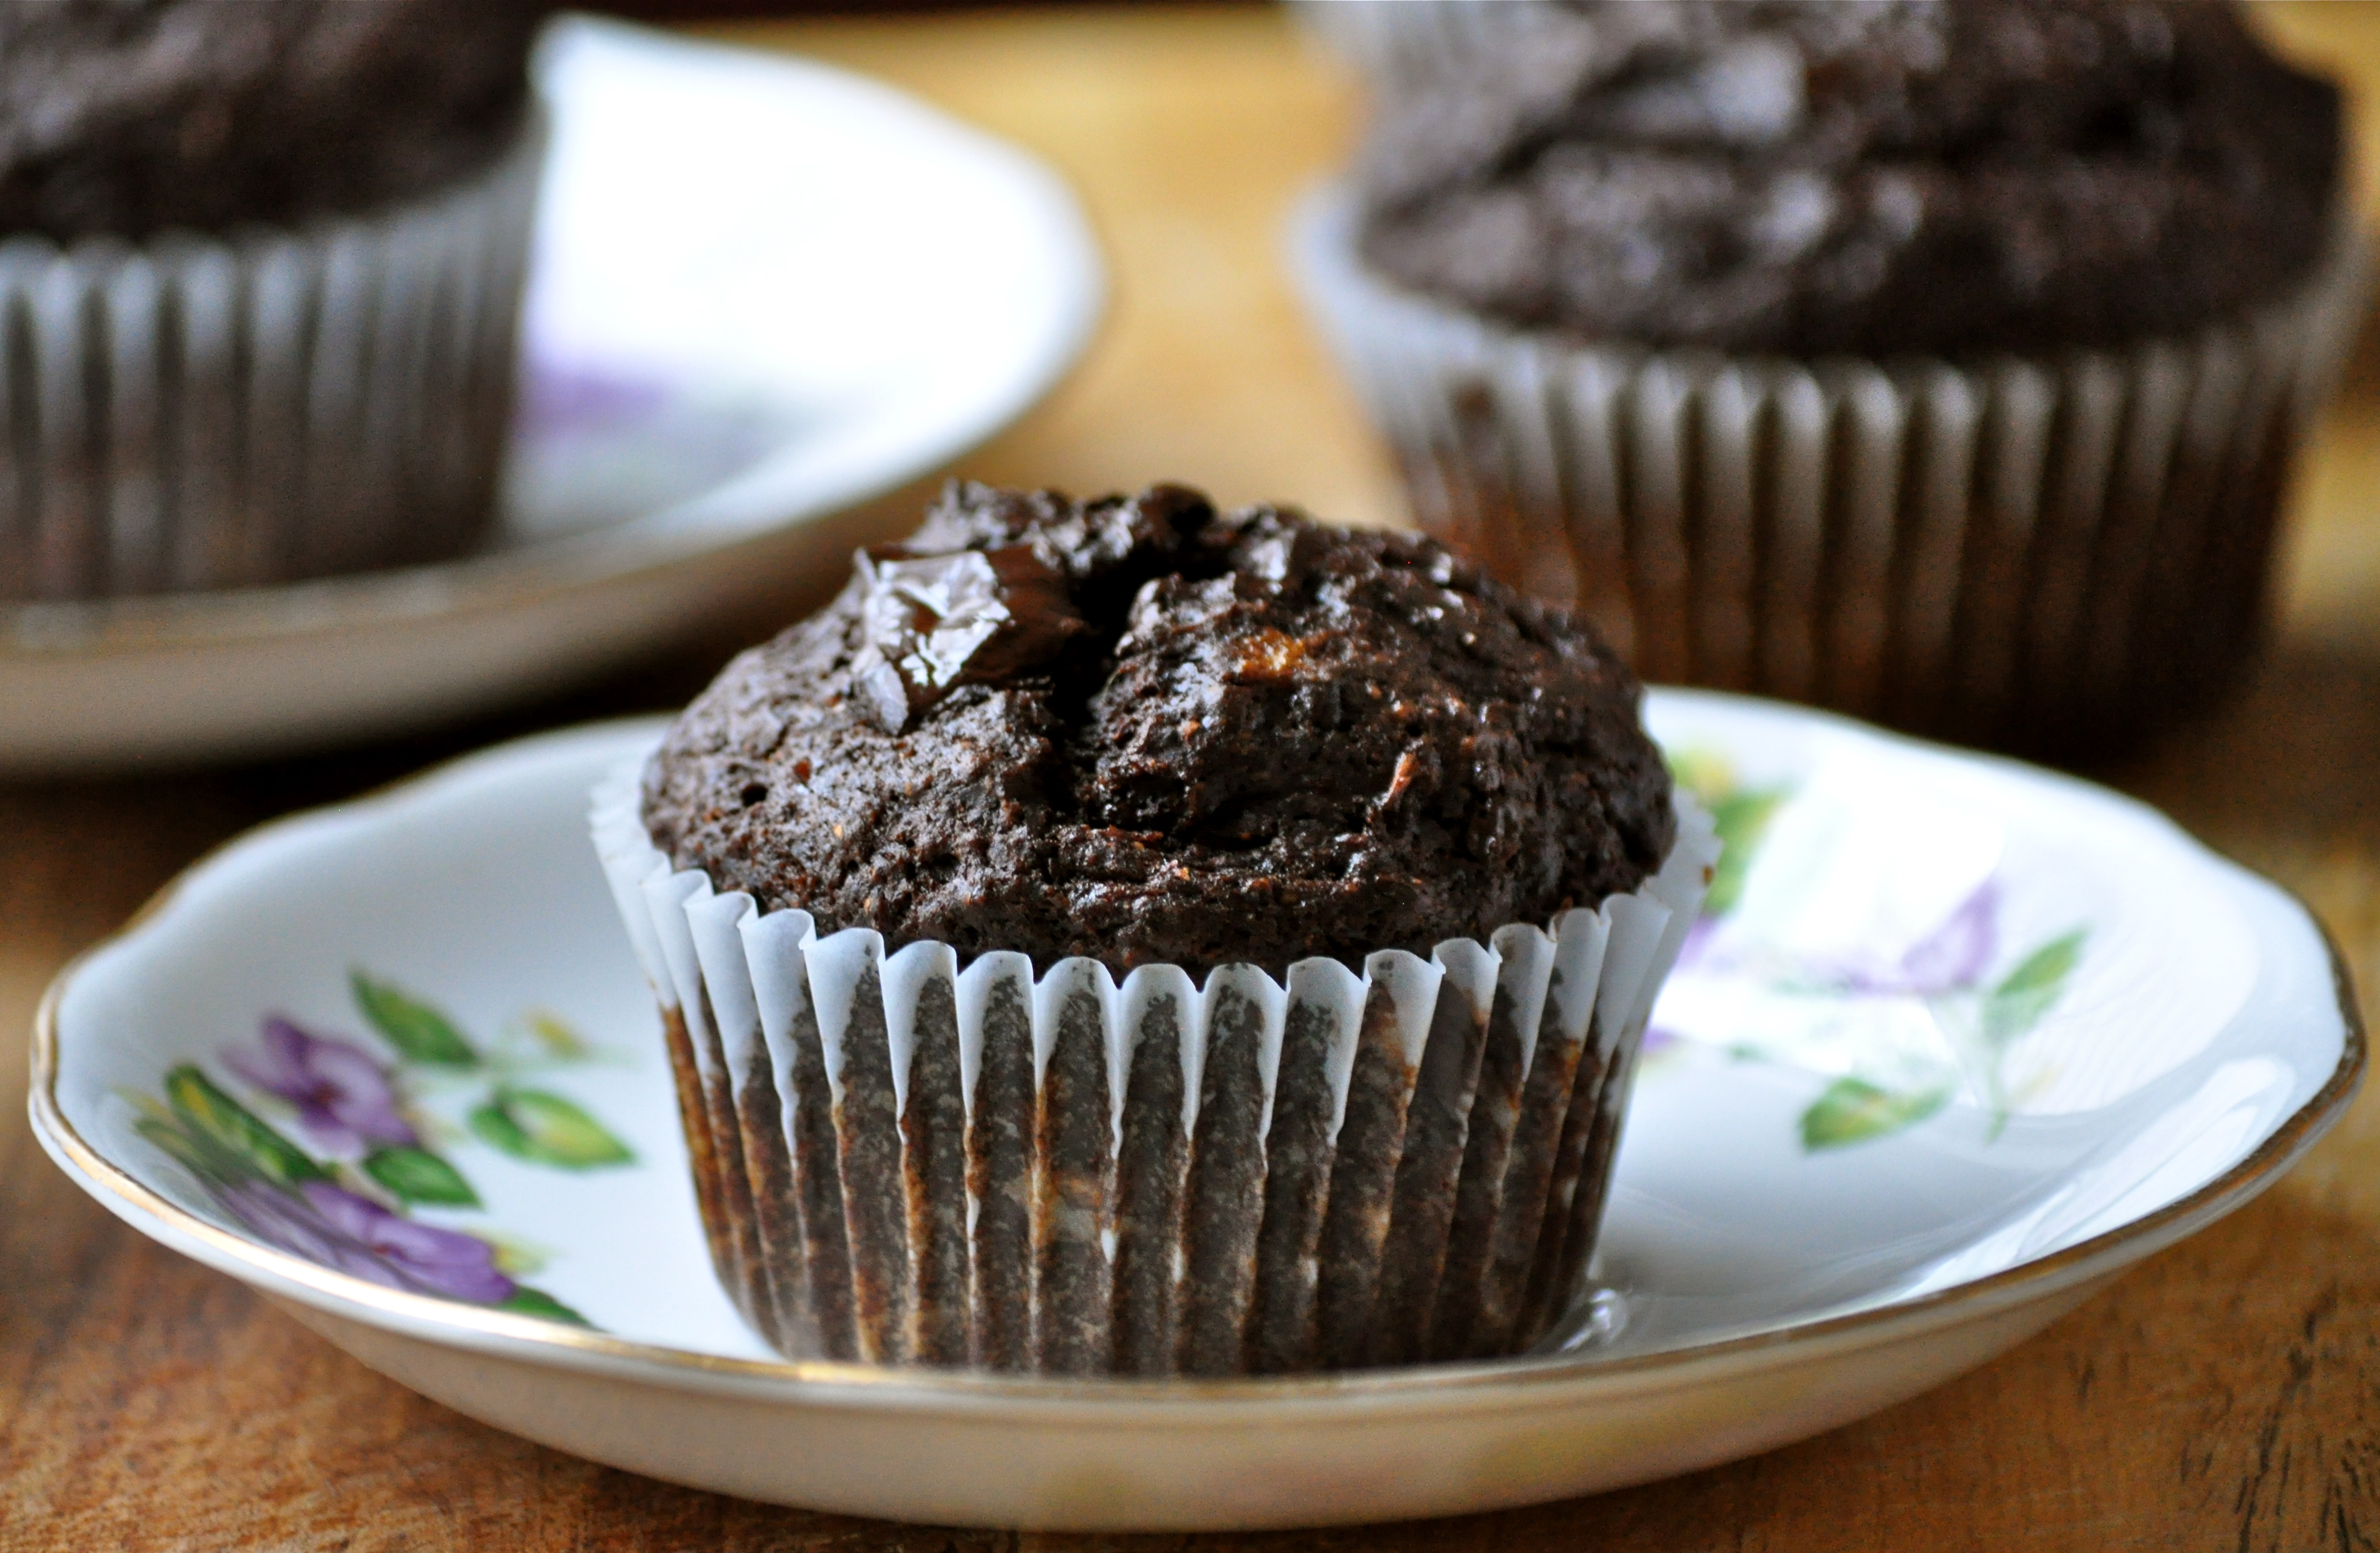
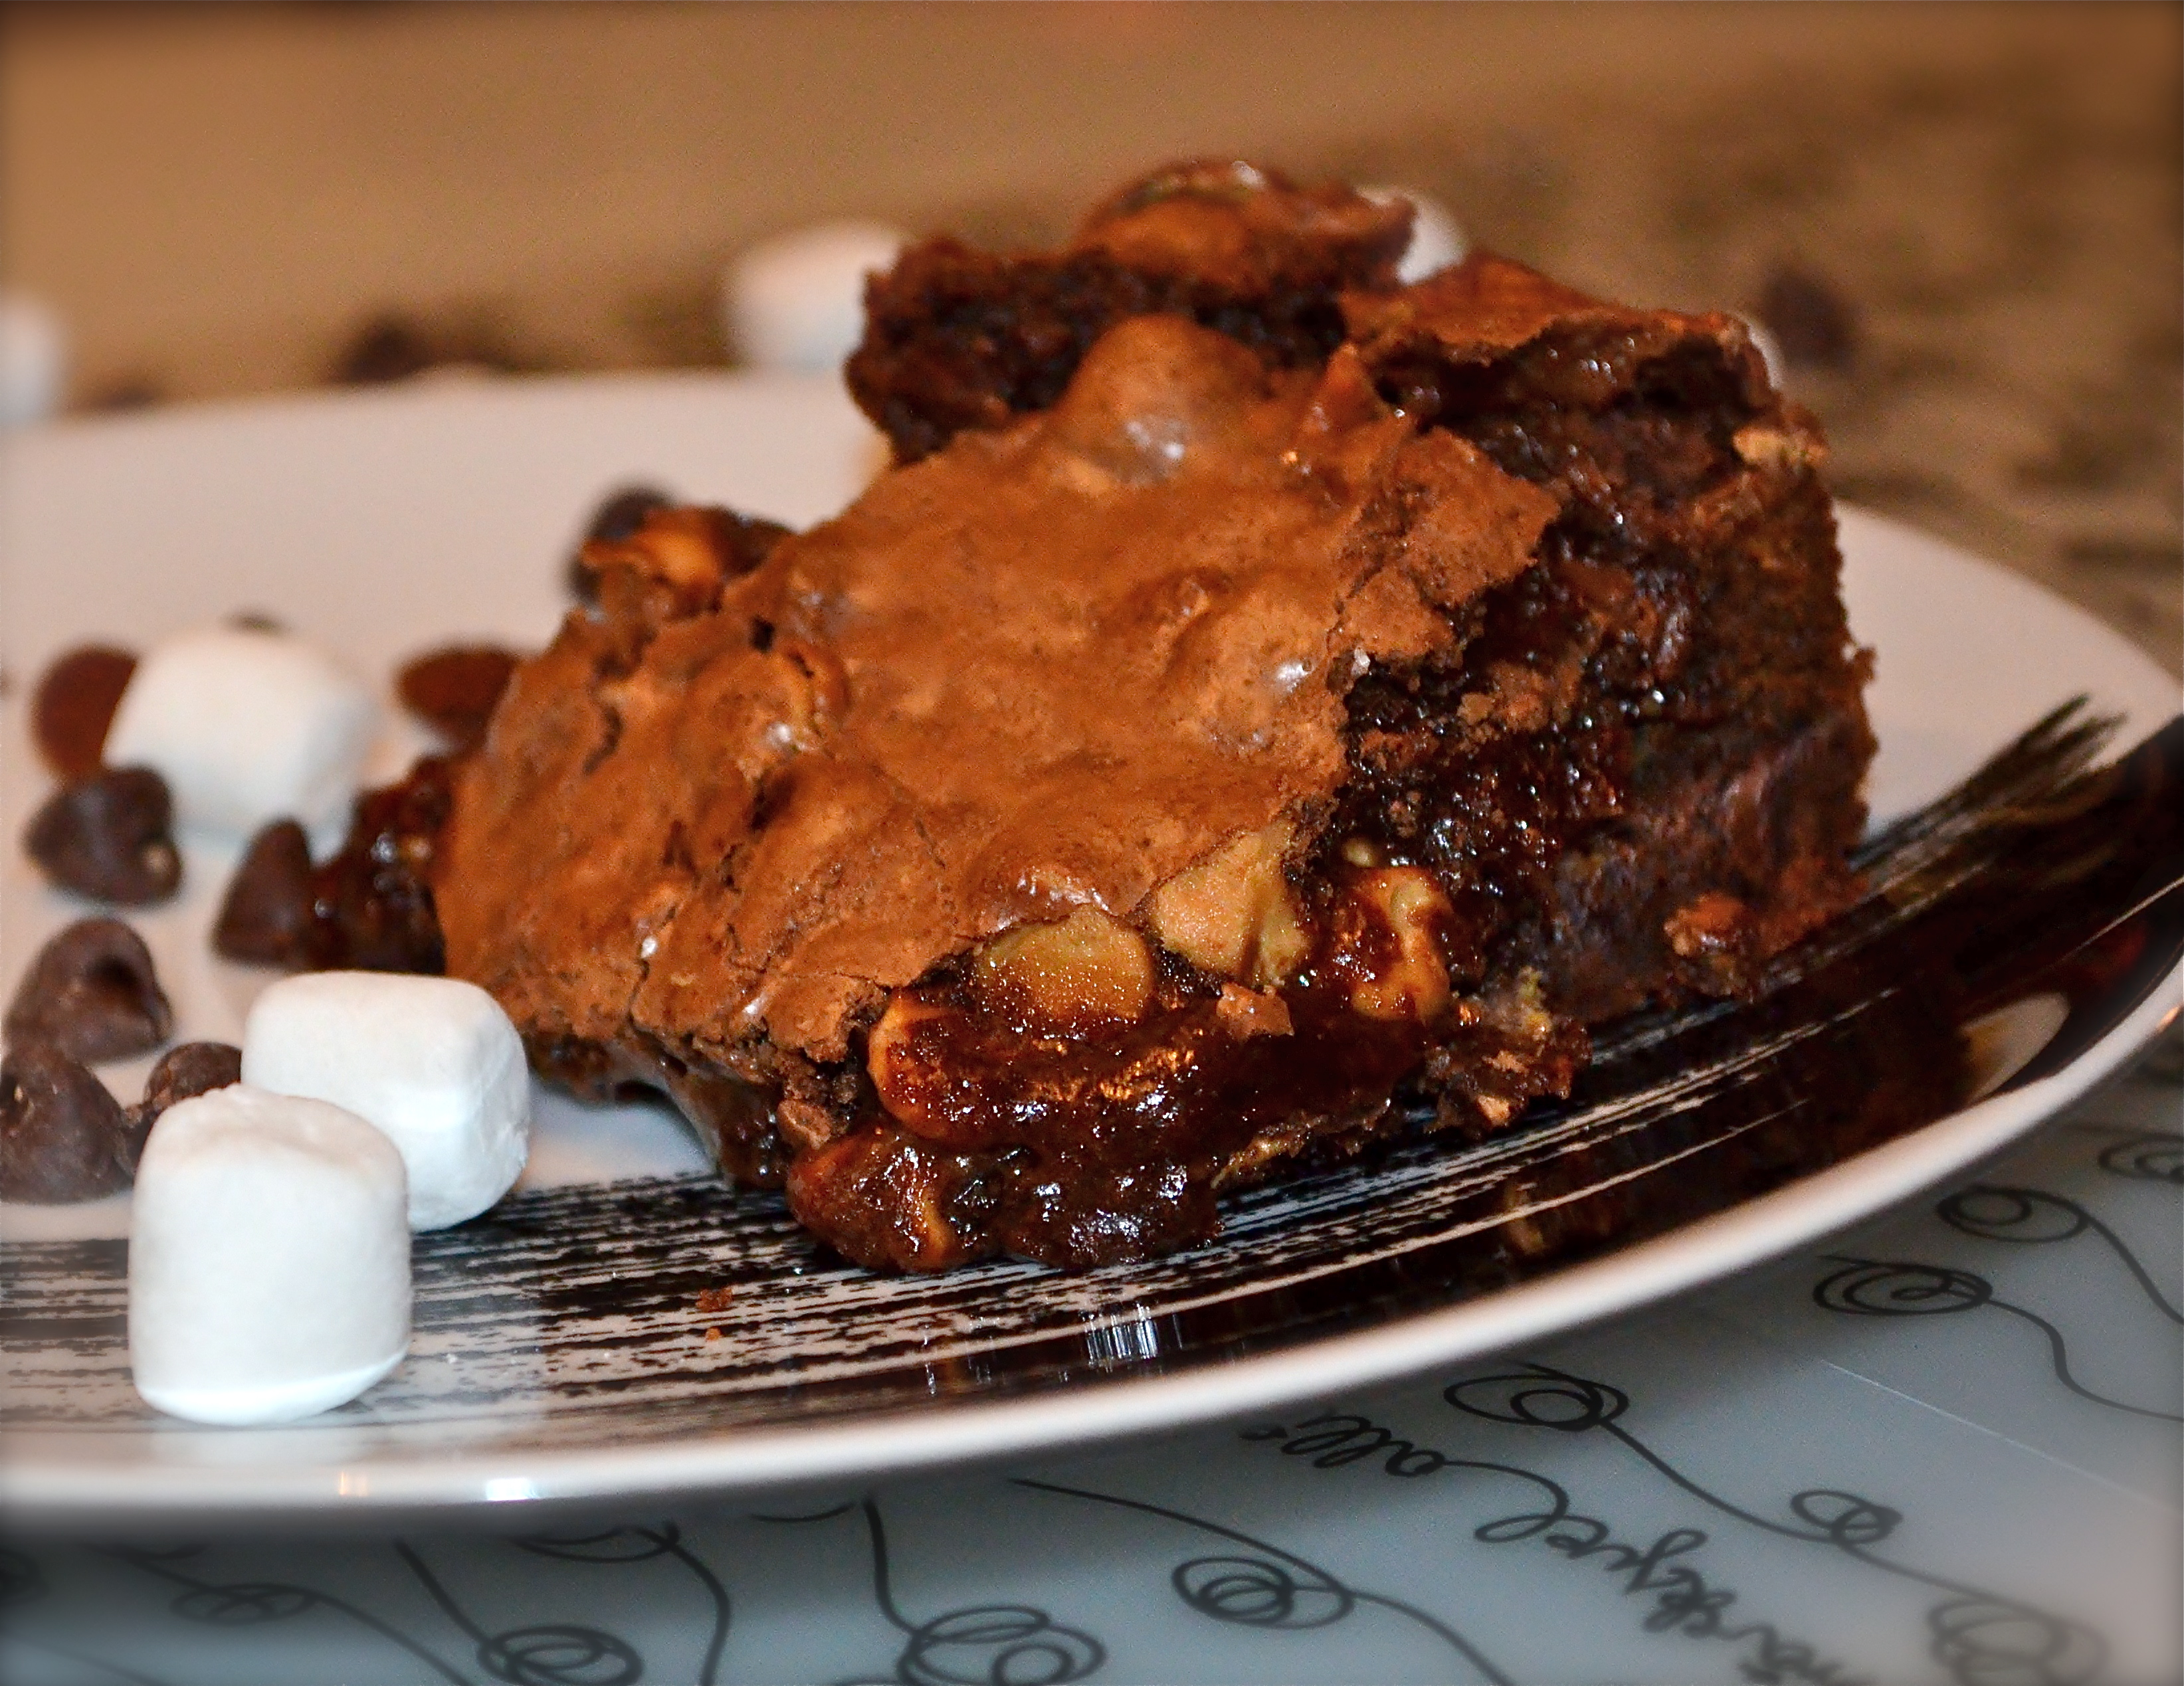
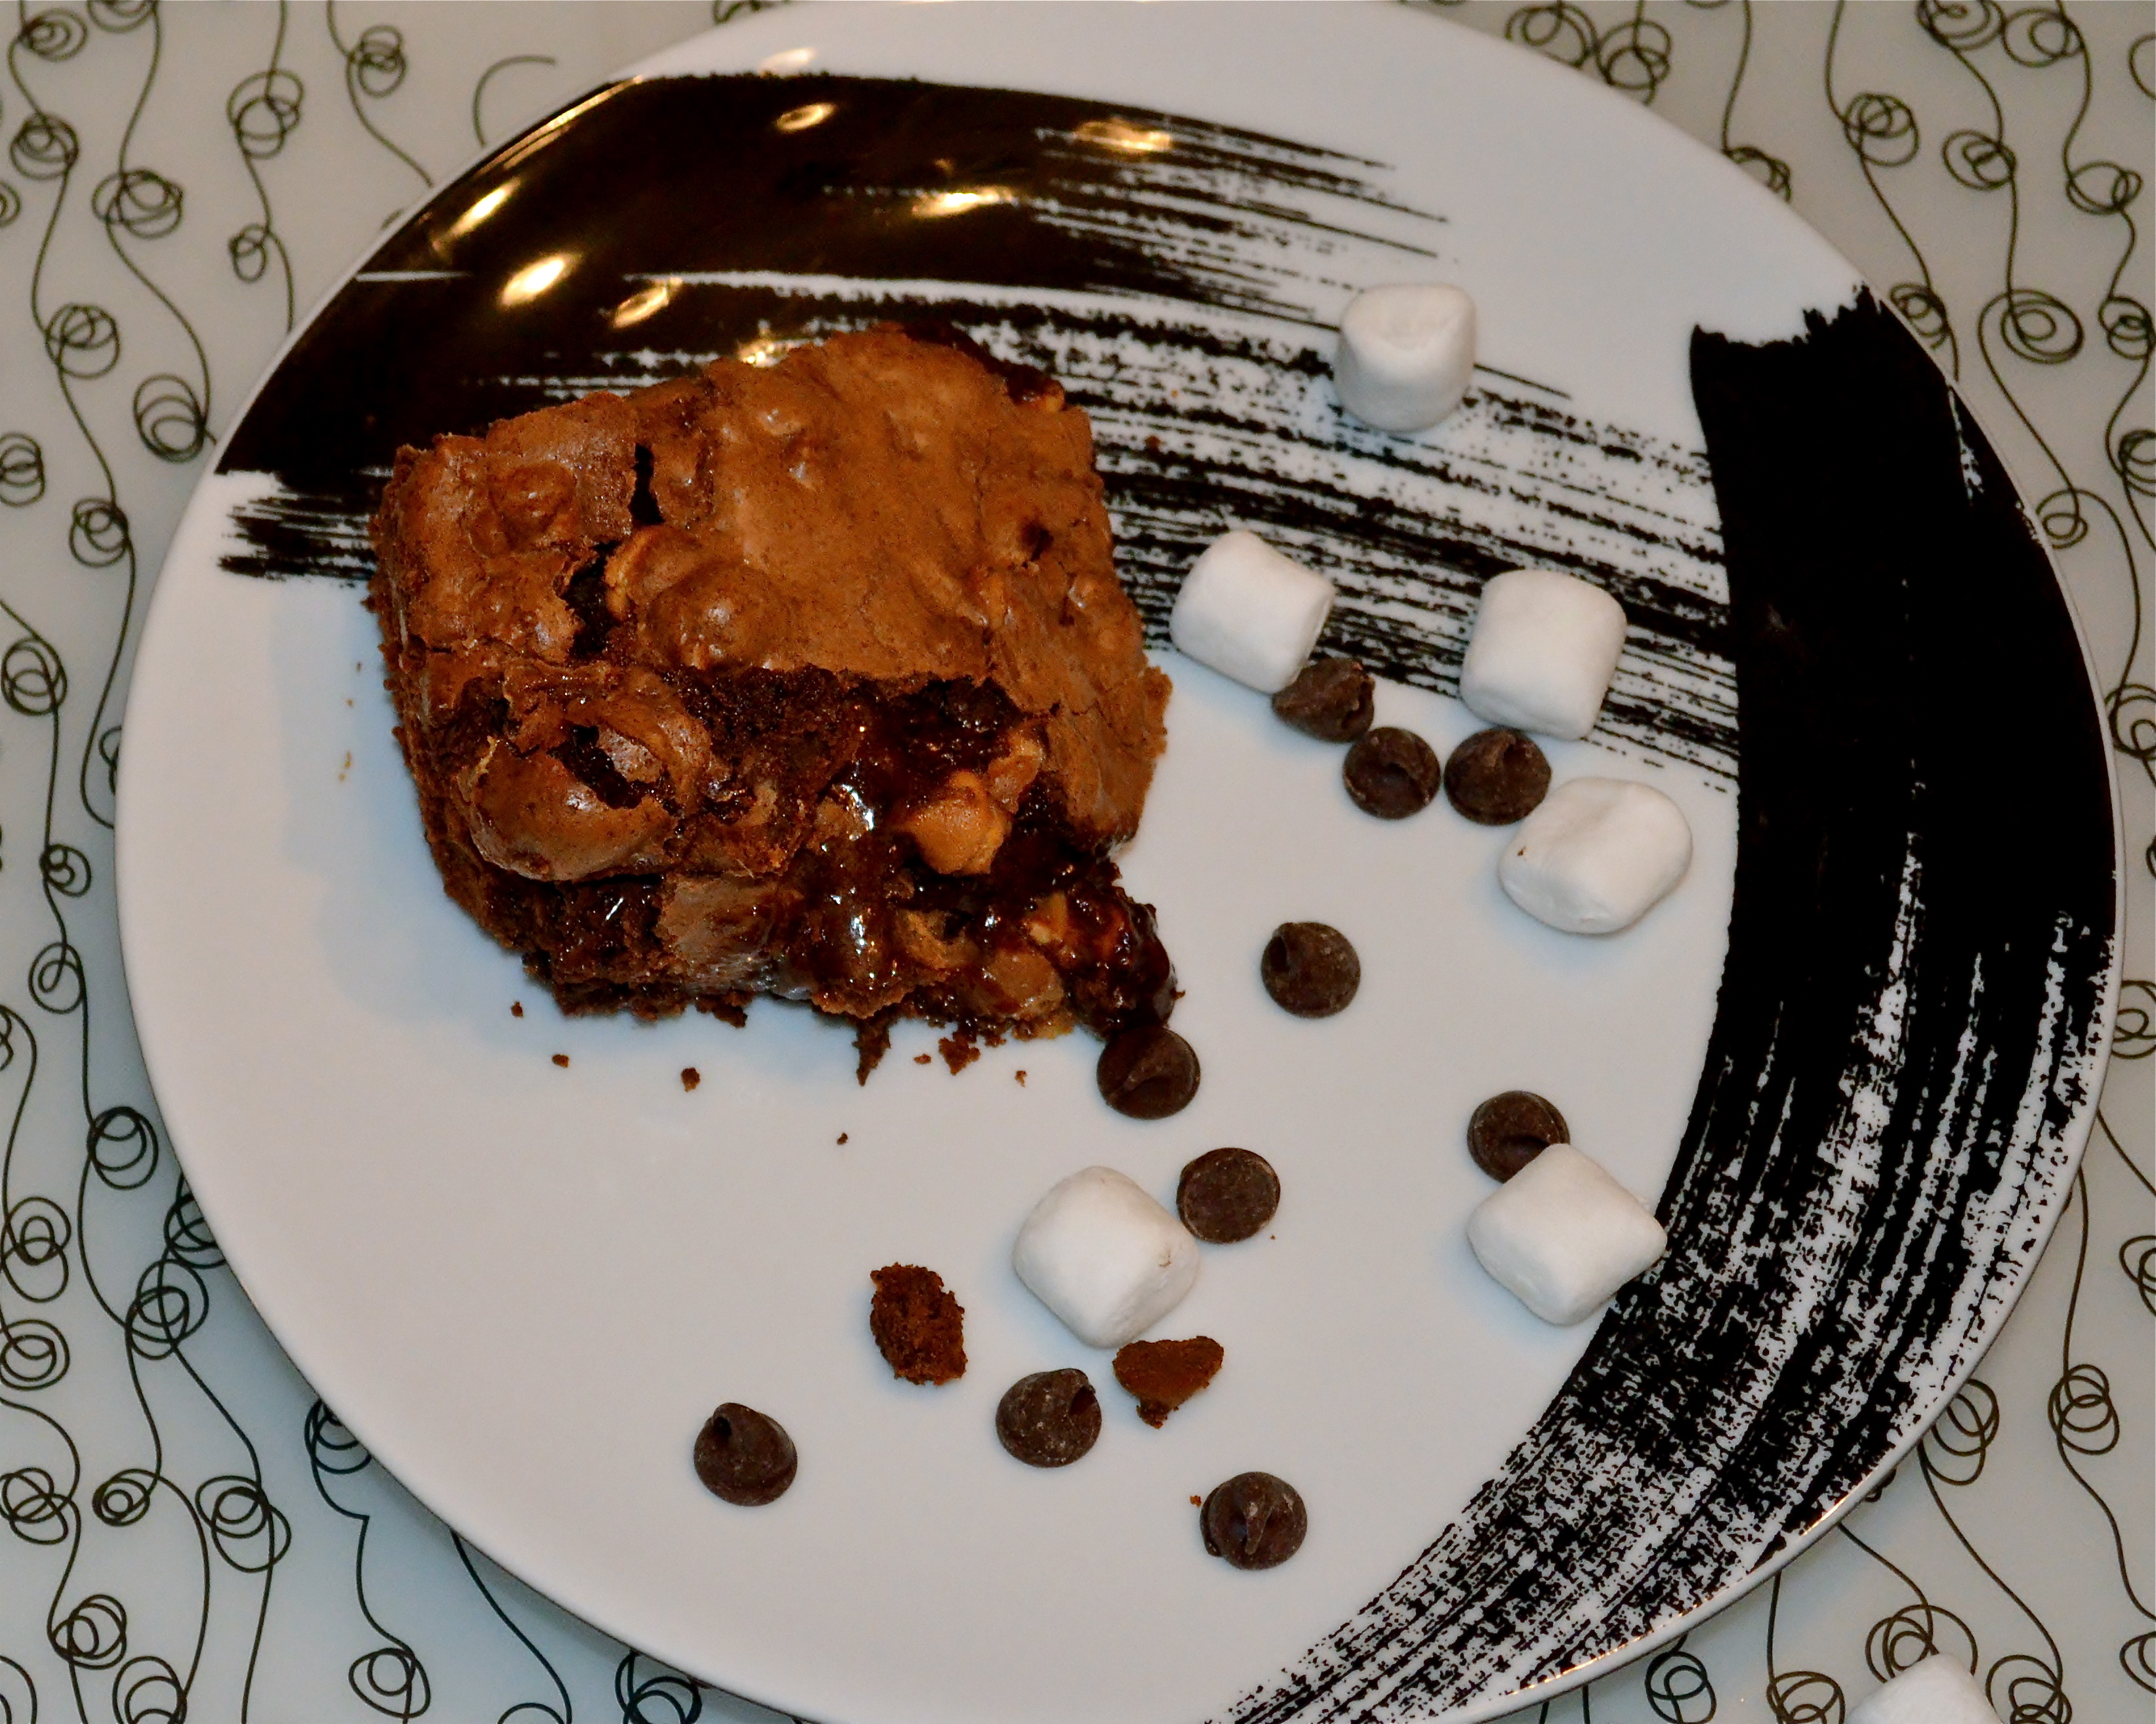
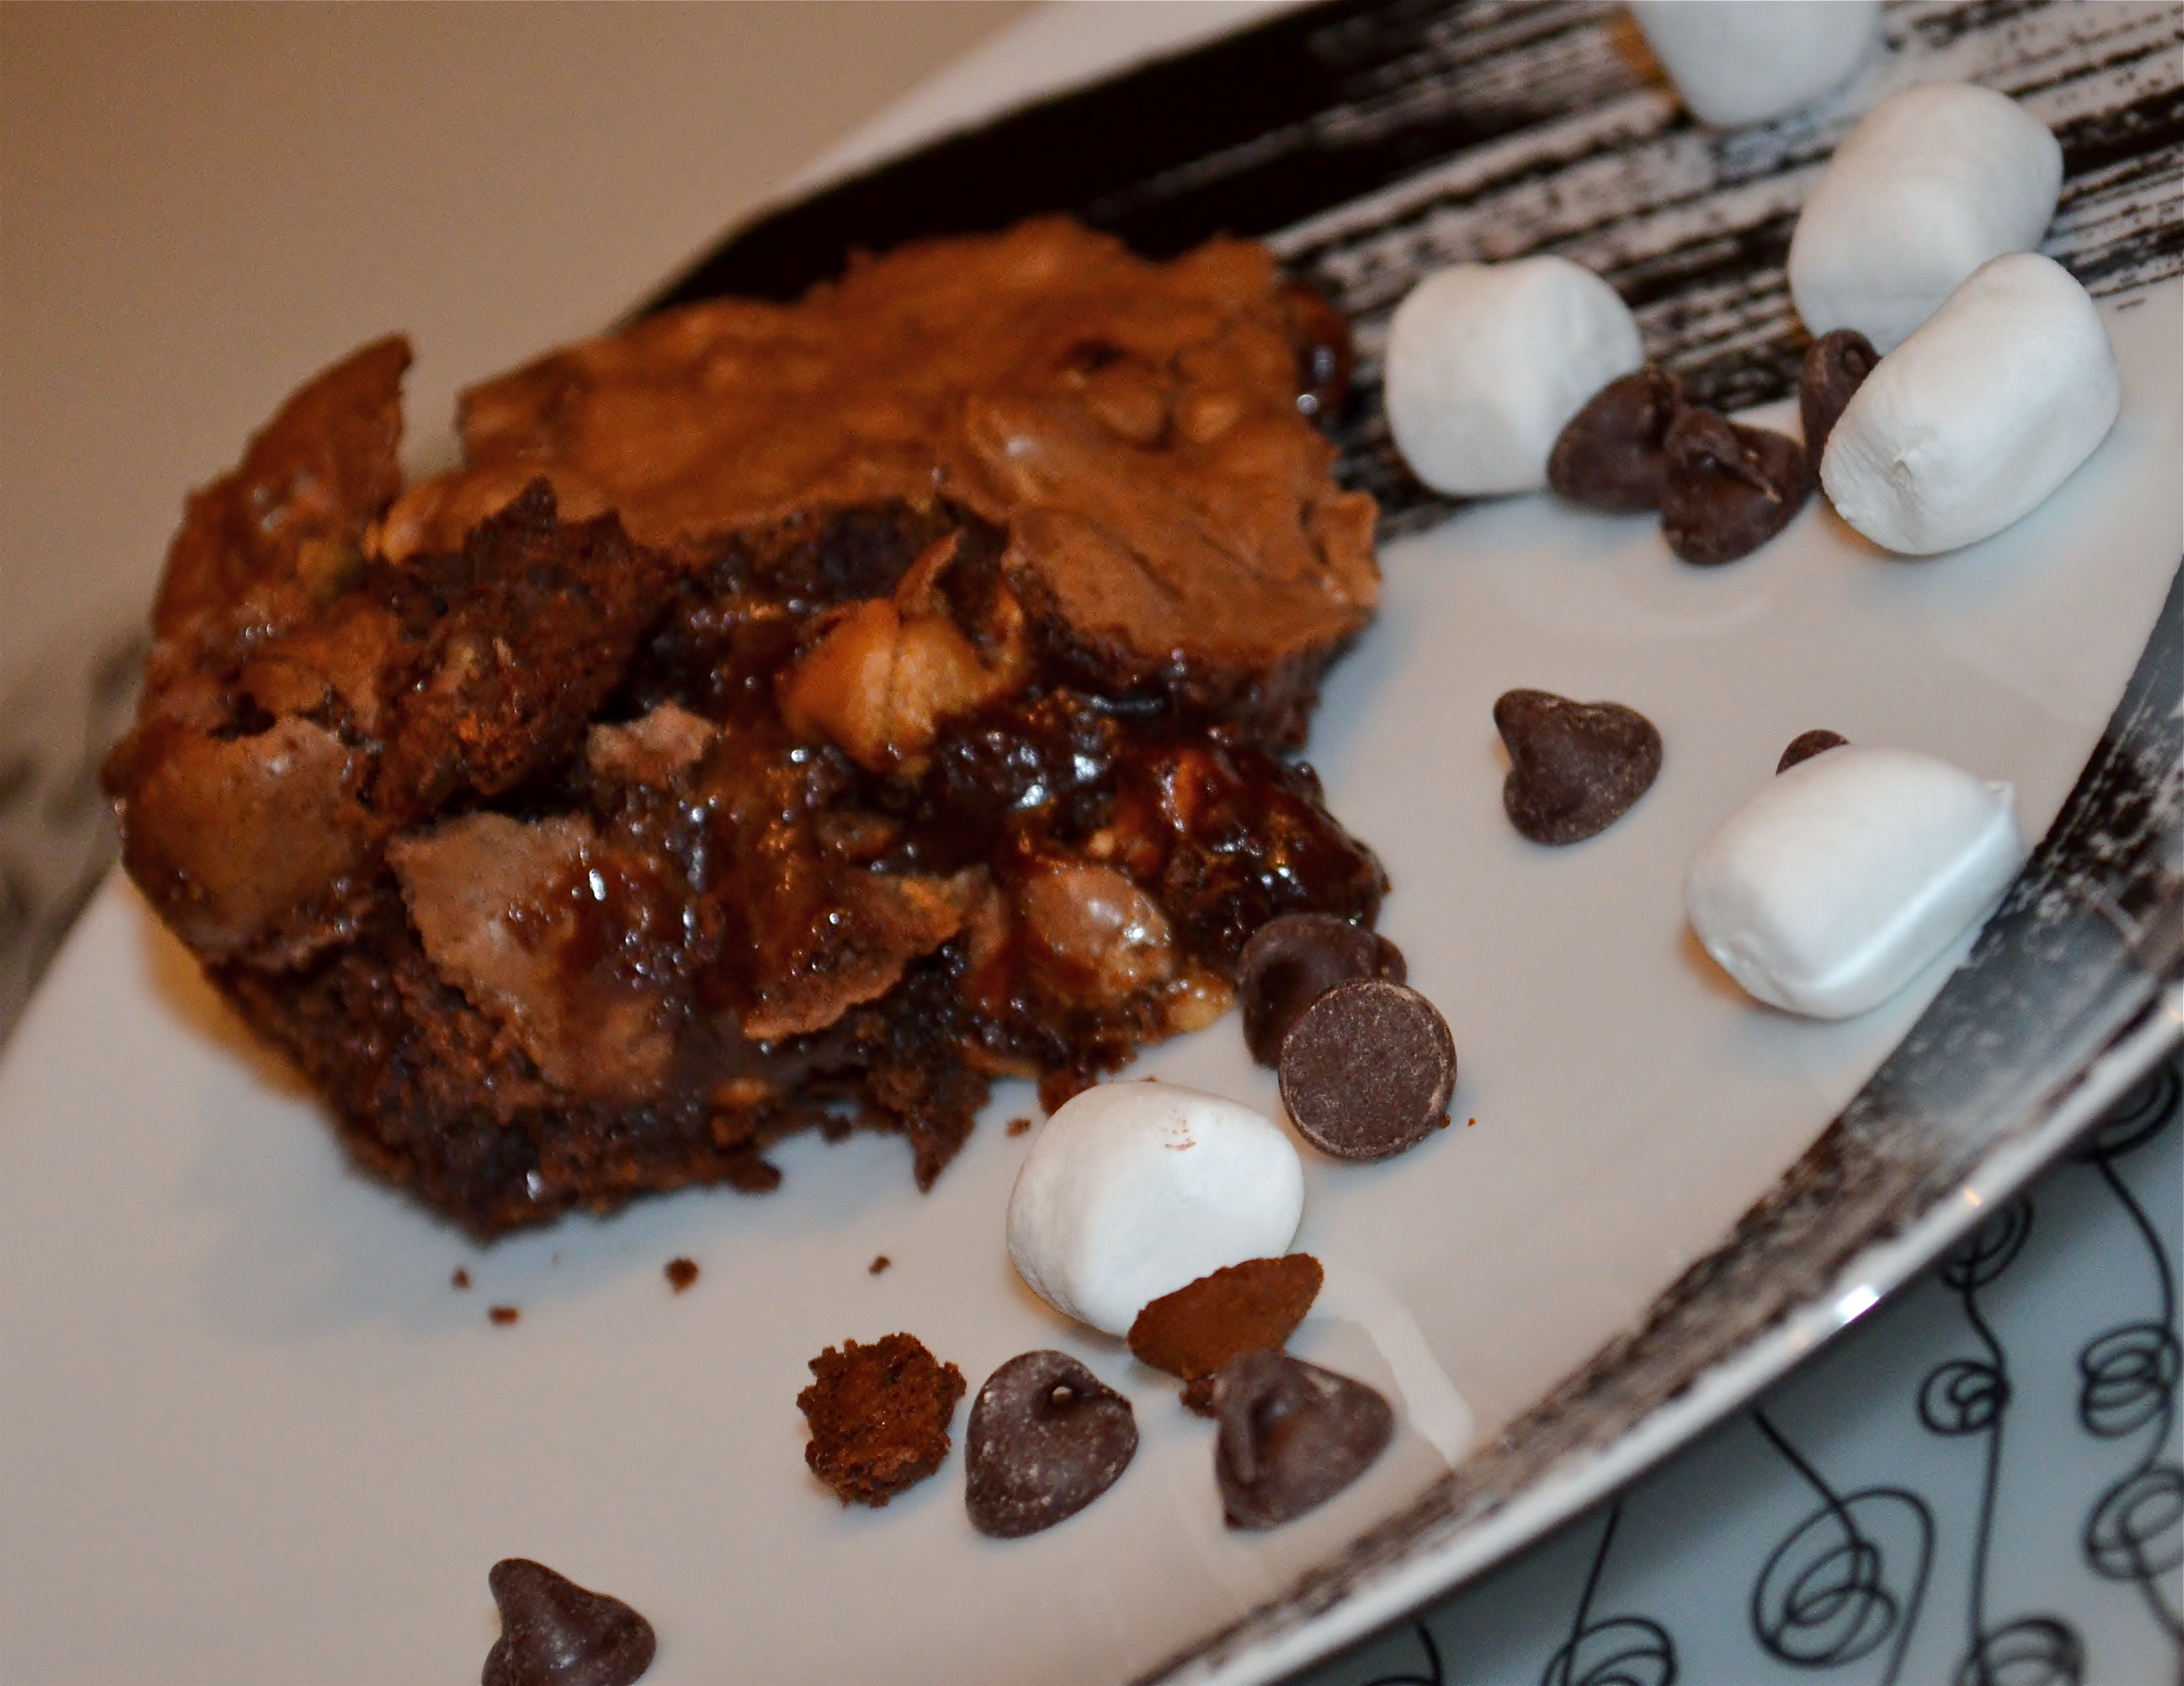
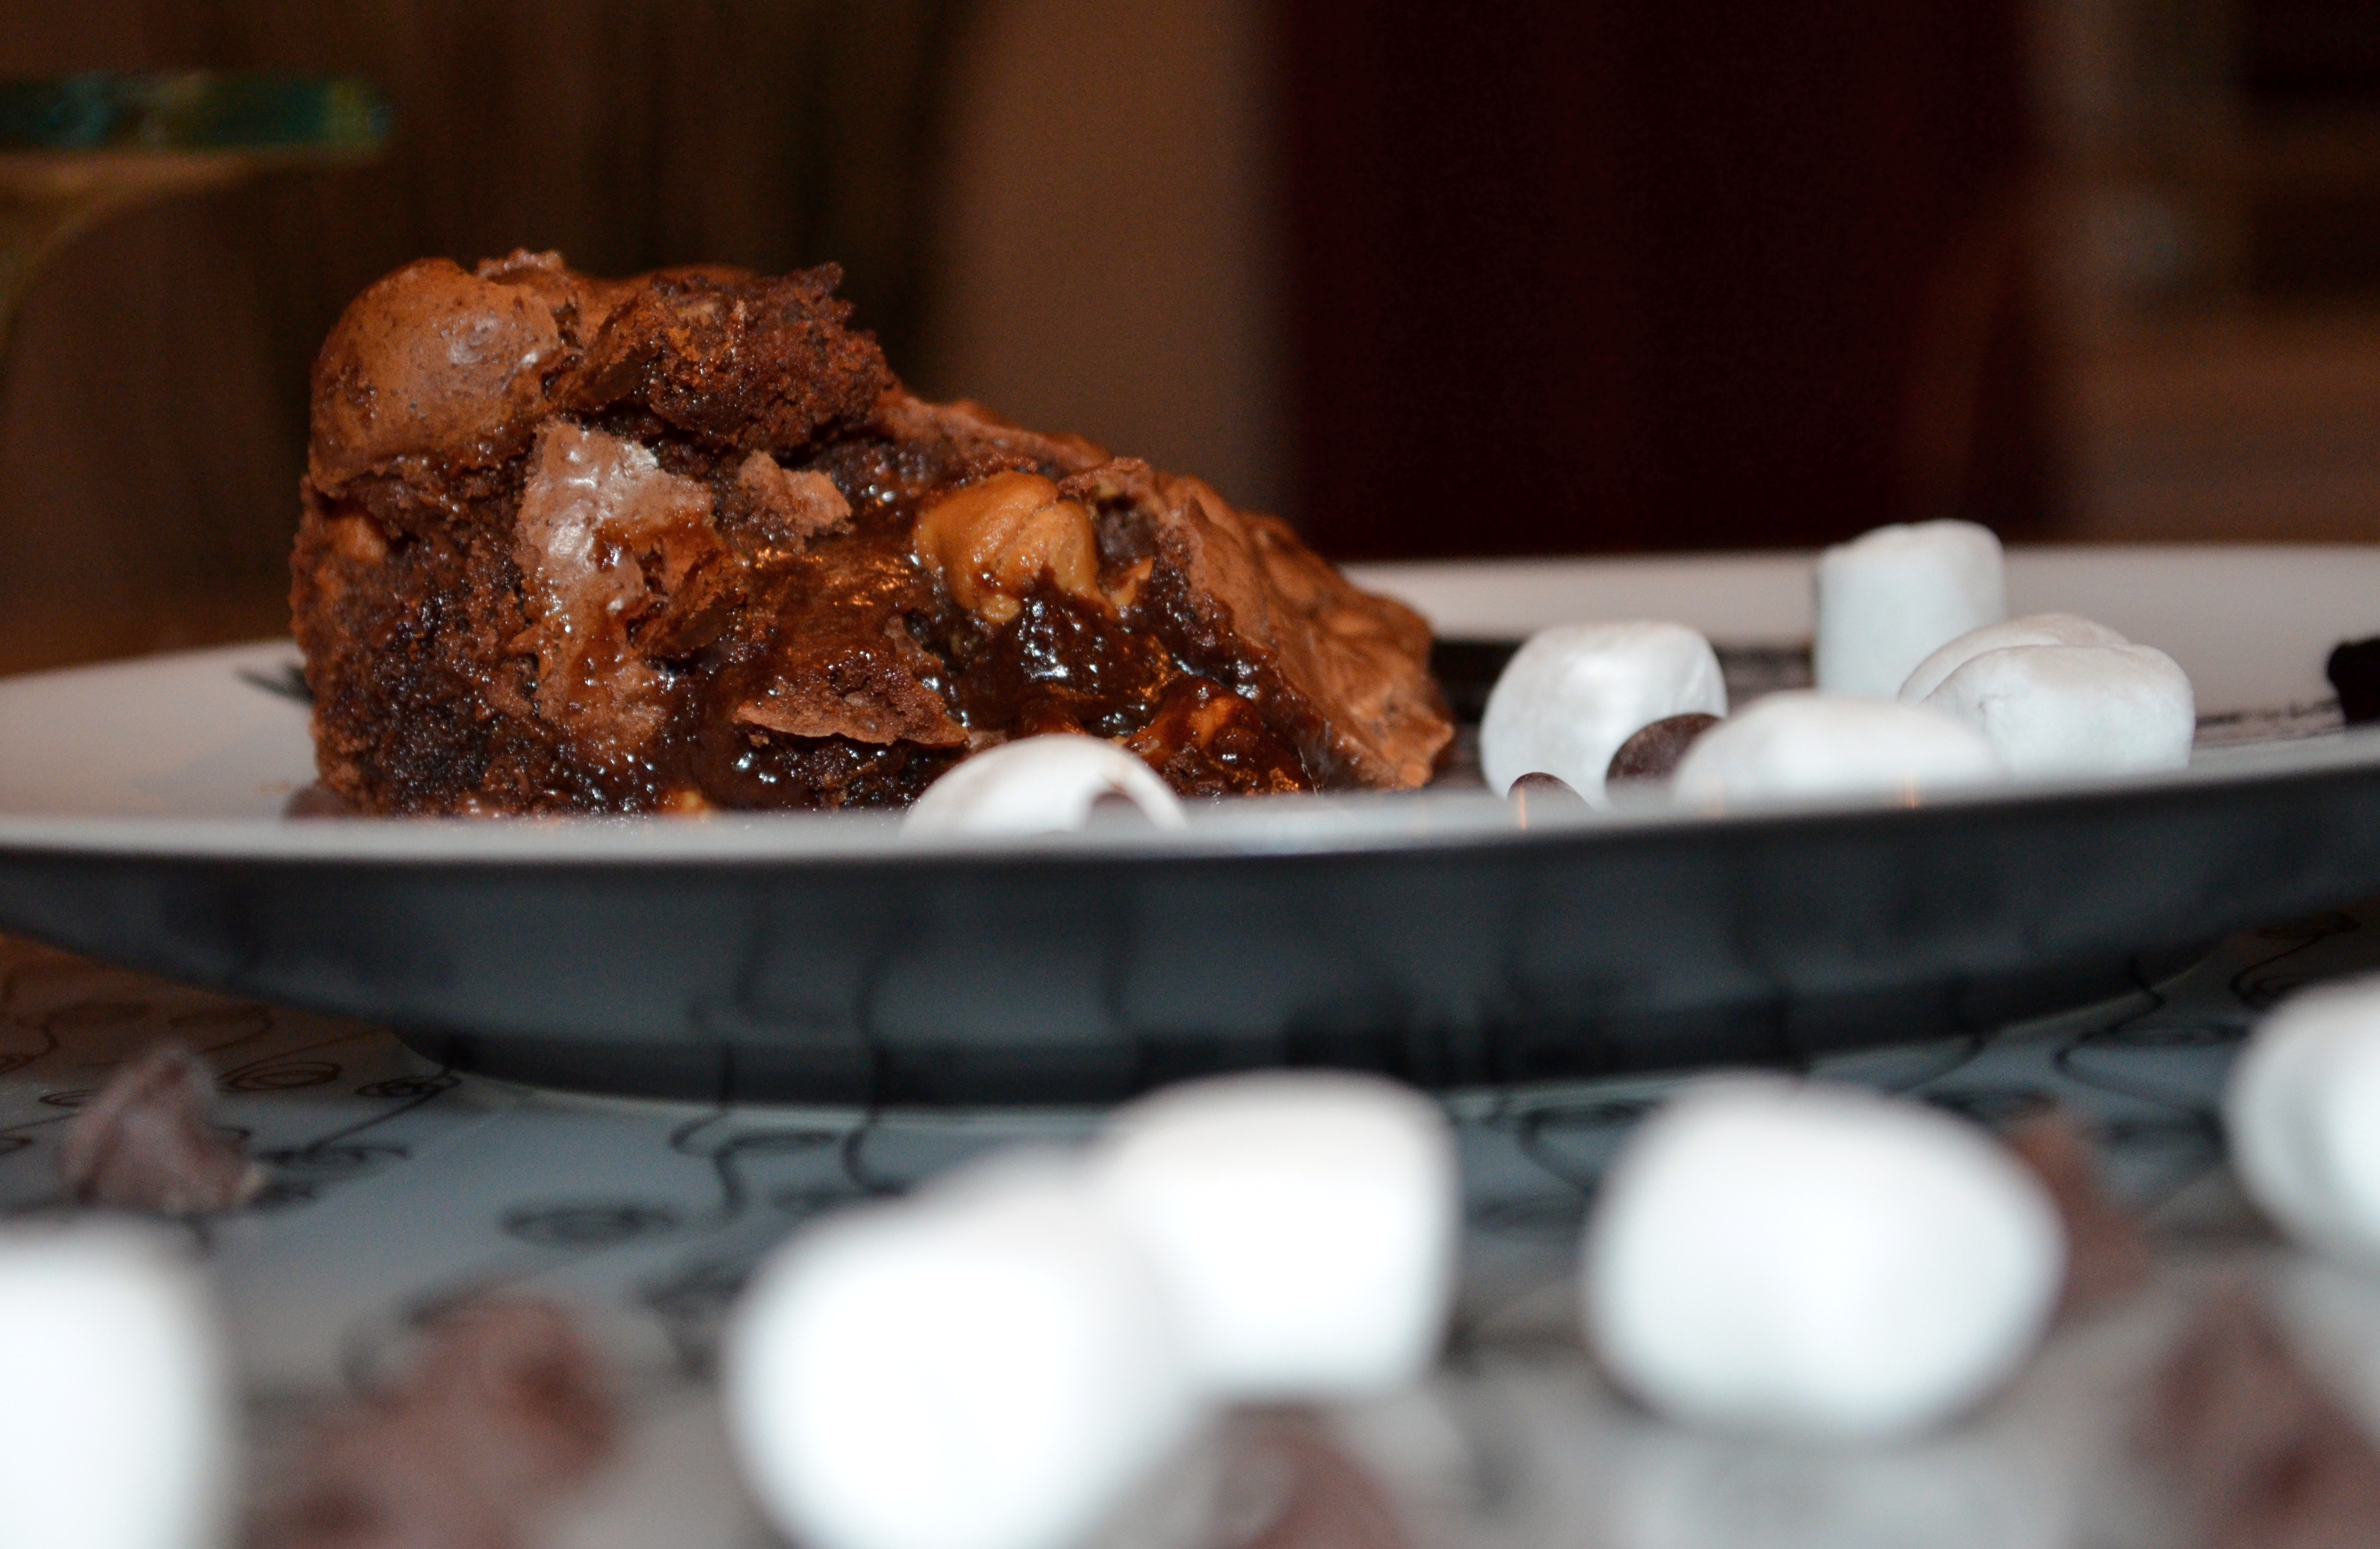
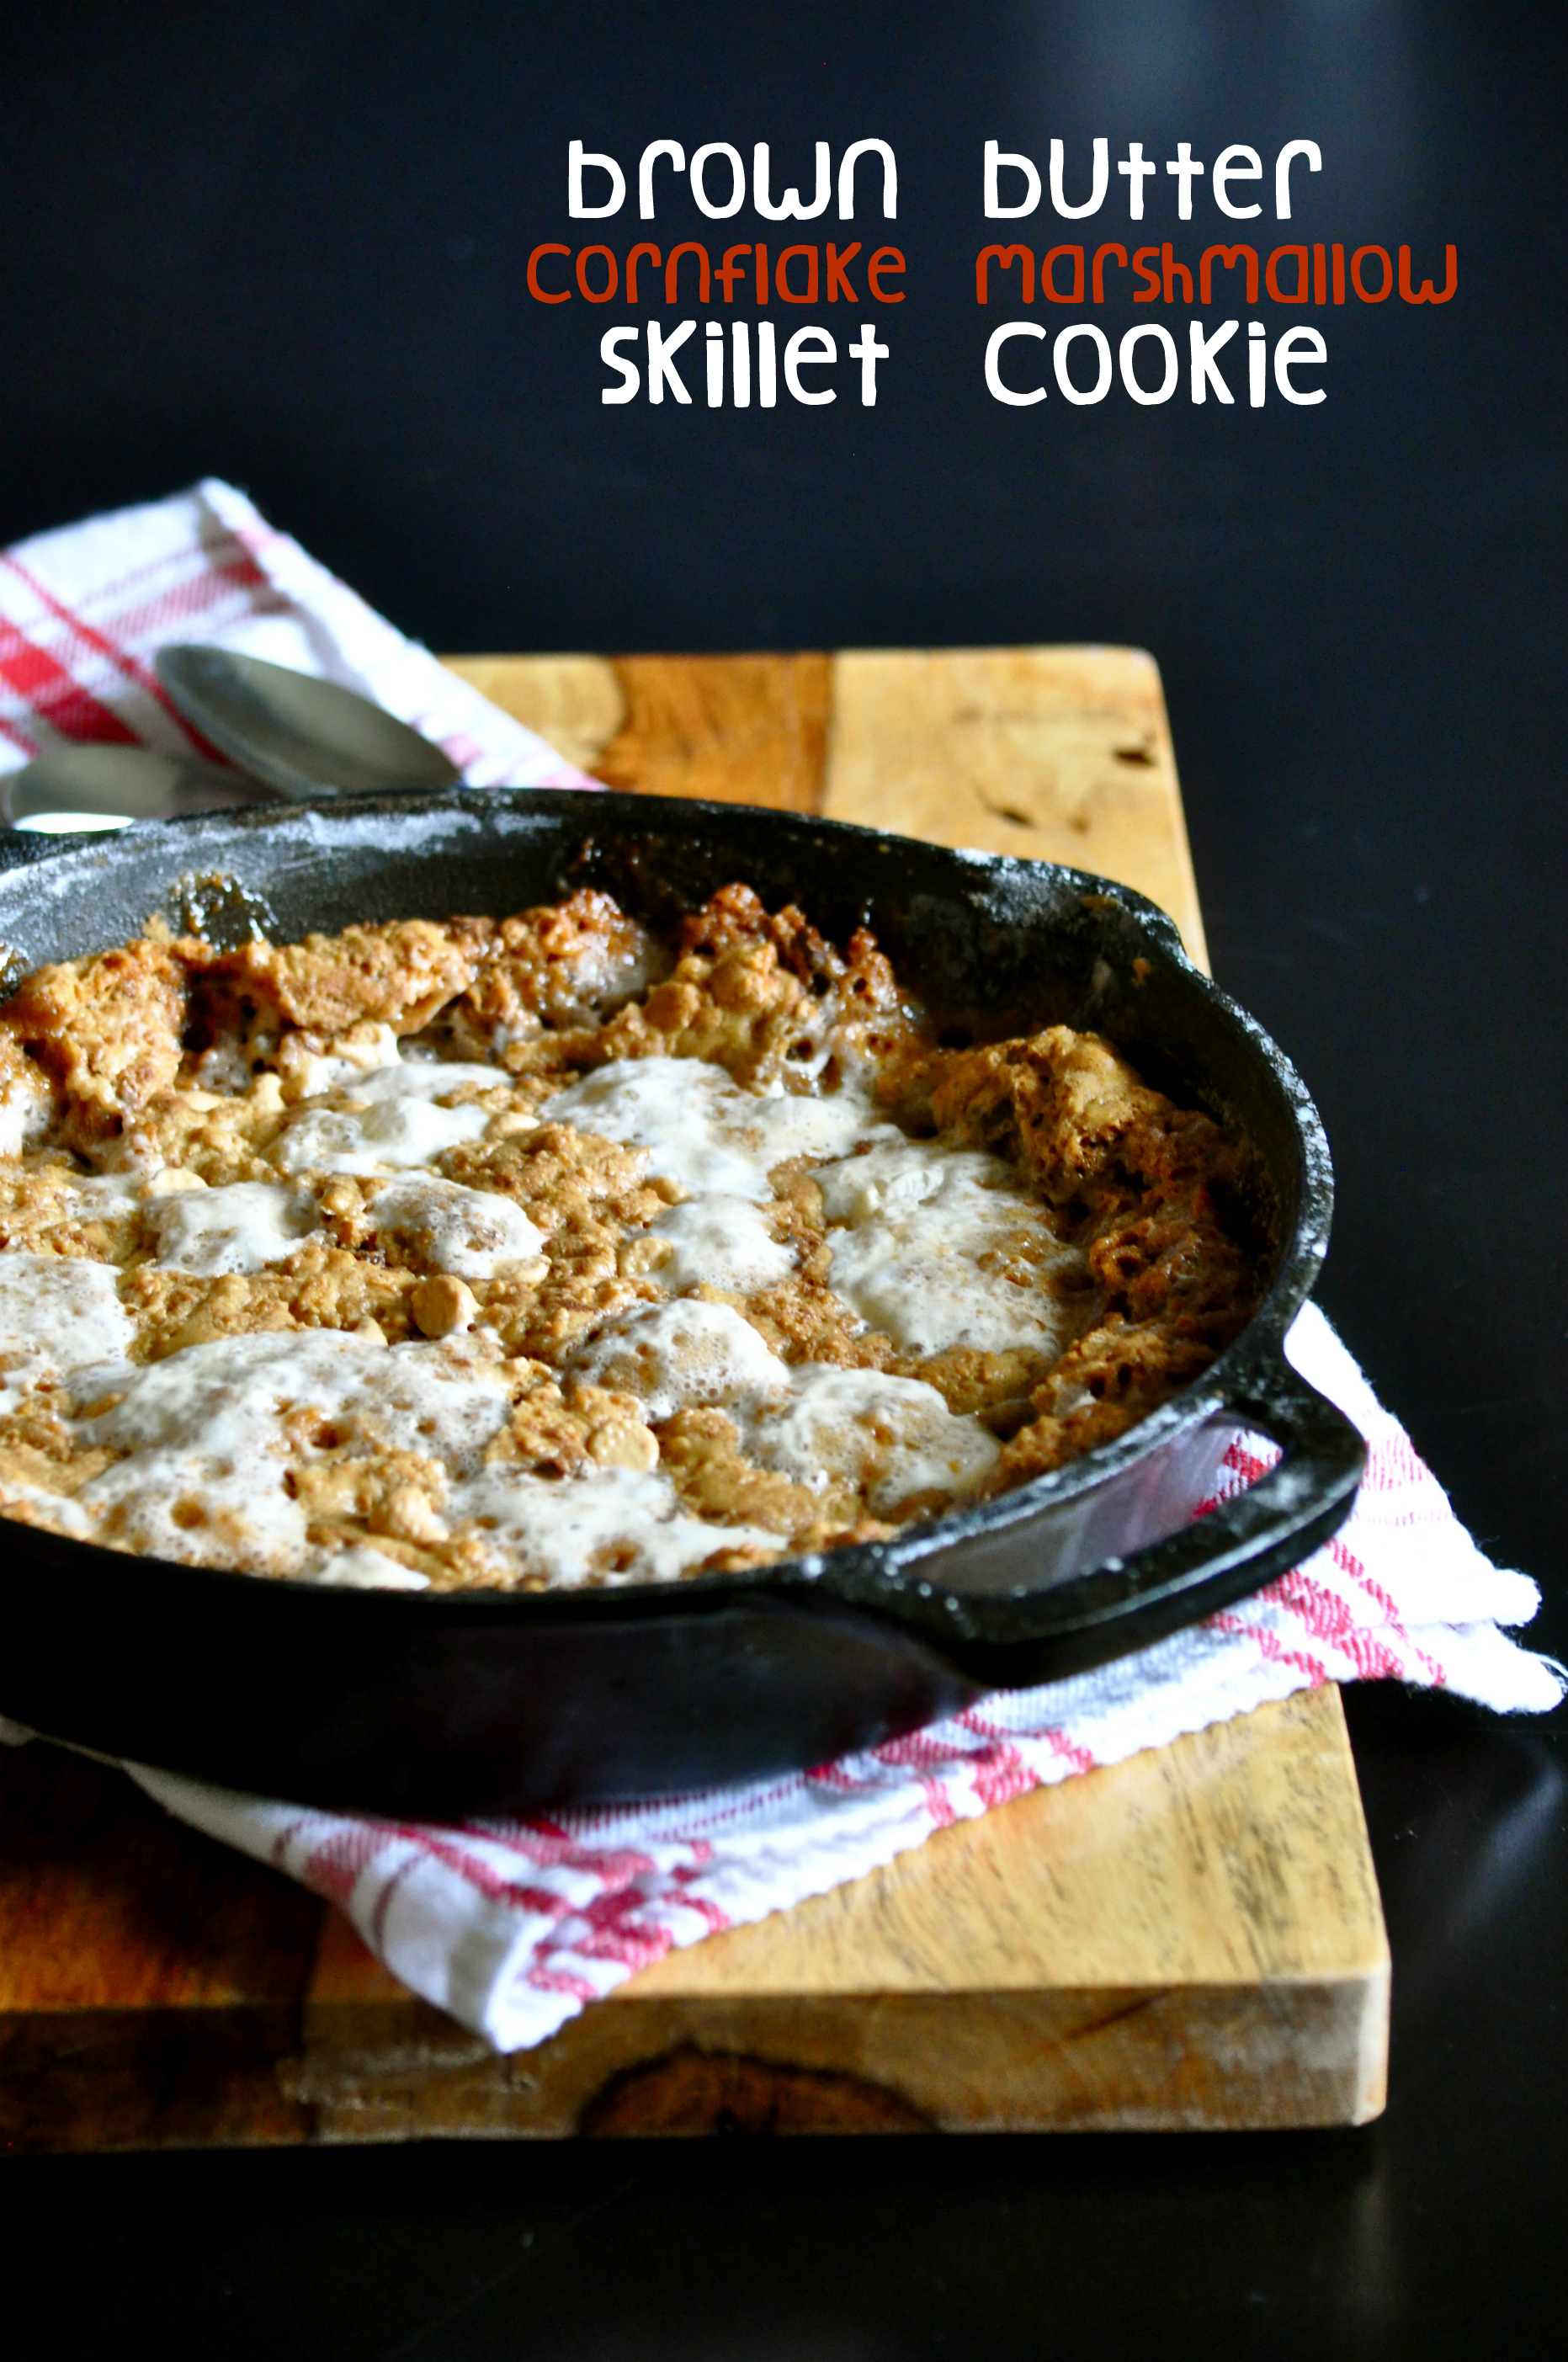
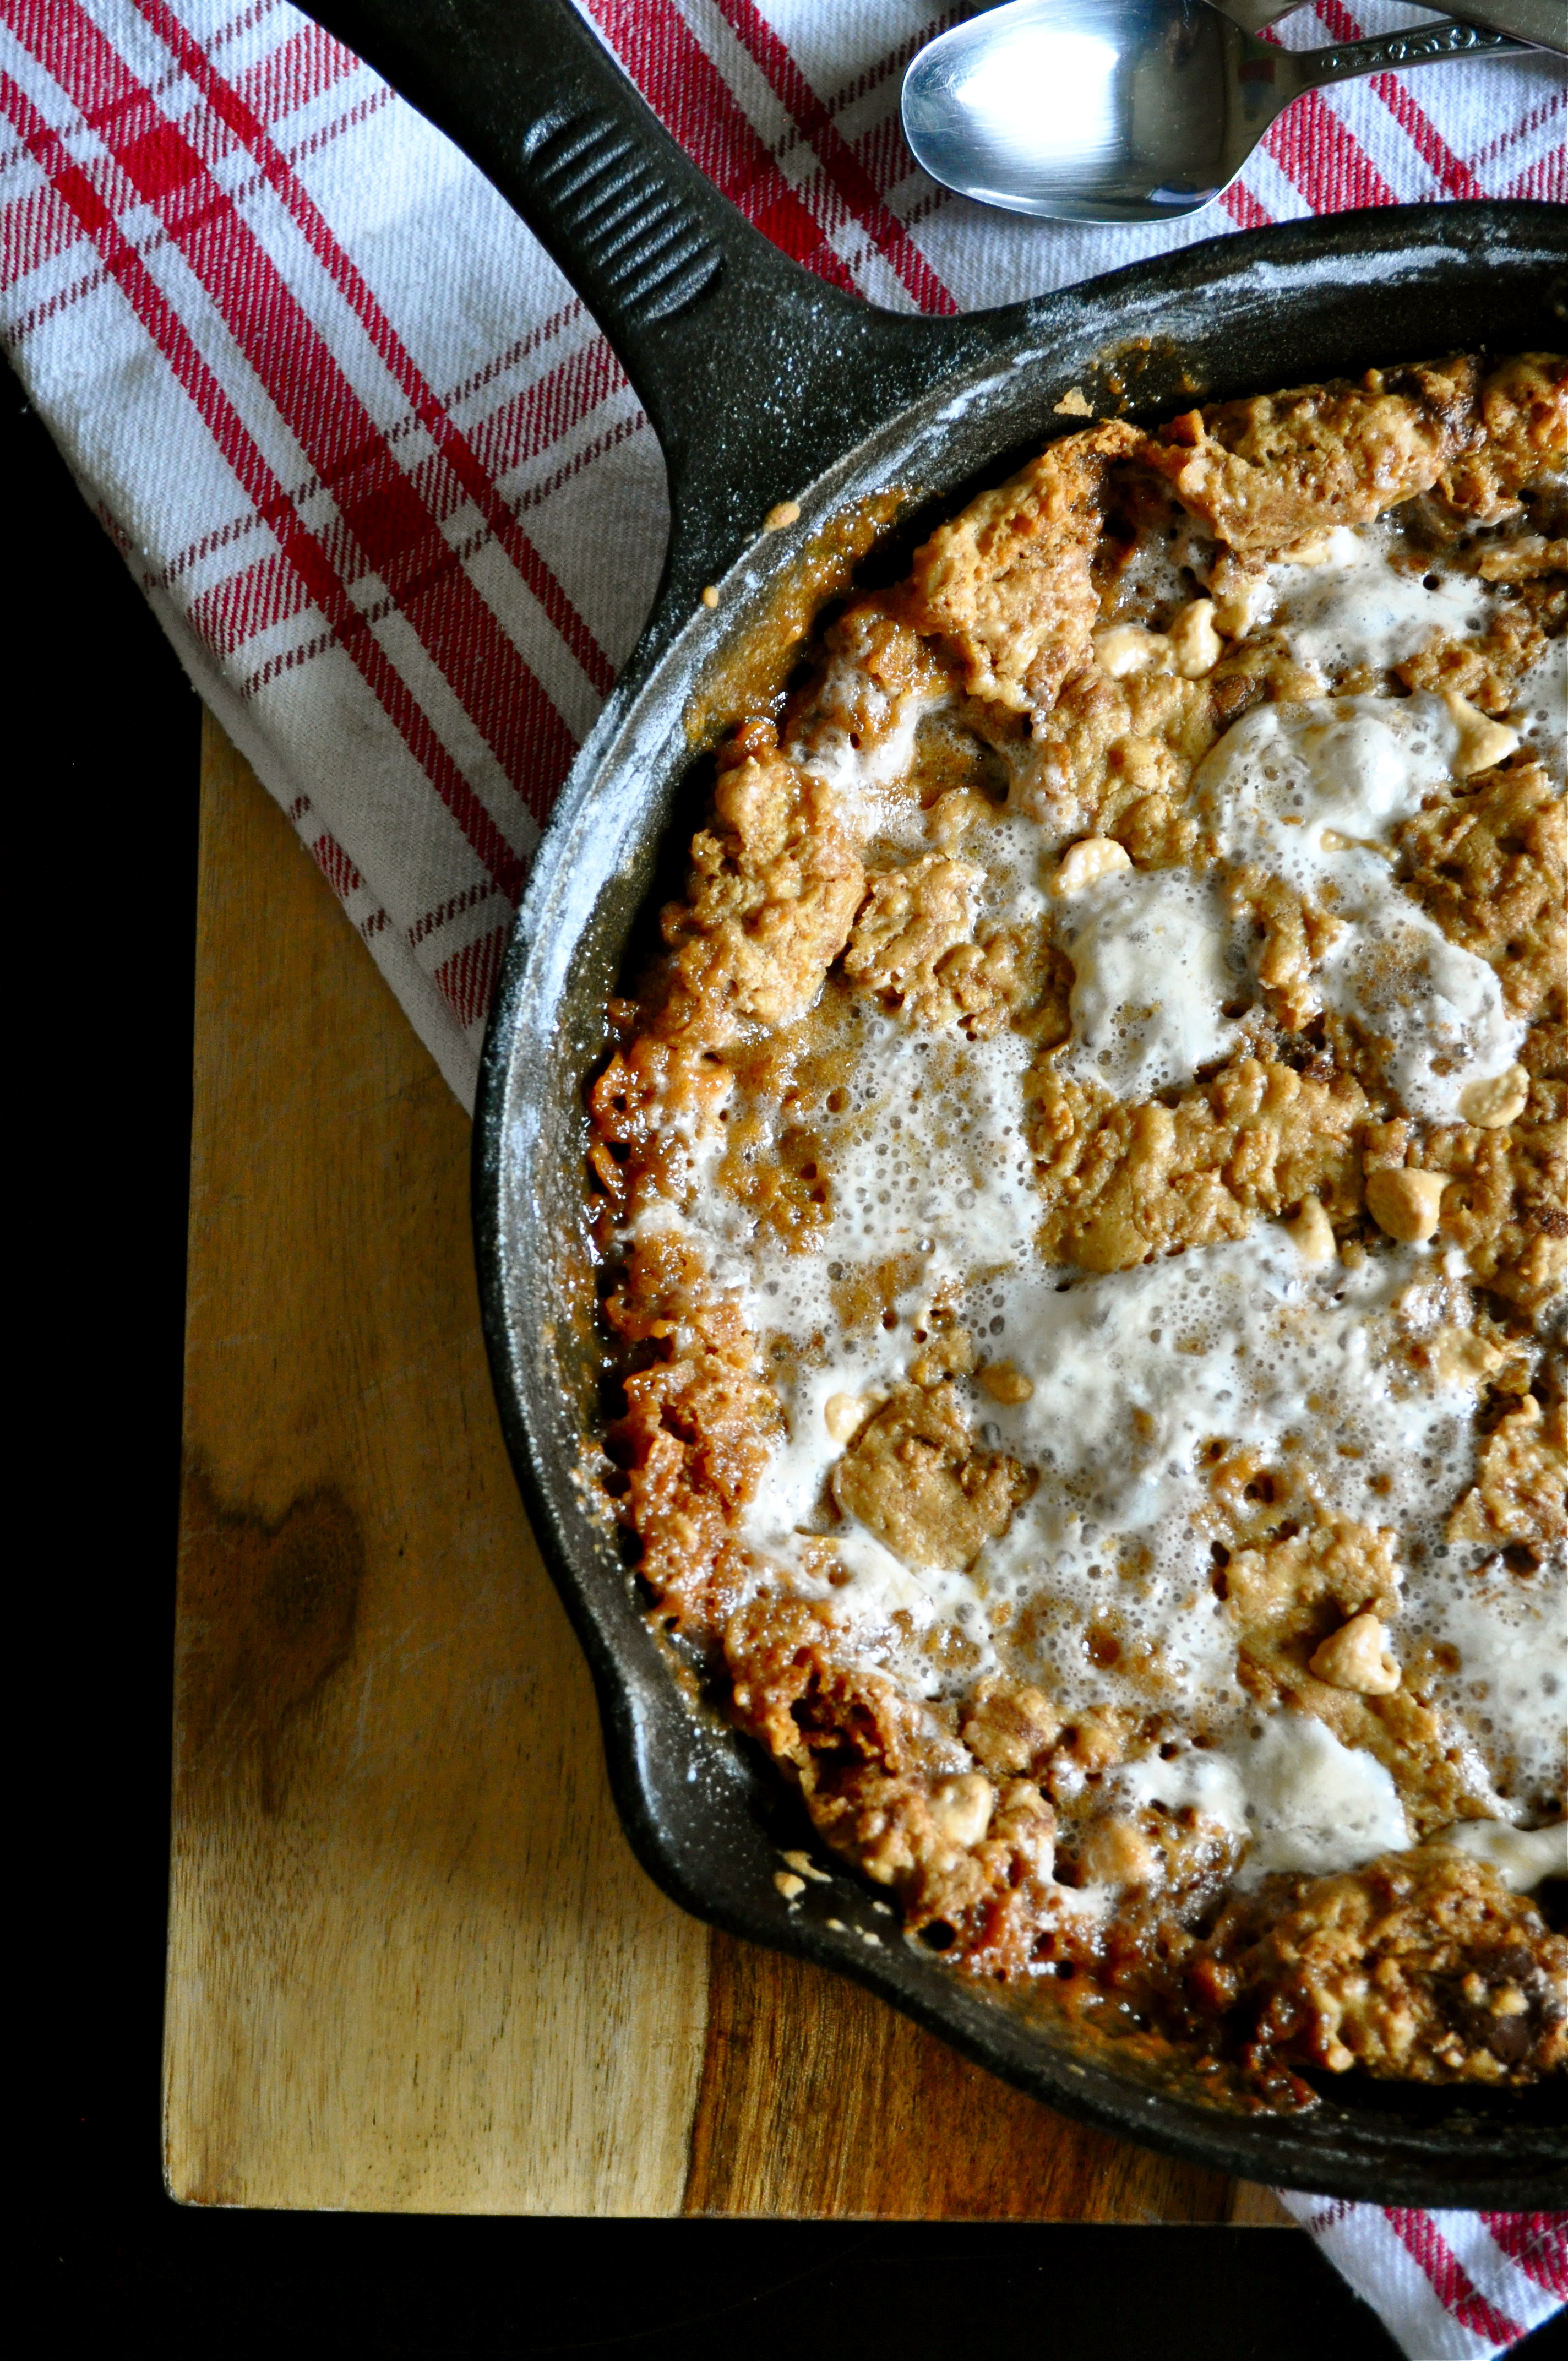
I’ve got a skillet cookie for yer face today! You’ve seen those cornflake marshmallow cookies from Momofuku Milk Bar around the interwebs, yes? The chewy, amazing, foodgasm-inducing, cornflake/chocolate/peanut butter chip/marshmallow-studded cookies as big as your hand. Yep, those are the ones.

Brown Butter Cornflake Marshmallow Skillet Cookie | Once Upon a Recipe

Well those cookies really are all they’re cracked up to be. In fact, they’re kind of like crack. Ridiculously addicting and really not good for you at all. Why is it that things that taste so good have to be so bad? You know me though – all about the balance. Eat some kale salad, go for a run, eat a skillet cookie. Yep, balance.

Brown Butter Cornflake Marshmallow Skillet Cookie | Once Upon a Recipe

Brown Butter Cornflake Marshmallow Skillet Cookie | Once Upon a Recipe

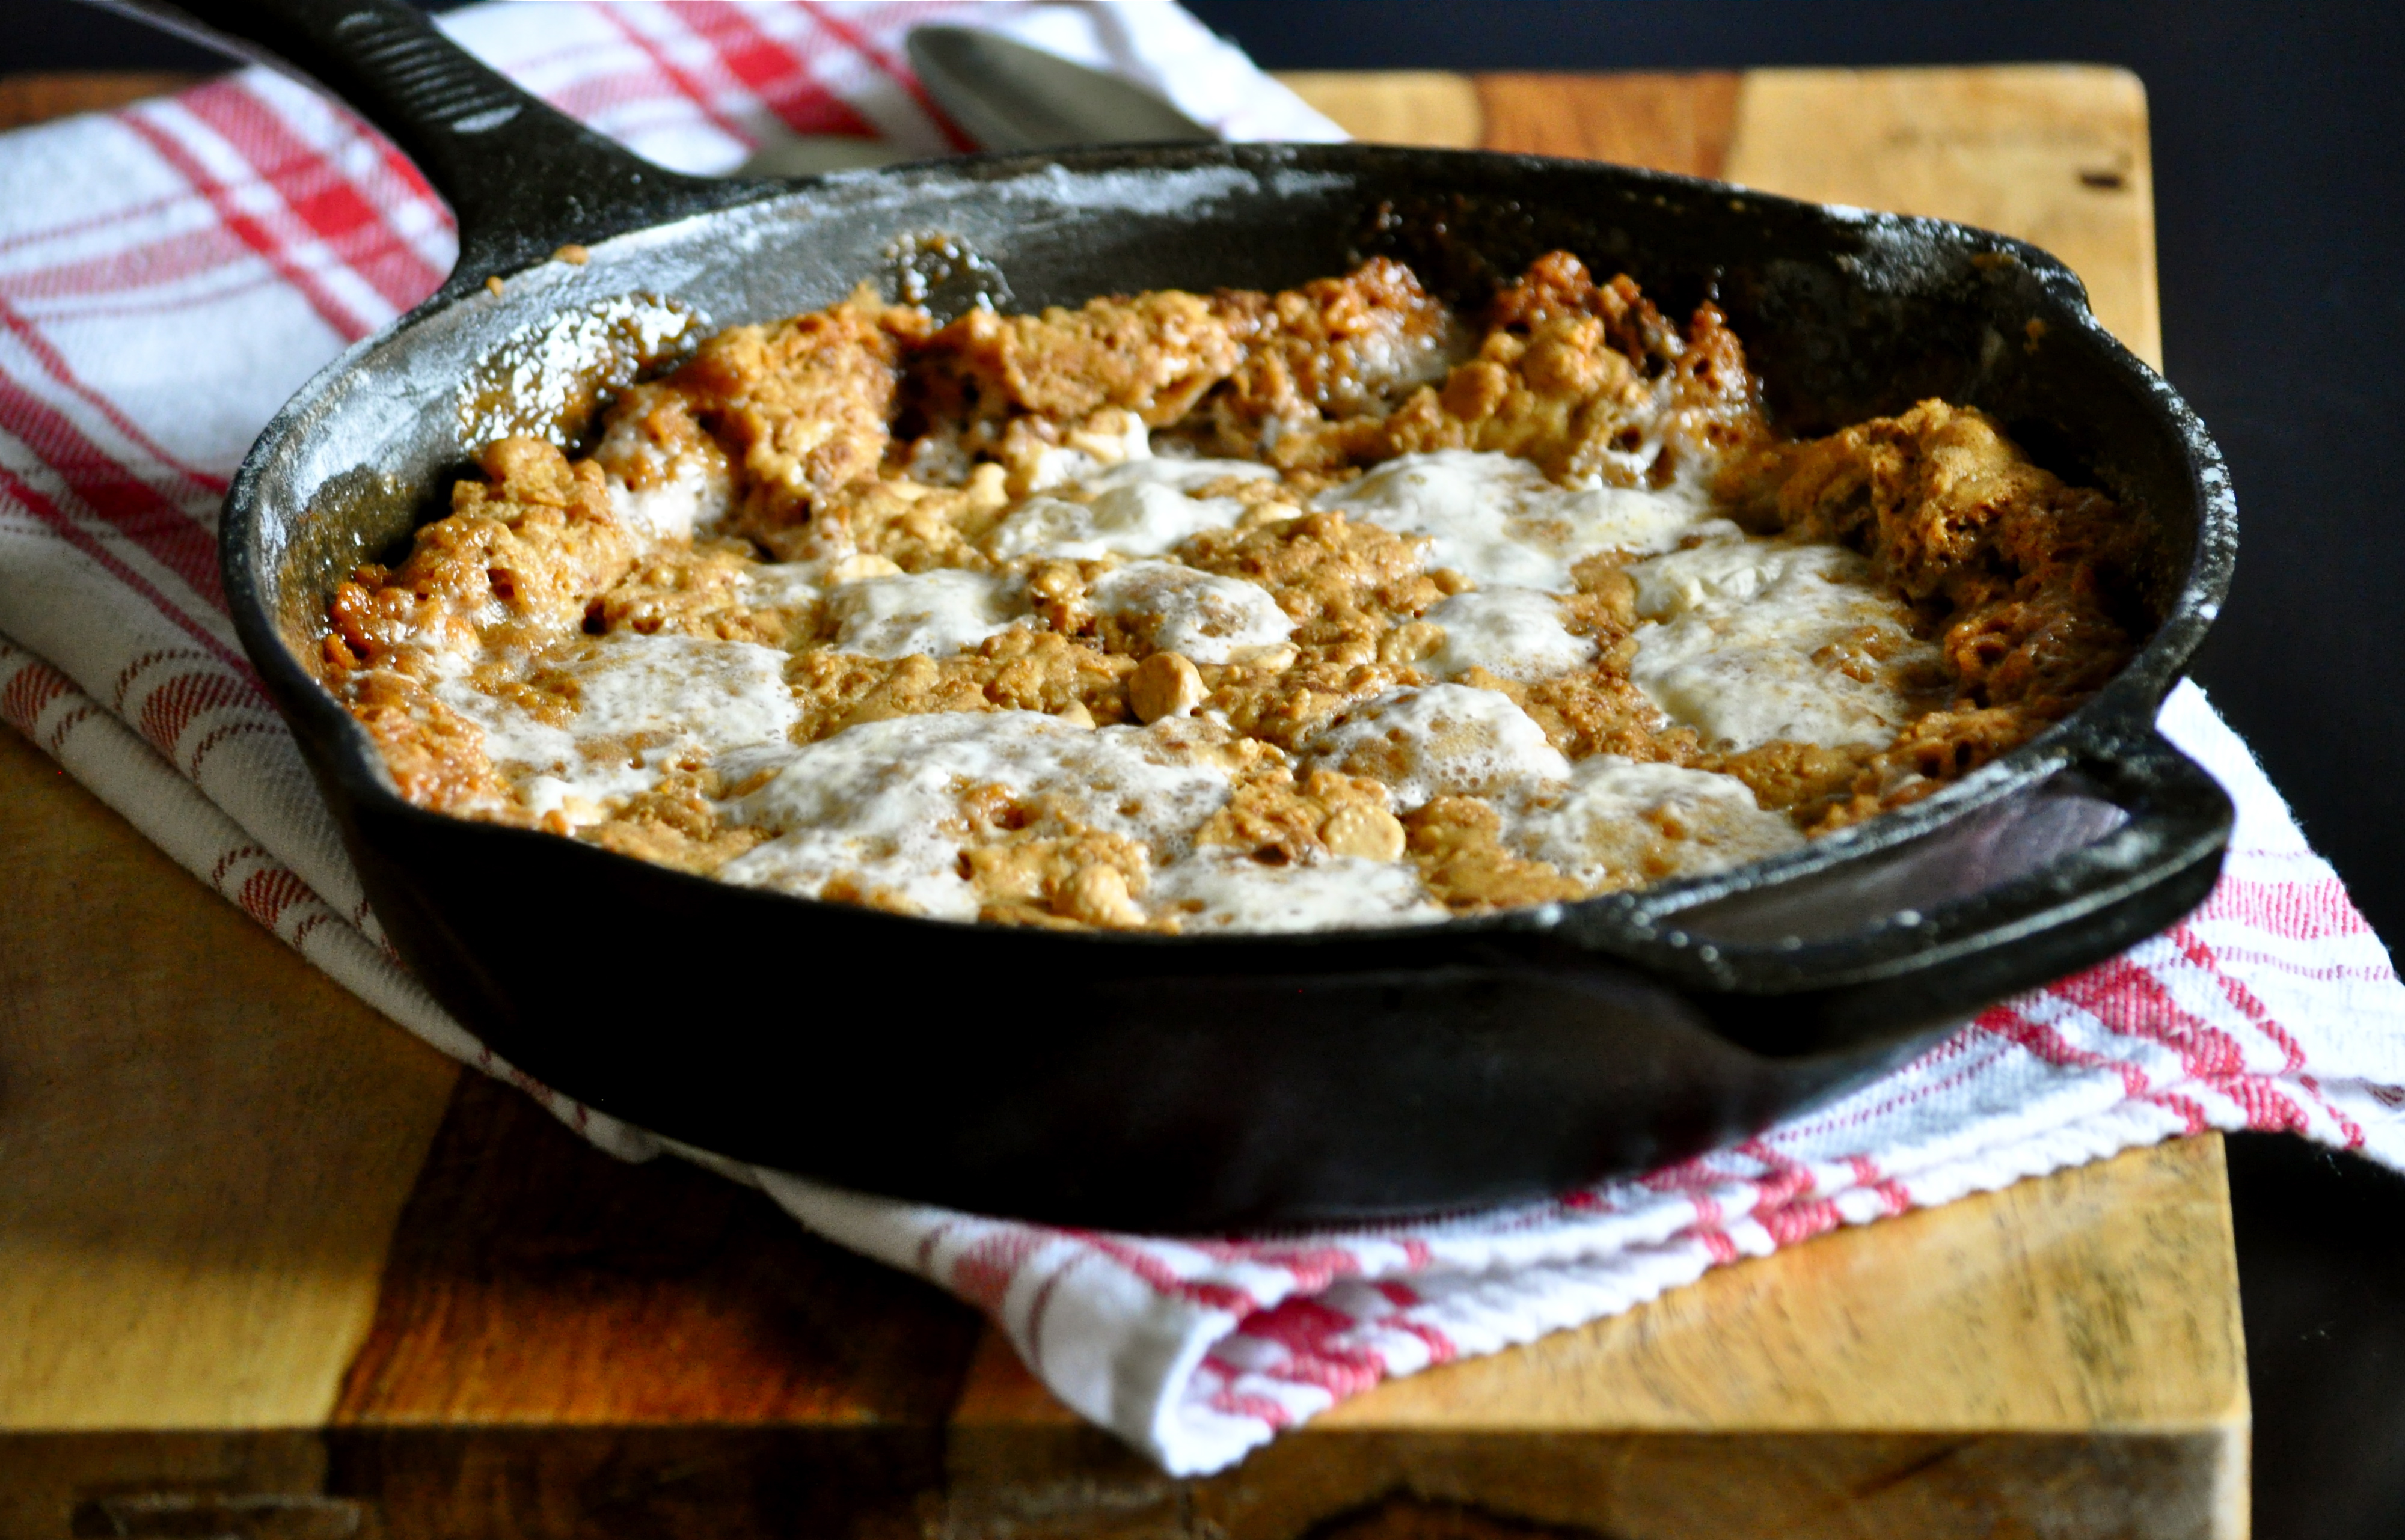
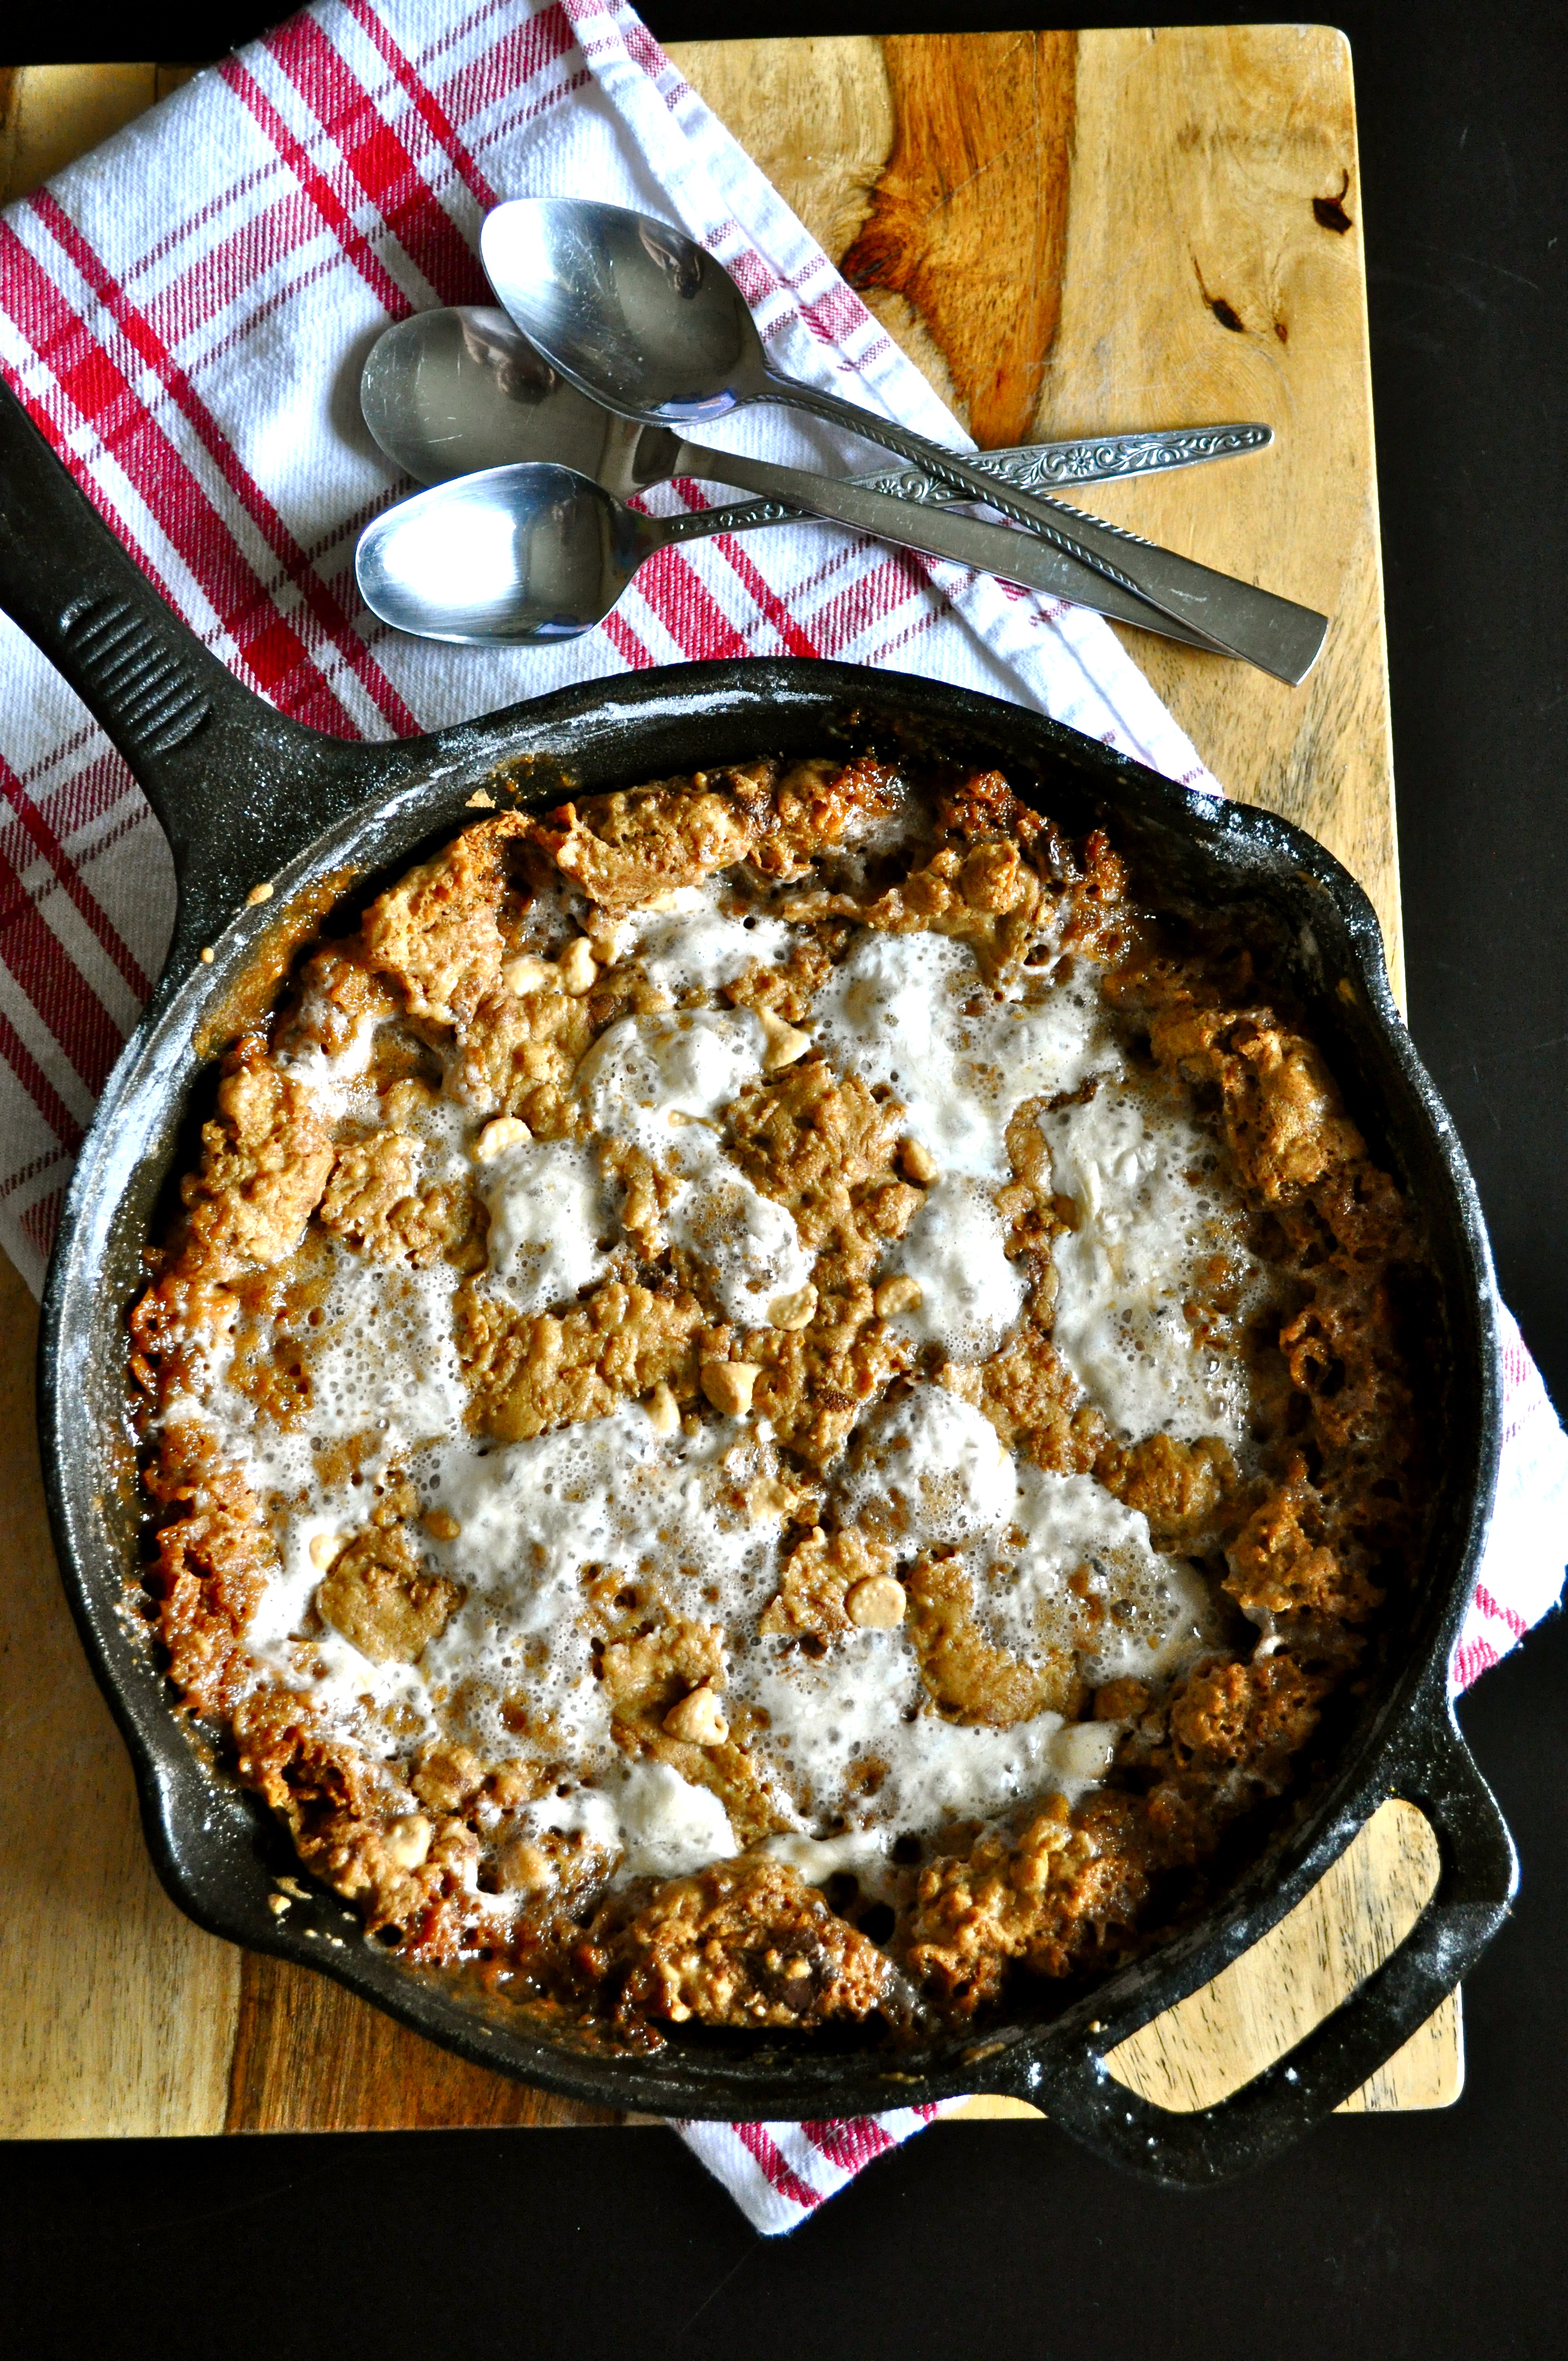
Basically I took that cookie and turned it into a no-bowl required skillet cookie. Skillet cookies are my jam. I mean seriously, a big, warm, gooey cookie that is best served with good friends and many spoons – it doesn’t get much better. And I browned my butter, ’cause brown butter is still the cat’s meow. Annnnddd, it’s ready in about 30 minutes. So grab a few of your faves, throw this bad boy in the oven, and dig in! Treat yo’ self!

Brown Butter Cornflake Marshmallow Skillet Cookie | Once Upon a Recipe

Brown Butter Cornflake Marshmallow Skillet Cookie (adapted from Shutterbean, which was adapted from Momofuku Milk Bar)

A gooey skillet cookie full of cornflakes, dark chocolate, peanut butter chips, and marshmallows. No bowl required! Serves as few or as many as you want! 

1/2 cup (1 stick) unsalted butter
1/2 cup granulated sugar
1/3 cup brown sugar, packed
1 large egg
1/2 tsp. vanilla
3/4 cup all-purpose flour
1/4 tsp. sea salt
1/2 teaspoon baking powder
1/4 teaspoon baking soda
1 1/2 cups cornflakes
2 TBSP. dark chocolate, chopped
2 TBSP. peanut butter chips
3/4 cup mini marshmallows

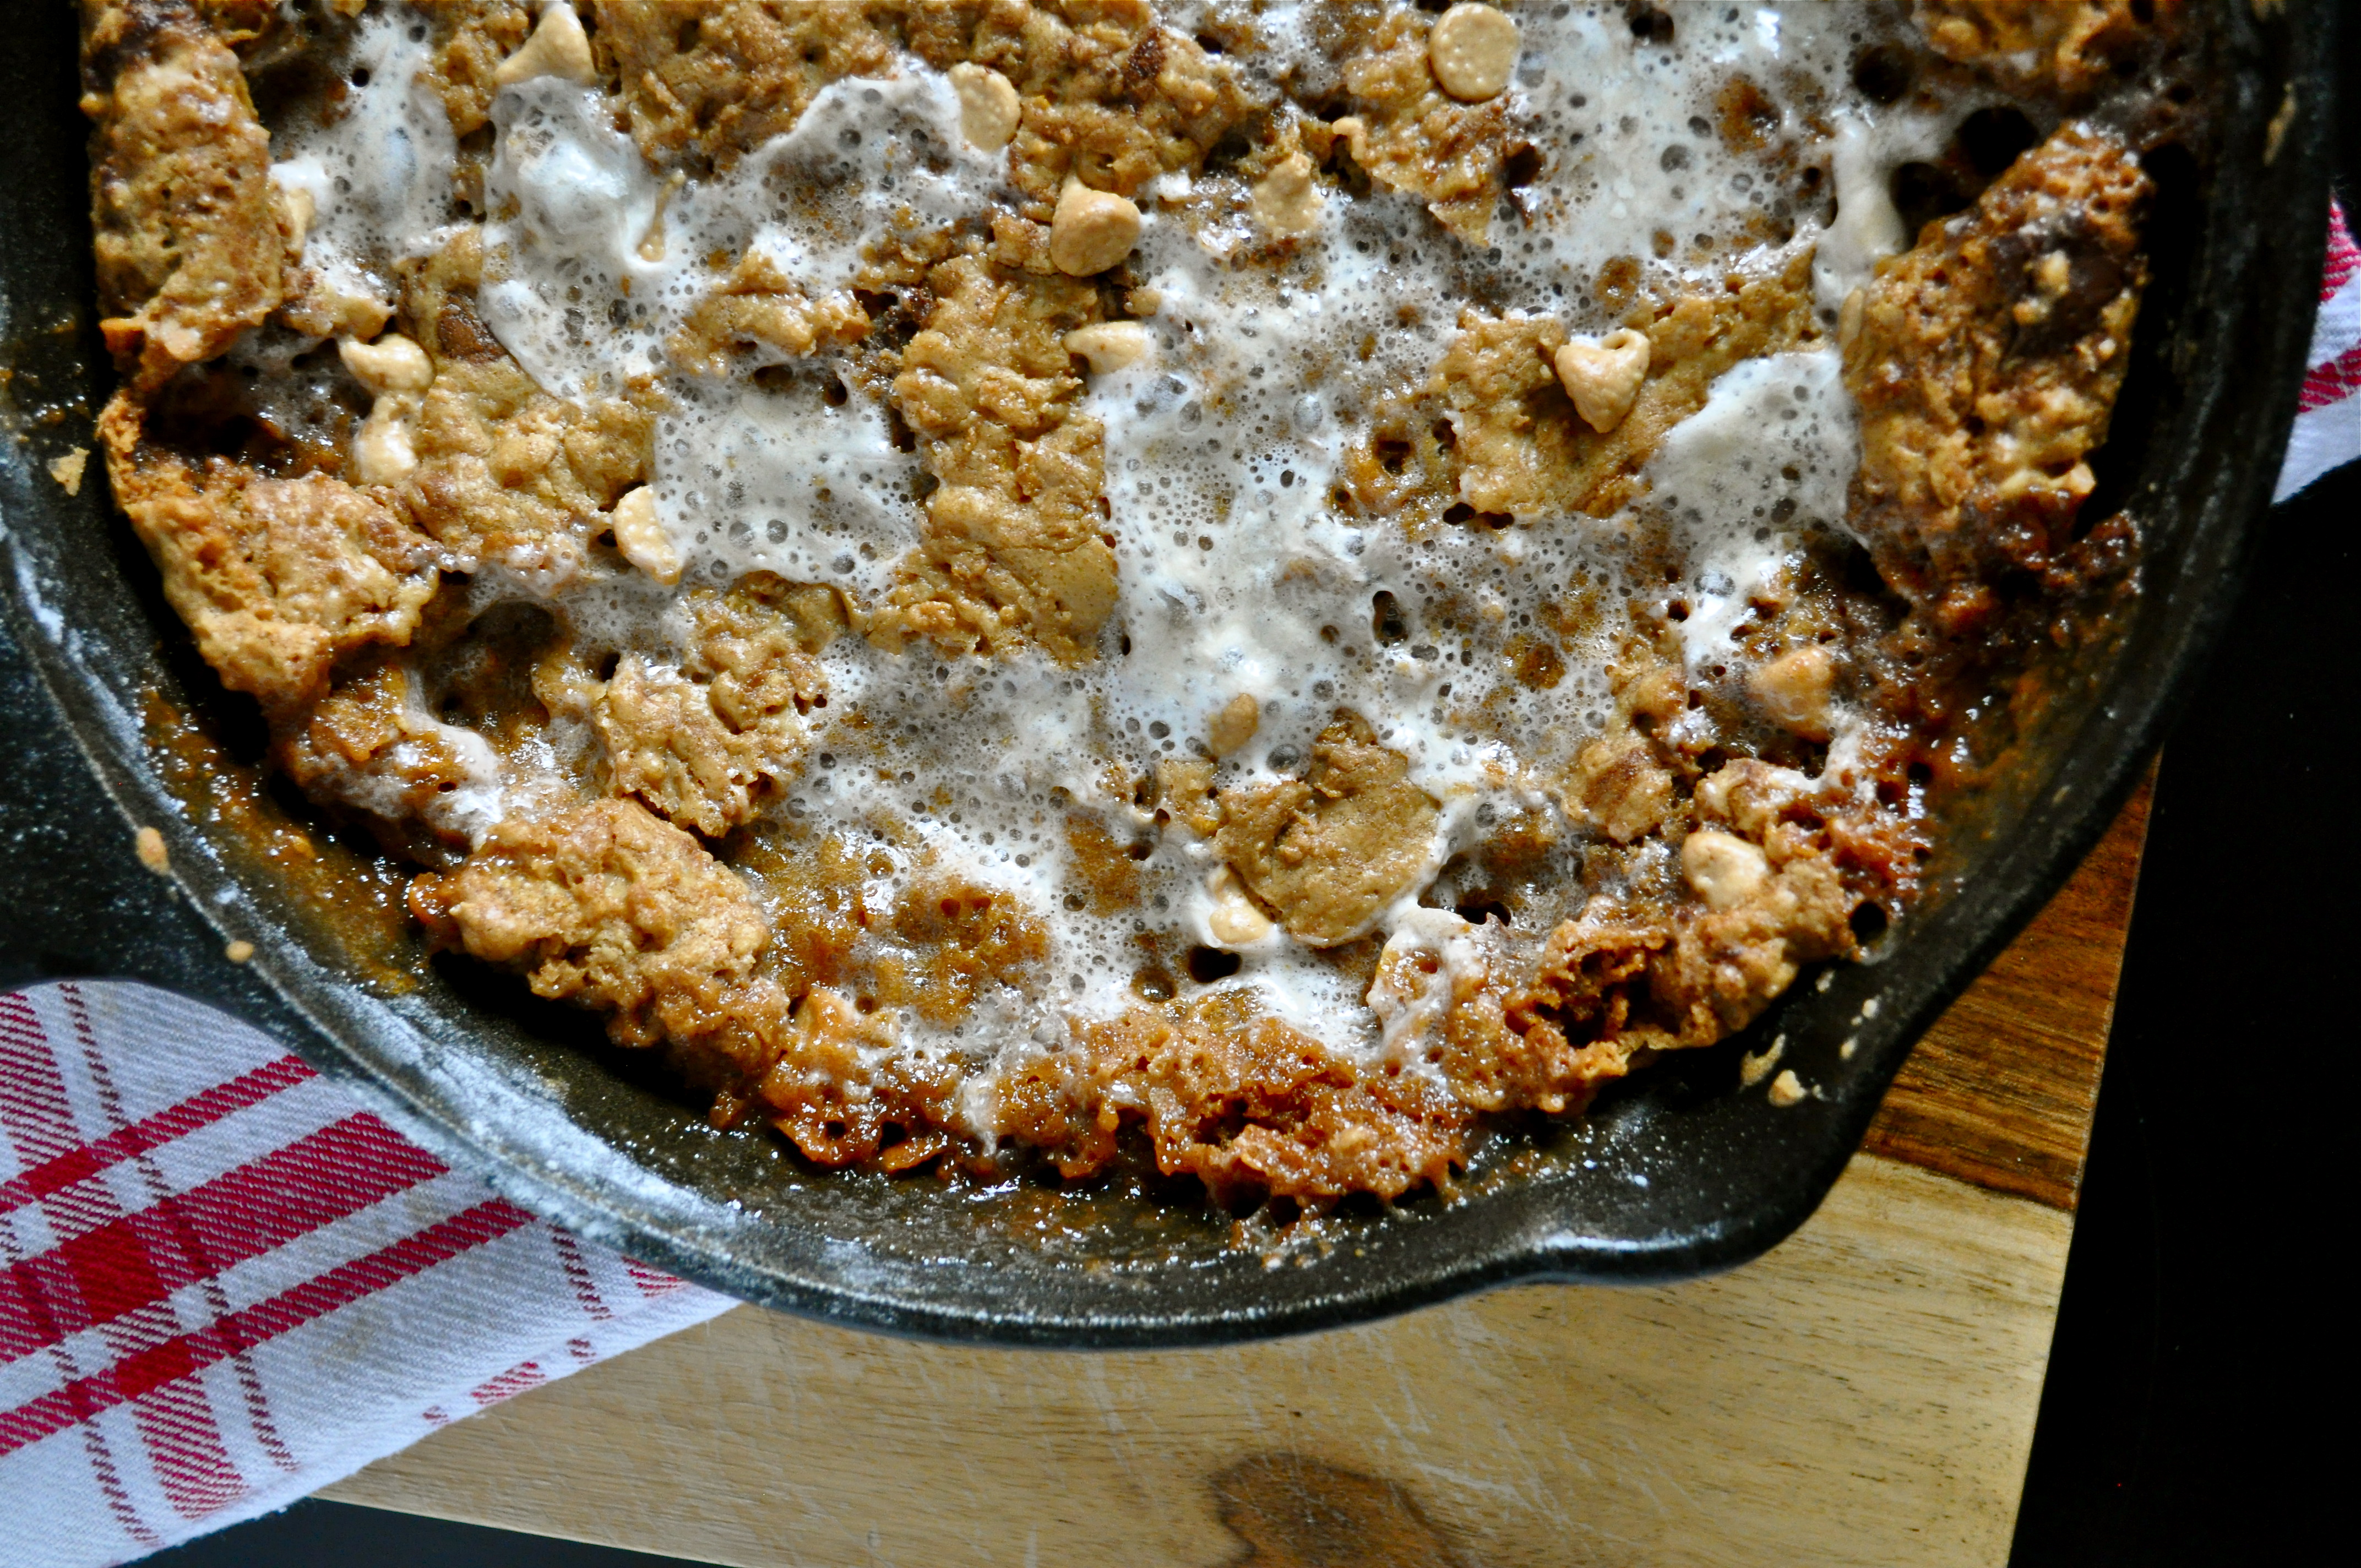
Preheat oven to 350°F. Place the butter in a 10-inch cast iron skillet over medium heat. Melt and brown the butter, stirring until golden brown and fragrant (about 5-7 minutes). Remove from heat. Add the sugars and mix well. Add the egg and vanilla and stir. Add the flour, salt, baking powder, and baking soda and mix well. Fold in the cornflakes, chocolate, and peanut butter chips. Spread the batter out evenly in the skillet. Sprinkle with marshmallows. Bake for  20-25 minutes, or until golden brown. Don’t over bake, as the goal is a gooey cookie! Allow to cool slightly and then eat straight out of the skillet. Bliss!

Brown Butter Cornflake Marshmallow Skillet Cookie | Once Upon a Recipe

Chocolate Peanut Butter Banana & Cookie Chunk Ice Cream

Chocolate Peanut Butter Banana & Cookie Chunk Ice Cream | Once Upon a Recipe

Friends! Hello! How are you?

Please forgive me for my absence over the past few weeks. Things got a little hectic there for a while, I got a little tired, and this ol’ blog was forced to the back burner for a wee time. But, I spent the weekend in the kitchen and I have a batch of recipes to share with you, so let’s get to it!

Chocolate Peanut Butter Banana & Cookie Chunk Ice Cream | Once Upon a Recipe

http://www.onceuponarecipeblog.com/2013/12/the-great-food-blogger-cookie-swap-nutella-and-rolo-stuffed-double-chocolate-chip-cookies/

This ice cream. Oh, this ice cream.

I’m no purist when it comes to ice cream. I like my ice cream trashy. Full of different flavors and textures, especially big chunks of chewy cookie. I may or may not dig around in the container in search of the chunky bits. Except that I totally do. This ice cream has a creamy chocolate base that gets all trashed up with swirls of peanut butter and chunks of banana and chocolate cookies. I mean?!

Chocolate Peanut Butter Banana & Cookie Chunk Ice Cream | Once Upon a Recipe

Chocolate Peanut Butter Banana & Cookie Chunk Ice Cream | Once Upon a Recipe

Let’s just say that after having my first taste of this ice cream, I promptly shared it with anyone who was willing to eat it, simply so that I wouldn’t devour the whole thing myself.

Despite the fact that we’re dealing with more cold temperatures and another round of snow, I know that Spring is around the corner somewhere. So I’m just going to keep making ice cream and margaritas and pretend that it’s already here. If we believe it, it will come!

Chocolate Peanut Butter Banana & Cookie Chunk Ice Cream

Chocolate ice cream base from The Kitchn, which was adapted from Jeni Britton. Makes just over 1 quart.

8 oz. good-quality semi-sweet chocolate, chopped
3 1/2 cups half and half
1 TBSP. plus 1 tsp. cornstarch
2 ounces cream cheese, softened (about 1/4 cup)
1/4 cup sugar
pinch salt

Mix-ins: 1 banana (chopped small), 1/2 cup chocolate cookies* (chopped), and about 1/2 cup peanut butter

*I used these cookies (minus the centers) because I had some left over, but you can use any homemade or storebought chewy chocolate cookies.

In a small bowl, mix 2 TBSP. of the half and half with the cornstarch. Set aside.

In a large saucepan, combine the remaining half and half with the sugar. Bring the milk mixture to a boil and cook over medium heat until the sugar dissolves, about 4 minutes. Remove from heat, and gradually whisk in the cornstarch mixture. Return to heat, bring to a boil and cook over medium high heat until the mixture is slightly thickened, about 1 minute.

In a separate bowl, combine the chocolate and cream cheese. Pour just enough of the hot milk over the chopped chocolate and cream cheese to cover it. Whisk until the chocolate is melted and the mixture is smooth. Add the salt. Gradually add the remaining hot milk mixture and whisk well. Cover the mixture and chill completely, preferably overnight.

Pour the ice cream base into an ice cream maker and freeze according to the manufacturer’s instructions. Stir in the banana and cookie chunks. Layer in a container, along with spoonfuls of the peanut butter (I microwaved my peanut butter for about 20 seconds to make it thinner and easier to work with), then swirl with a knife. Freeze for an additional four hours (or more) in an airtight container. Scoop and serve!

Chocolate Peanut Butter Banana & Cookie Chunk Ice Cream | Once Upon a Recipe

Super Easy Velvety Chocolate Pots

Velvety Chocolate Pots | Once Upon a Recipe

Happy Love Day, lovers!

Here we are again, February 14, Valentine’s Day, the day of L-O-V-E! As promised, I’m sharing another chocolate recipe today. Behold these velvety chocolate pots! They taste just like they sound: rich and chocolate-y and oh. so. smooth. Like buttah, baby!

Velvety Chocolate Pots | Once Upon a Recipe

Velvety Chocolate Pots | Once Upon a Recipe   Velvety Chocolate Pots | Once Upon a Recipe

Maybe you’re still undecided about your Valentine’s Day menu with your honey. Maybe you’re a big procrastinator (like me) and waited until the big day to pick a sweet and decadent treat to celebrate the occasion. Or maybe you don’t give a flying fart about Valentine’s Day, but you have a chocolate craving that you just can’t curb. Whatever the reason, or even if there is no reason at all, let’s all enjoy these velvety chocolate pots together, mmmk? They’re super easy to whip up – we’re talking less than 5 minutes – and mega delicious.

Velvety Chocolate Pots | Once Upon a Recipe   Velvety Chocolate Pots | Once Upon a Recipe

I’ll bring the chocolate, you bring the wine, and let’s all just celebrate the wonderful thing that is love. I’m grateful to call you all my valentines. Now go tell your favorites how much you love them! <3

Super Easy Velvety Chocolate Pots (adapted from The Pioneer Woman)

Makes 4. This recipe is easy to halve or double, depending on the number of servings you require. You can also switch up the flavor by using flavored coffee, different liqueurs, and different kinds of chocolate (ie. milk vs. dark). I used Madeira wine for my liqueur and vanilla macadamia nut coffee. Experiment away!

6 ounces dark chocolate (~70% cocoa), chopped

2 eggs

A pinch of salt

1 TBSP. liqueur (optional)

1/2 cup very hot coffee

In a food processor or blender, combine the chocolate, eggs, salt, and liqueur (if using). Blend until well mixed. With the food processor or blender still running, slowly add the coffee and blend until smooth. Pour the mixture into four 4-ounce ramekins (or tea cups, if you want to get fancy), and refrigerate until cold and set (about 4 hours). Top with whipped cream and more chopped chocolate. Dive in!

Velvety Chocolate Pots | Once Upon a Recipe

Vegan Double Chocolate Banana Espresso Muffins

Vegan Double Chocolate Banana Espresso Muffins | Once Upon a Recipe

Hey friends! There are a couple of chocolate recipes comin’ atcha this week, I hope you don’t mind. And if you don’t like chocolate, well…you can show yourself out. Just kidding. (But really, why don’t you like chocolate and are you seeking help?)

The holiday of love is quickly approaching. The big V-day doesn’t hold much meaning for me, although I do use it as an excuse to eat lots of chocolate and those little cinnamon hearts. And of course, it’s a great reminder to tell those we love just how much they mean to us.  (But really, do that everyday, ok?)

Vegan Double Chocolate Banana Espresso Muffins | Once Upon a Recipe

Whether you love Valentine’s Day or not, you should really make these muffins. They might just be my new favorite. First of all, they’re vegan. Second, they’re packed with good for you ingredients like whole wheat flour, flax, bananas, and coconut oil. But most importantly, they taste like a fudgey chocolate cupcake. And if I can get away with eating a relatively healthy muffin that tastes like a fudgey chocolate cupcake for breakfast, you better believe I’m totally going to do just that.

Vegan Double Chocolate Banana Espresso Muffins | Once Upon a Recipe

Vegan Double Chocolate Banana Espresso Muffins | Once Upon a Recipe   Vegan Double Chocolate Banana Espresso Muffins | Once Upon a Recipe

Vegan Double Chocolate Banana Espresso Muffins (adapted from Minimalist Baker)

These muffins taste even better the next day. My favorite way to enjoy them was actually right out of the fridge, when they were chilled. I kind of felt like I was in that McCain Deep’n Delicious chocolate cake commercial from back in the day. You know the one, right?

2 flax eggs (2 TBSP. ground flax seed + 5 TBSP. water)

1 cup mashed bananas (~3 large)

1/4 cup maple syrup

1/4 cup brown sugar

1/4 tsp. sea salt

1 1/2 tsp. baking soda

1/4 cup coconut oil, melted

1 tsp. espresso powder

1/4 cup unsweetened vanilla almond milk

1/2 cup good-quality cocoa powder

1 1/3 cups whole wheat flour

1/2 cup dark chocolate chips/chunks (dairy-free)

Preheat the oven to 375°F. Prepare a 12-count muffin tin with paper liners or spray with non-stick spray.

Prepare the flax eggs in a large mixing bowl and let rest for 5 minutes. Add the mashed bananas through to the espresso powder and whisk for 45 seconds. Add the almond milk and whisk again. Add the cocoa powder, flour, and chocolate, and mix until just combined. Divide the batter evenly between the muffin tins. Bake for 18-20 minutes, or until a toothpick inserted into the center of the muffins comes out clean. Allow the muffins to cool for a few minutes in the pan, then move to a wire rack to cool completely. Store in an airtight container. These muffins also freeze really well.

http://minimalistbaker.com/fudgy-vegan-double-chocolate-beet-muffins/

Salted Caramel Bark

Salted Caramel Bark | Once Upon a Recipe

Bonjour friends!

The Christmas Countdown is on! Only two more days to go until the big day is here.

Salted Caramel Bark | Once Upon a Recipe

Are you ready? Is your house all decorated nice? Have all of your presents been wrapped and placed under the tree with care? Do you have your Christmas menu planned? Is your holiday baking finished? Are you sitting by the fire relaxing with a rum and ‘nog, basking in relaxation? Or are you scrambling around trying to buy and wrap and bake all the things?

Never fear, I’m here to help! I’ve got a last minute gift idea for you. And it can be made and wrapped up in less than an hour.

Salted Caramel Bark | Once Upon a Recipe

Salted Caramel Bark | Once Upon a Recipe   Salted Caramel Bark | Once Upon a Recipe

Three ingredients. Chocolate. Caramel. Sea salt. Boom! Delicious.

Chocolate gets melted and spread on a cookie sheet. Caramel gets drizzled on top. A little sea salt sprinkle, 15 minutes in the freezer to set, and salted caramel bark is born! Break it up, tie it up with ribbon in little gift bags and it’s ready for gifting! Or you can totes just eat it yourself. It will be extremely difficult not to.

Salted Caramel Bark | Once Upon a Recipe

Salted Caramel Bark

You can use the chocolate of your choice in this recipe. I used chocolate wafers found in the bulk section of my local grocery store. Feel free to use higher quality chocolate; however, it tastes pretty darn good when you use the cheap stuff. 

12 oz. (~2 heaping cups) dark chocolate

12 oz. (~2 heaping cups) milk chocolate

12 oz. Kraft caramels

Coarse ground sea salt (~2 tsp.)

Cover a 9 x 13″ baking sheet with wax paper. Melt the chocolate in a double boiler. Place the caramels in a microwave safe bowl with 2 TBSP. water. Microwave for 1 minute, stir, then microwave in 30-second intervals until fully melted and smooth. Spread the chocolate onto the baking sheet evenly. Drop spoonfuls of the caramel over the chocolate and then swirl with a knife. Sprinkle liberally with the coarse ground sea salt. Place the baking sheet in the freezer for 15 minutes, or until set. Break up into pieces.

Salted Caramel Bark | Once Upon a Recipe

If you’re looking for other easy homemade gift ideas, look no further! Check out Christmas Crack, Lemon Butter, or this long-ago post with other last-minute holiday gift ideas.

Guest Post: Erin from Read, Eat, Create: Super-Rocky Rocky Road Brownies

Happy hump day friends!

Today I have a special guest here to share a sweet recipe. Take it away, Erin!

Guest Post - Read, Eat, Create - Rocky Road Brownies

Hi all you Once Upon a Recipe readers! I’m so excited that Amanda let me invade her cute space for the day! I absolutely love her blog and the recipes on here are just to die for! I suppose I should introduce myself. My name is Erin and I blog over at Read, Eat, Create. I’m still working on the “create” part though. Pinterest is just a little too intimidating if you know what I mean.

I’m here to share my love for sweet treats. Now I’m not really a big cupcake or cake lover and I have to be in the mood for cookies (say whaaaa?) but I have a serious soft spot in my heart for brownies. Another soft spot when it comes to sweets for me is ice cream, specifically Rocky Road ice cream. Anyone else with me on this?

So I figured I would combine the two to make one seriously delicious bite.The best part is these are really easy to make!

Guest Post - Read, Eat, Create - Rocky Road Brownies Guest Post - Read, Eat, Create - Rocky Road Brownies

Super-Rocky Rocky Road Brownies

2  1-ounce squares unsweetened chocolate

2/3 cup all-purpose flour

½ tsp. baking powder

¼ tsp. salt

¼ cup (1/2 stick) butter, softened

1 cup granulated sugar

2 eggs

1 tsp. vanilla extract

1  6-ounce package semi-sweet chocolate morsels

1 cup peanut butter chips

1 cup mini marshmallows

Non-stick cooking spray

1. Preheat oven to 350 degrees.

2. Melt chocolate squares in a double boiler. If you don’t have one you can put a metal bowl over the top of a small kettle of boiling water and melt the chocolate in the bowl that way. Set aside to cool slightly.

3. In a large mixing bowl, beat together the butter and the sugar until they’re well blended. Add eggs, one at a time, mixing well after each egg.

4. Gradually add the melted chocolate and mix well. Beat in the vanilla.

5. Slowly add the flour mixture to the bowl and mix thoroughly.

6. Fold in the chocolate chips, peanut butter chips, and marshmallows.

7. Pour the batter into an 8×8 inch pan that has a good coat of non-stick spray.

8. Bake for 40 minutes.  You can tell that they are done if you put a wooden toothpick near the center and it comes out clean.

Thanks so much for letting me stop by Amanda! Want more kitchen fun (and a peek into my life of never ending randomness)?  Come on over for a visit at Read, Eat, Create. Hope to see you all there!

Baked, Not Fried | Double Chocolate Baked Doughnuts

Double Chocolate Baked Doughnuts | Once Upon a Recipe

Hi friends, happy Friday!

My brain is full of pressing questions. First of all, is it doughnut or donut? Is it simply a matter of preference or is there one correct answer? These are the questions that keep me awake at night. Just kidding…sort of. #firstworldproblems

Secondly, why the blazes has it taken me so long to make baked doughnuts? I mean, I realize that I’m a little late to the party. In my defense, I bought my doughnut pan approximately 11 months ago, when baked doughnuts were gaining popularity. Prior to the creation of the lovely specimen you see above, I used my doughnut pan approximately once. It was a massive fail of a recipe, so perhaps I began to equate my doughnut pan with failure and consequently shoved it to the very back of my cupboard to suffer with the mice poop and other dusty dishes. Just kidding, I don’t have mice poop in my cupboards. At least, not to my knowledge. What you don’t know can’t hurt you!

Double Chocolate Baked Doughnuts | Once Upon a Recipe

In any case, earlier this week I decided to give my doughnut pan another shot. And proceeded to become extremely frustrated when my doughnuts came out of the oven with muffin tops, making them resemble anything but a doughnut. Argh. The doughnuts tasted good, but they didn’t look like doughnuts, and I kind of thought that defeated the purpose. I mean, I may as well make muffins if my baked doughnuts aren’t going to resemble actual doughnuts.

Fortunately, instead of giving up, I pressed on. And I figured out the problem. The key to pretty little baked doughnuts is to refrain from overfilling the pan. Those bad boys rise up in the oven, and you’ve got to give ’em some room! It really helps to put the batter into a piping bag and pipe it into the pan. Spooning it into the pan just might cause you to have a frustration/impatience-induced stroke. Words of wisdom friends.

Double Chocolate Baked Doughnuts | Once Upon a Recipe

If you don’t already own a doughnut pan, I highly recommend the $10 investment. (I have this pan). Baked doughnuts look freaking boss! I mean, they look like a doughnut, which is inherently impressive given the amount of time and energy that goes into making real doughnuts (the amazingly delicious fried kind). But the kicker is, they’re baked, not fried, meaning they take way less effort and they’re way less bad for you to consume. Winning!

They’re cute too, no? Cute food. It’s the little things that make life worth living.

Double Chocolate Baked Doughnuts | Once Upon a Recipe

Don’t even try to tell me that you don’t want to stick your face right into that up there. I’ll totally call your bluff.

Double Chocolate Baked Doughnuts | Once Upon a Recipe

Bonus: These baked doughnuts aren’t all that bad for you. I’m not calling them health food, but they’ll provide you with the satisfaction of enjoying a delicious treat (a doughnut!) without the kind of abuse to your waistline caused by their fried cousins. And the recipe makes six doughnuts. Even if you completely lack any self control, you’ll only have consumed six doughnuts. There are worse things you could do. Just sayin’…

Double Chocolate Baked Doughnuts | Once Upon a Recipe

Double Chocolate Baked Doughnuts

Makes six doughnuts. If you don’t have a doughnut pan, you could make these into muffins (you’ll have to bake them a bit longer), but that really wouldn’t be as much fun, in my opinion. 

For the doughnuts (adapted from Food Family Finds):

1 cup all-purpose flour

¼ cup + 2 TBSP. granulated sugar

¼ cup cocoa powder

½ tsp. baking powder

½ tsp. baking soda

½ tsp. salt

¼ cup + 3 TBSP. milk

1 egg, beaten

½ tsp. vanilla

1 TBSP. unsalted butter, melted

For the glaze (from my fried doughnut recipe):

2 TBSP. unsalted butter

1 TBSP. milk

1 tsp. honey

1/2 tsp. vanilla

1 ounce semi-sweet chocolate, chopped

2/3 cup icing sugar, sifted

Sprinkles!

Preheat the oven to 325°F. Spray a 6-count doughnut pan with non-stick spray. Set aside.

For the doughnuts: In a medium bowl, sift the dry ingredients together. In a separate bowl, combine the wet ingredients. Add the wet ingredients to the dry ingredients and stir until just combined. The batter will be very thick. Divide the batter between the six doughnut cavities (each should be about 3/4 full). I recommend piping the batter into the cavities. Bake for about 12 minutes or until a toothpick inserted into one of the doughnuts comes out clean. Allow the doughnuts to cool in the pan for a few minutes and then invert them onto a cooling rack.

For the glaze, combine the butter, milk, honey, and vanilla in a small saucepan over medium heat. Once the butter has melted, add in the chocolate and whisk until smooth. Remove from heat and add the icing sugar, stirring until combined. Dip the cooled doughnuts into the glaze and cover with chocolate sprinkles. Enjoy immediately! Leftovers can be stored in an airtight container for a couple of days.

Double Chocolate Baked Doughnuts | Once Upon a Recipe

Looking for more baked doughnut inspiration?

I highly recommend these baked cinnamon sugar doughnuts by Shutterbean (seriously amazing) and these blueberry doughnuts with lemon and cream cheese glaze (yes please!) by Hungry Girl Por Vida. Bomb. If that doesn’t inspire you to buy a doughnut pan, I don’t know what will. Have a great weekend!

Be My Schmalentine | Quick Sticky Chocolate Cake for One (or Two)

Sticky Chocolate Cake for One | Once Upon a Recipe

Here we are again. It’s almost February 14. Schmalentine’s Day. Hooray.

I’ve said it before, and I’ll say it again, Valentine’s Day just ain’t my jam. It kind of makes me want to gag. I am a big believer in giving and receiving love every damn day of the year, and therefore I fail to see the point of devoting an entire day to over-the-top demonstrations of love when it’s much nicer to spread it around all year. Flowers? Yes, I’d like to receive them a little more regularly, please and thank you. Chocolate? I already eat it nearly every day. A nice dinner out? Let’s do it. Weekly. Jewelry? I’m not really into it. Jewelry makes my body feel…cluttered.

Sticky Chocolate Cake for One | Once Upon a Recipe

Simple acts of love? Now we’re talking. Slip a sweet note into my coat pocket. Make me a simple dinner at home. Pick up a nice bottle of wine to enjoy with dinner. And don’t wait for February 14 to do it.

Whether or not you have a significant other to celebrate with this Valentine’s Day, you’re probably looking for a sweet treat to enjoy. If nothing else, V-day is a total excuse to eat as much chocolate as your little heart desires. How about this quick and dirty chocolate cake? I came across this recipe for chocolate cake for one in the beautiful cookbook “Home Made Winter” by Yvette van Boven. The recipe is described as a 3-minute chocolate mug cake.

Sticky Chocolate Cake for One | Once Upon a Recipe


Cringe. Friends, I don’t do mug cakes. The microwave, while useful for many things, does not cook cakes very well. Have you ever tried it? The texture is just…ugh. Gummy. Spongy. Yuck. But what intrigued me about this recipe is the fact that Yvette suggested that the cake could be baked in the oven for those who find microwave cakes to be off-putting. For the record, I tried the cake both ways. And I maintain my sentiments about microwave cakes. But you may wish to give it a try, especially if you’re in a pinch for time.

For me, this cake serves a particular purpose. Either you’re having a mad craving for chocolate cake and you don’t want to go to the trouble of making a big cake, and then be left with an entire cake to entice you until it’s gone. Or, you’re in a pinch for a quick dessert for one or two. The cake batter comes together in a flash, and even if you choose to bake it in the oven, it will be ready within 20 minutes. Go the microwave route, and you’ll be taking your first bite in just over 3 minutes. The best part? No leftovers!

Sticky Chocolate Cake for One | Once Upon a Recipe

Quick Sticky Chocolate Cake for One (or Two) ~ adapted from Home Made Winter

3 TBSP. all-purpose flour

1/4 tsp. baking power

Pinch of salt

3 TBSP. sugar

2 TBSP. cocoa powder

1 egg

1/2 tsp. vanilla

3 TBSP. milk

3 TBSP. vegetable oil

3 TBSP. dark chocolate chips

If using the oven, preheat it to 350°F and spray your baking dish with non-stick spray (I used a large ramekin dish). If using the microwave, pick a large microwave safe mug. Use a separate bowl to mix together all of the ingredients and pour into the baking dish. If using a mug, you can simply add everything into the mug and mix it together. No clean-up! However, with the microwave technique, you can omit the baking powder and salt. Bake your cake for about 20 minutes, or until a toothpick inserted into the centre of the cake comes out clean. If using the microwave, pop your mug into the microwave and cook on high for 3 minutes. The cake will rise over the rim of the mug, but don’t sweat it.

Enjoy the cake while still warm, and definitely feel free to add a scoop of ice cream on top. I’m a bit of a chocolate cake purist and prefer to eat it straight up.

Sticky Chocolate Cake for One | Once Upon a Recipe

______________________________________

Need some other Valentine’s Day ideas? I suggest that you start your day with Banana Bread Oatmeal Pancakes or my Nana’s Cinnamon Buns. If you’re in the mood for a love day beverage, I highly recommend a Red Lotus Martini (or two) or a big glass of Red Wine Sangria.

Cooking together is so romantic (in my opinion). Get in the kitchen with your significant other or your friends and make some heart-shaped pizzas with this Whole Wheat Pizza Dough. For a festively colored side dish, try this creamy and dreamy Beet Risotto.

Sweet treats? These Red Velvet Sandwiches are delicious and easy. If you’ve got a little more time on your hands, make some decadent Rice Pudding. Or Homemade Snickers Bars. Or Bourbon Pecan Pie Brownies. For something a little lighter, try Fruit Salsa and Cinnamon Chips. And diving into this Skillet Chocolate Chip Cookie might just be the most delicious thing you can do on February 14.

Happy love day, my friends. And remember to share some love, each and every day of the year. <3

Sometimes You Just Need a Cookie | Skillet Chocolate Chip Cookie

Sometimes life just calls for a cookie. And not just any cookie. A humungous cookie that can be made in one bowl (a skillet, to be exact), is ready in less than 30 minutes, and that can be topped with a scoop or two of ice cream, and eaten straight out of said skillet as soon as it comes out of the oven.

Possible life events that may necessitate the making and the consumption of a skillet cookie:

-You had a bad day at work. Make yourself a skillet cookie. Invite friends over. You do not want to be faced with the task of eating the whole cookie yourself. I mean, you do, but you really don’t. You know?

-A good friend is going through a rough time. Make your friend a skillet cookie, give her some wine to help her wash it down (milk, what?), and most importantly, help her eat it.

-It’s that time of the month. Aunt Flo is visiting, the monthly curse, etc. What woman doesn’t use PMS as an excuse to eat a little extra chocolate? See point #1.

-Boy troubles.

-You have chocolate chips in your cupboard that are about to go bad and you must use them immediately, for fear of chocolate going to waste. That just wouldn’t be acceptable.

-You feel like eating a cookie.

-It’s Monday.

But really, if you need an excuse to enjoy a delicious, extra-large, hot, ooey-gooey cookie, you probably wouldn’t have come here in the first place. (However, if you do, I’ll gladly feed you as many excuses as you need. I’ve got your back.).

This recipe comes straight from here. No additions or substitutions needed, it’s quite perfect the way it is. I have made this skillet cookie more times than I care to admit since I first came across the recipe. It’s so darn easy, so good, and I always have the necessary ingredients on hand. Feel free to use your favorite kind of chocolate. My favorite is dark chocolate chips. Rumor has it that dark chocolate is full of many good-for-you things (antioxidants, iron, magnesium). See? This cookie is practically doing your body a favor. Get on it!

Chocolate Chip Skillet Cookie (from the lovely Sophistimom)

1/2 cup (1 stick) unsalted butter

1/2 cup granulated sugar

1/2 cup brown sugar

1 tsp. vanilla

1 egg

1 1/2 cups all-purpose flour

1/2 tsp. baking soda

1/4 tsp. salt

1 cup chocolate chips

Preheat the oven to 350°F. Melt the butter in an 8-inch cast iron skillet set over medium-low heat. Stir in the sugars and vanilla and remove from heat. Let rest until pan is warm, but no longer very hot, about 5 minutes.

Add in the egg and mix well. Mix in the flour, baking soda, and salt until smooth. Stir in the chocolate chunks. Place in the oven for 15-20 minutes, or until starting to turn golden around the edges, and the centre is just set. Don’t overbake! Enjoy immediately (with ice cream, if you wish).

You’re totally going to burn your tongue on the first bite. Just sayin. 😉

I Scream, You Scream, We All Scream For… | Mint Chocolate Chip Ice Cream

Friends, I have a very sad confession to make. I have had an ice cream maker sitting, unused, in its original box, for one and a half long years. I received it as a gift for Christmas in 2010. I had good intentions of using it immediately. I picked out recipes. I formulated ice cream-making plans. And it never happened.

You see, whenever I followed through on those good intentions, and got all geared up to make ice cream, I’d open the box and realize (for the bazillionth time) that the canister needed to be frozen for at least 8 hours prior to using it. And I’m embarrassed to report that instead of taking it out of the box and sticking in the freezer to avoid the same disappointment the next time around, I just closed it right back up again. It is important to note that there was one other very labor intensive step required…washing the canister. Sometimes I confuse even myself.

Thankfully, I righted all of these wrongs last weekend when I did the smart thing and stuck that dang canister into the freezer, and the next day went out and picked up my ice cream making supplies. And then I got straight to makin’ ice cream!

The combination of mint and chocolate has been one of my favorites for a long time, so I immediately began searching for a mint chocolate chip ice cream recipe. Cool, minty ice cream chock full of dark chocolate chunks. And let me tell you…there is nothing quite like a humongous bowl of cold, minty ice cream on a hot summer evening to help cool a person down. Heat wave is an understatement. Let’s just say there’s been much spread eagle, underwear only, fan blasting directly at the bed insomnia sleeping going on lately. Thank goodness for ice cream.

PS. July is National Ice Cream month! Don’t be surprised if you see another ice cream recipe (or two) posted here in the next few weeks. I’ve spotted a recipe for peanut butter ice cream…trouble!

Mint Chocolate Chip Ice Cream (adapted from The Kitchn)

Makes about two quarts.

3 cups fresh mint leaves

4 cups half and half

3/4 cup sugar

A pinch of salt

1 tsp. vanilla

4 egg yolks

6 ounces good quality dark chocolate, chopped

Tear the mint leaves off of their stems and put in a bowl. Pound with a pestle or large spoon just until they are bruised and start to give off their delicious minty fragrance.

In a heavy saucepan over medium heat, whisk together the half and half, sugar, and salt. Heat until the mixture just begins to steam, the remove from heat, add the mint leaves, and cover. Steep for about two hours. Once the mixture has steeped, strain out the mint leaves and bring the mixture to just under a simmer. Whisk the egg yolks together in a small bowl and add a cup of the cream to temper the eggs. Whisk it all back into the saucepan and cook, stirring, until the custard reaches 170º to 174ºF (this only took a couple of minutes for me). Remove from heat and stir in the vanilla. Pour into a bowl, cover, and refrigerate overnight.

We’re ready to make ice cream! First, chop the chocolate into chunks and set aside. Freeze the custard in your ice cream maker according to directions, adding the chocolate about halfway through. Transfer ice cream to a container and cover with plastic wrap so that the wrap is touching the surface of the ice cream (this will prevent ice crystals from forming). Freeze for at least four hours before serving. Enjoy!

%d bloggers like this: