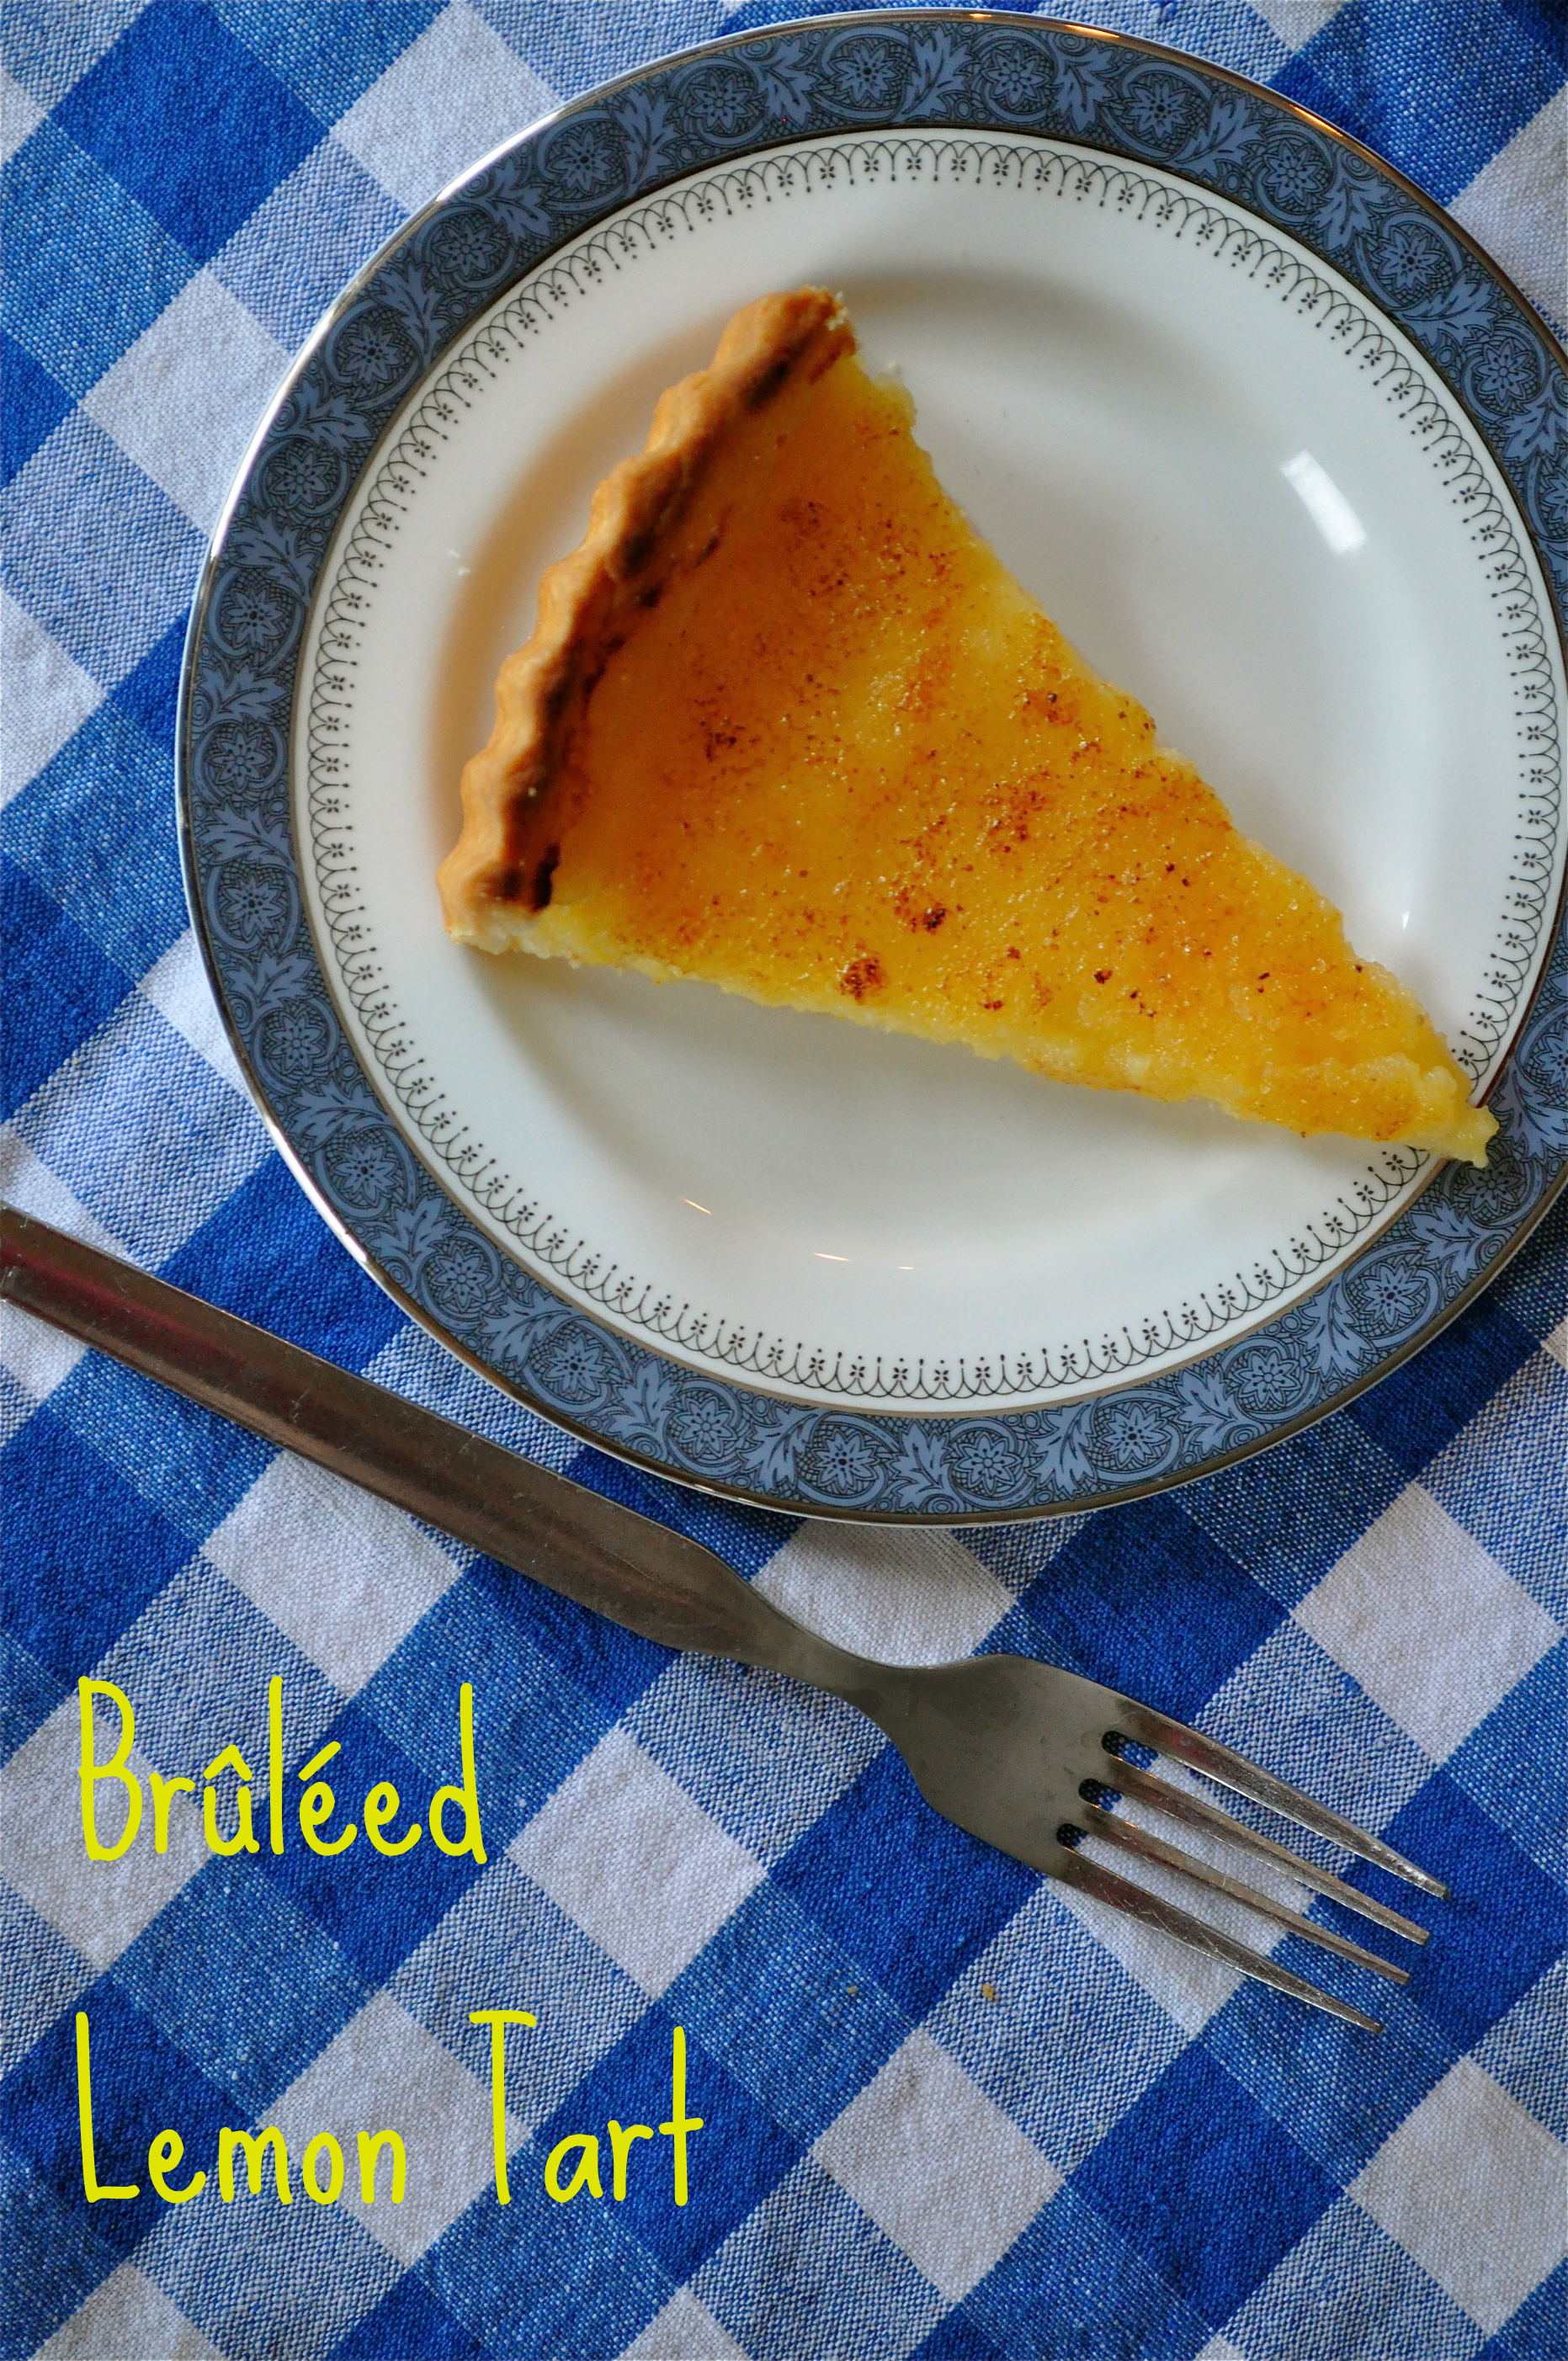
Brown Butter Cinnamon Roll Skillet Cake

Brown Butter Cinnamon Roll Skillet Cake | Once Upon a Recipe

Dear Time,

Why is there not more of you? Why must you move so quickly when I’m having fun and so slowly when I’m not? I’d like to please have the body of Halle Berry, but I don’t have the time to exercise like a maniac and count all of my calories (nor do I want to). I mean, I have time, but not that much time. I’d like to take up knitting and soap making and I’d like to really learn to play the guitar (and not just stumble my way through a few simple songs). I’d like to volunteer more. I’d like to take my pup to the dog park every morning so she can burn off more of her boundless energy. I’d like to organize my closet because it’s a jungle in there (and maybe a mouse. Help, I’m scared!). I’d like to read the 78 books on my “List of Books to Read” before I’m 78.

I’d like to keep my house in a more constant state of clean, rather than its constant state of chaos. I’d like to learn more about wine and beer and maybe even make my own. I’d like to host dinner parties and cook for my friends and family because that’s a whole lot more fun than eating cereal for dinner cooking for just me. I’d like to drink a green juice every morning, and not just the mornings that I “have time.” I’d like to take 15 minutes every day to try to meditate and clear my crazy brain. I’d like to handwrite letters to my friends from afar, rather than send them an occasional text message or email. I’d like to become a better photographer. I’d like to get out of the city once a month, even if it’s only for a few hours, to a town half an hour away. I’d really like to sleep more. I’d like to do all of these things and about a thousand more, but I. Need. More. Time.

Please consider stretching yourself out a bit?

Sincerely,

Amanda

Brown Butter Cinnamon Roll Skillet Cake | Once Upon a Recipe

Brown Butter Cinnamon Roll Skillet Cake | Once Upon a Recipe

Seriously friends, how do you all do it? You all make it look so easy – even those of you with children and a load of responsibilities twice the size of mine. Please tell me that it really isn’t as simple as you make it look, or at least share some of your secrets. How do you balance it all?

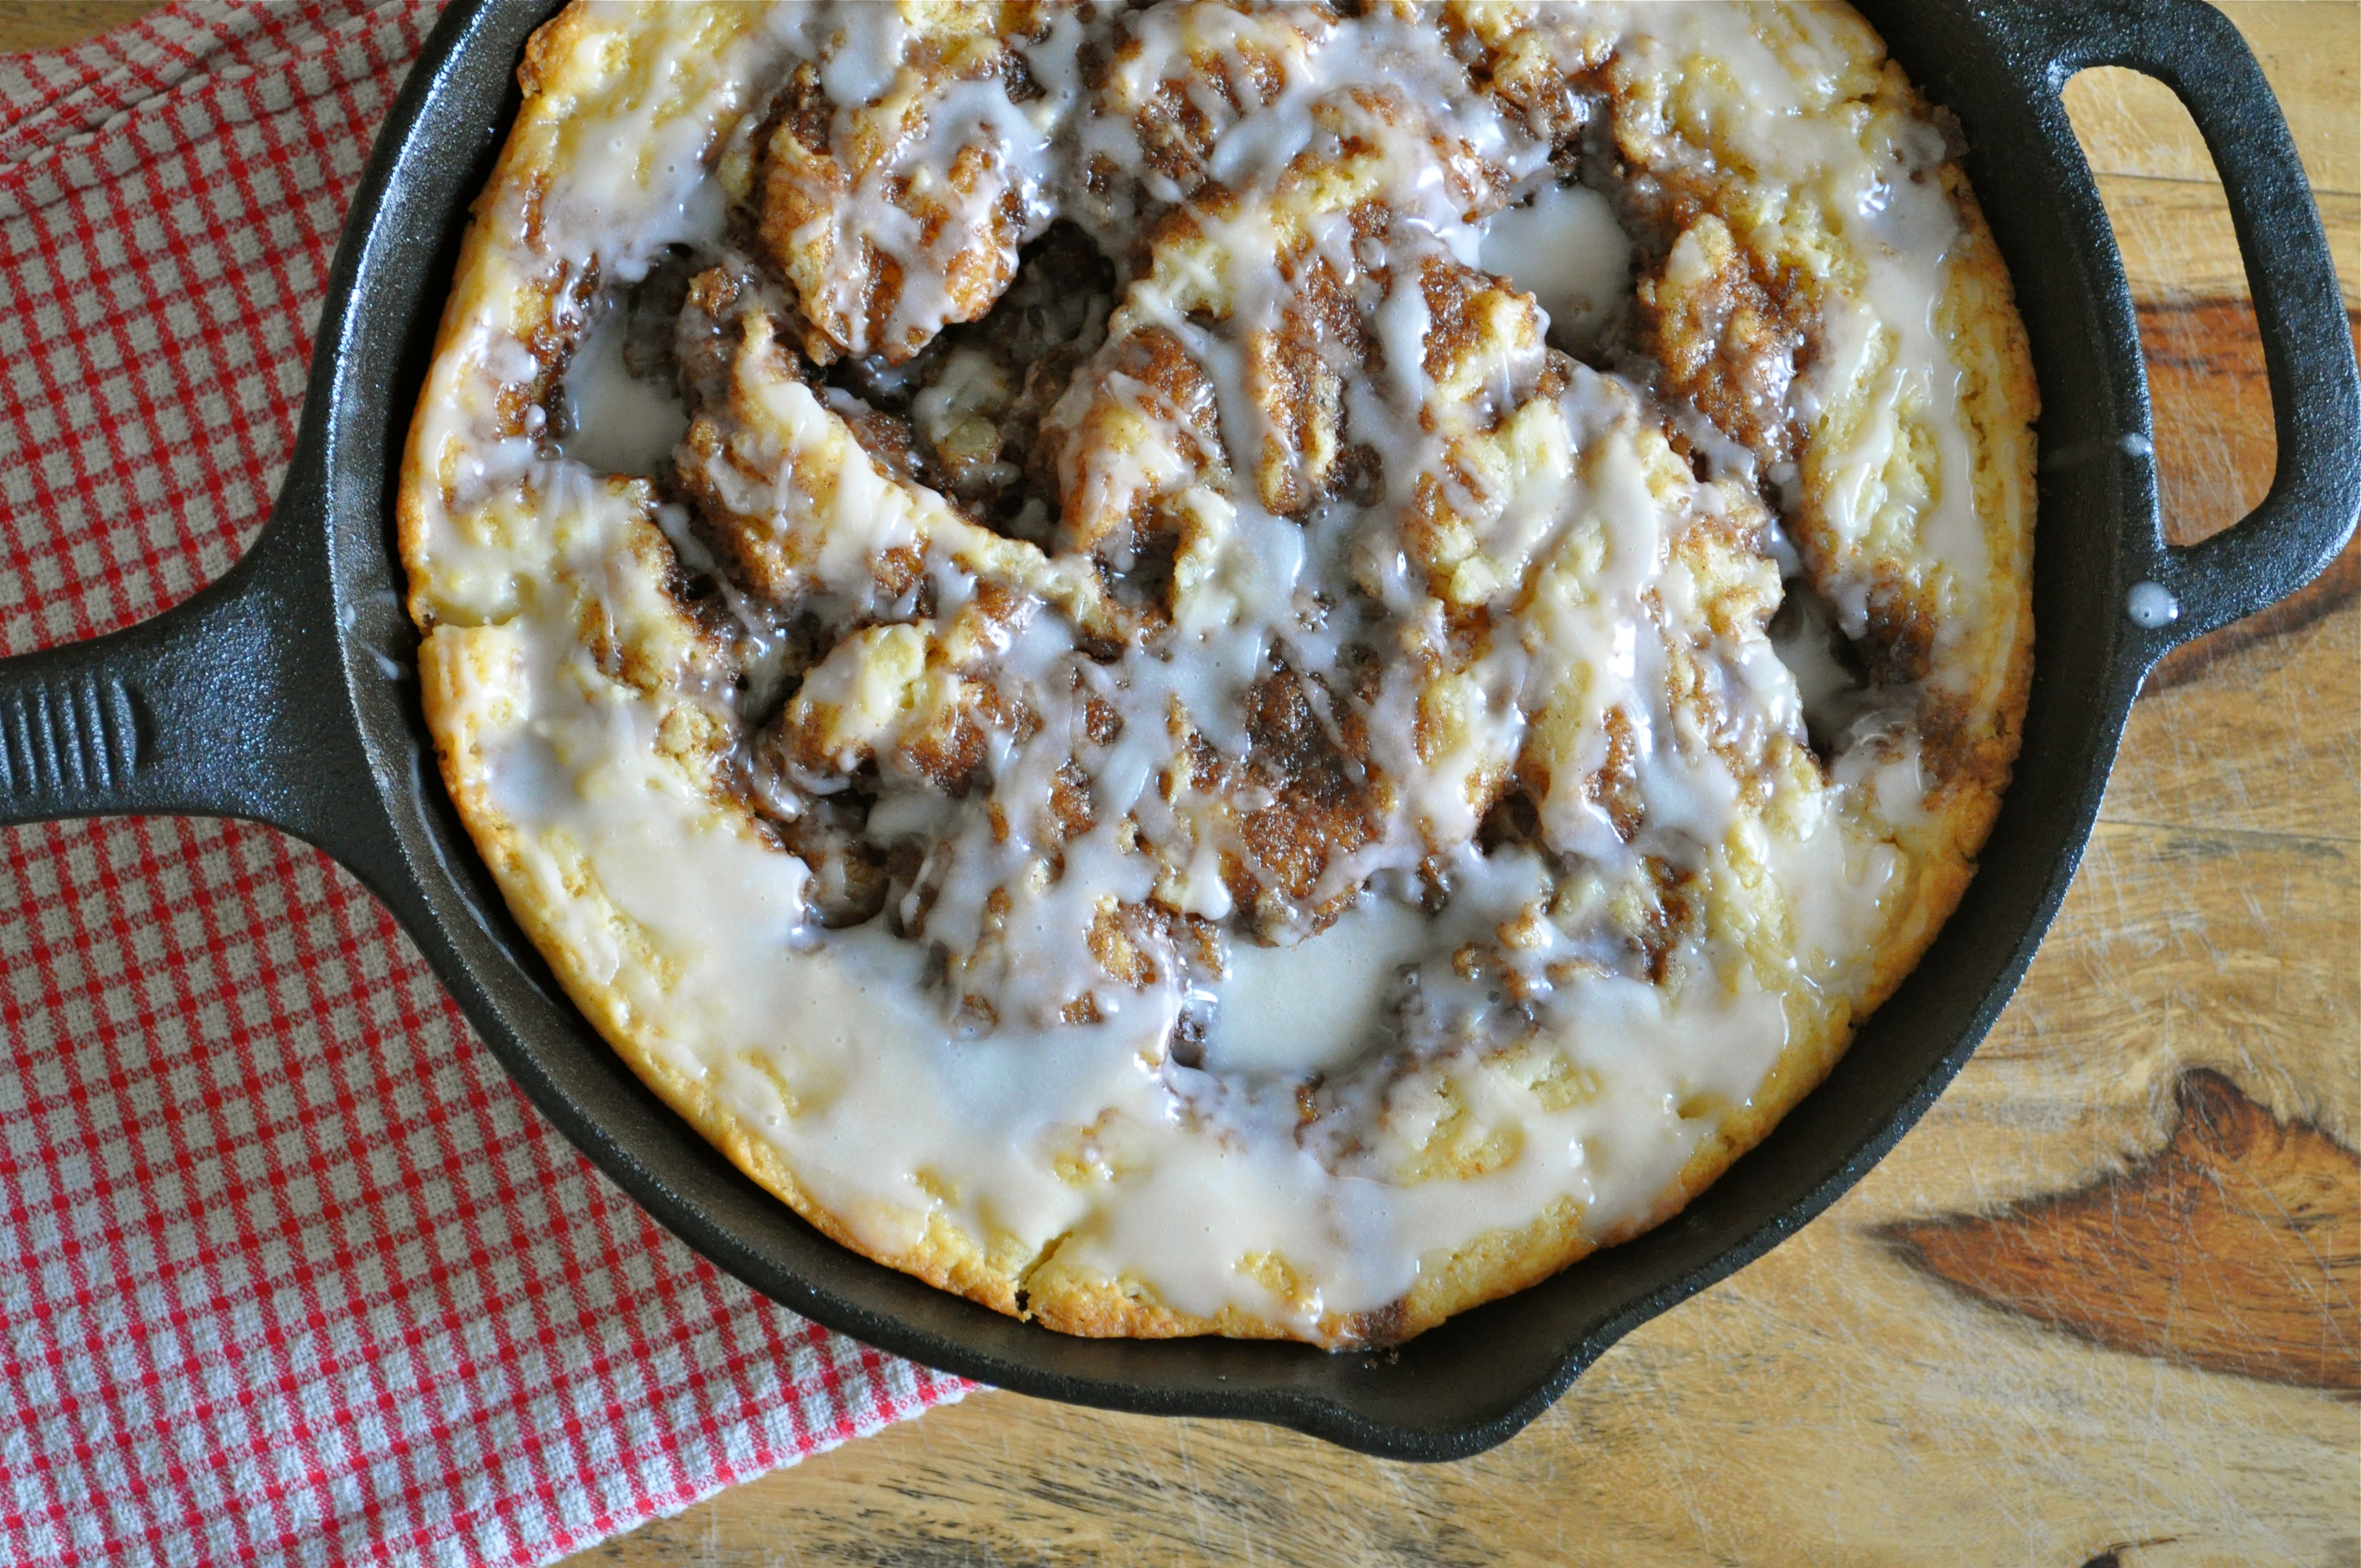
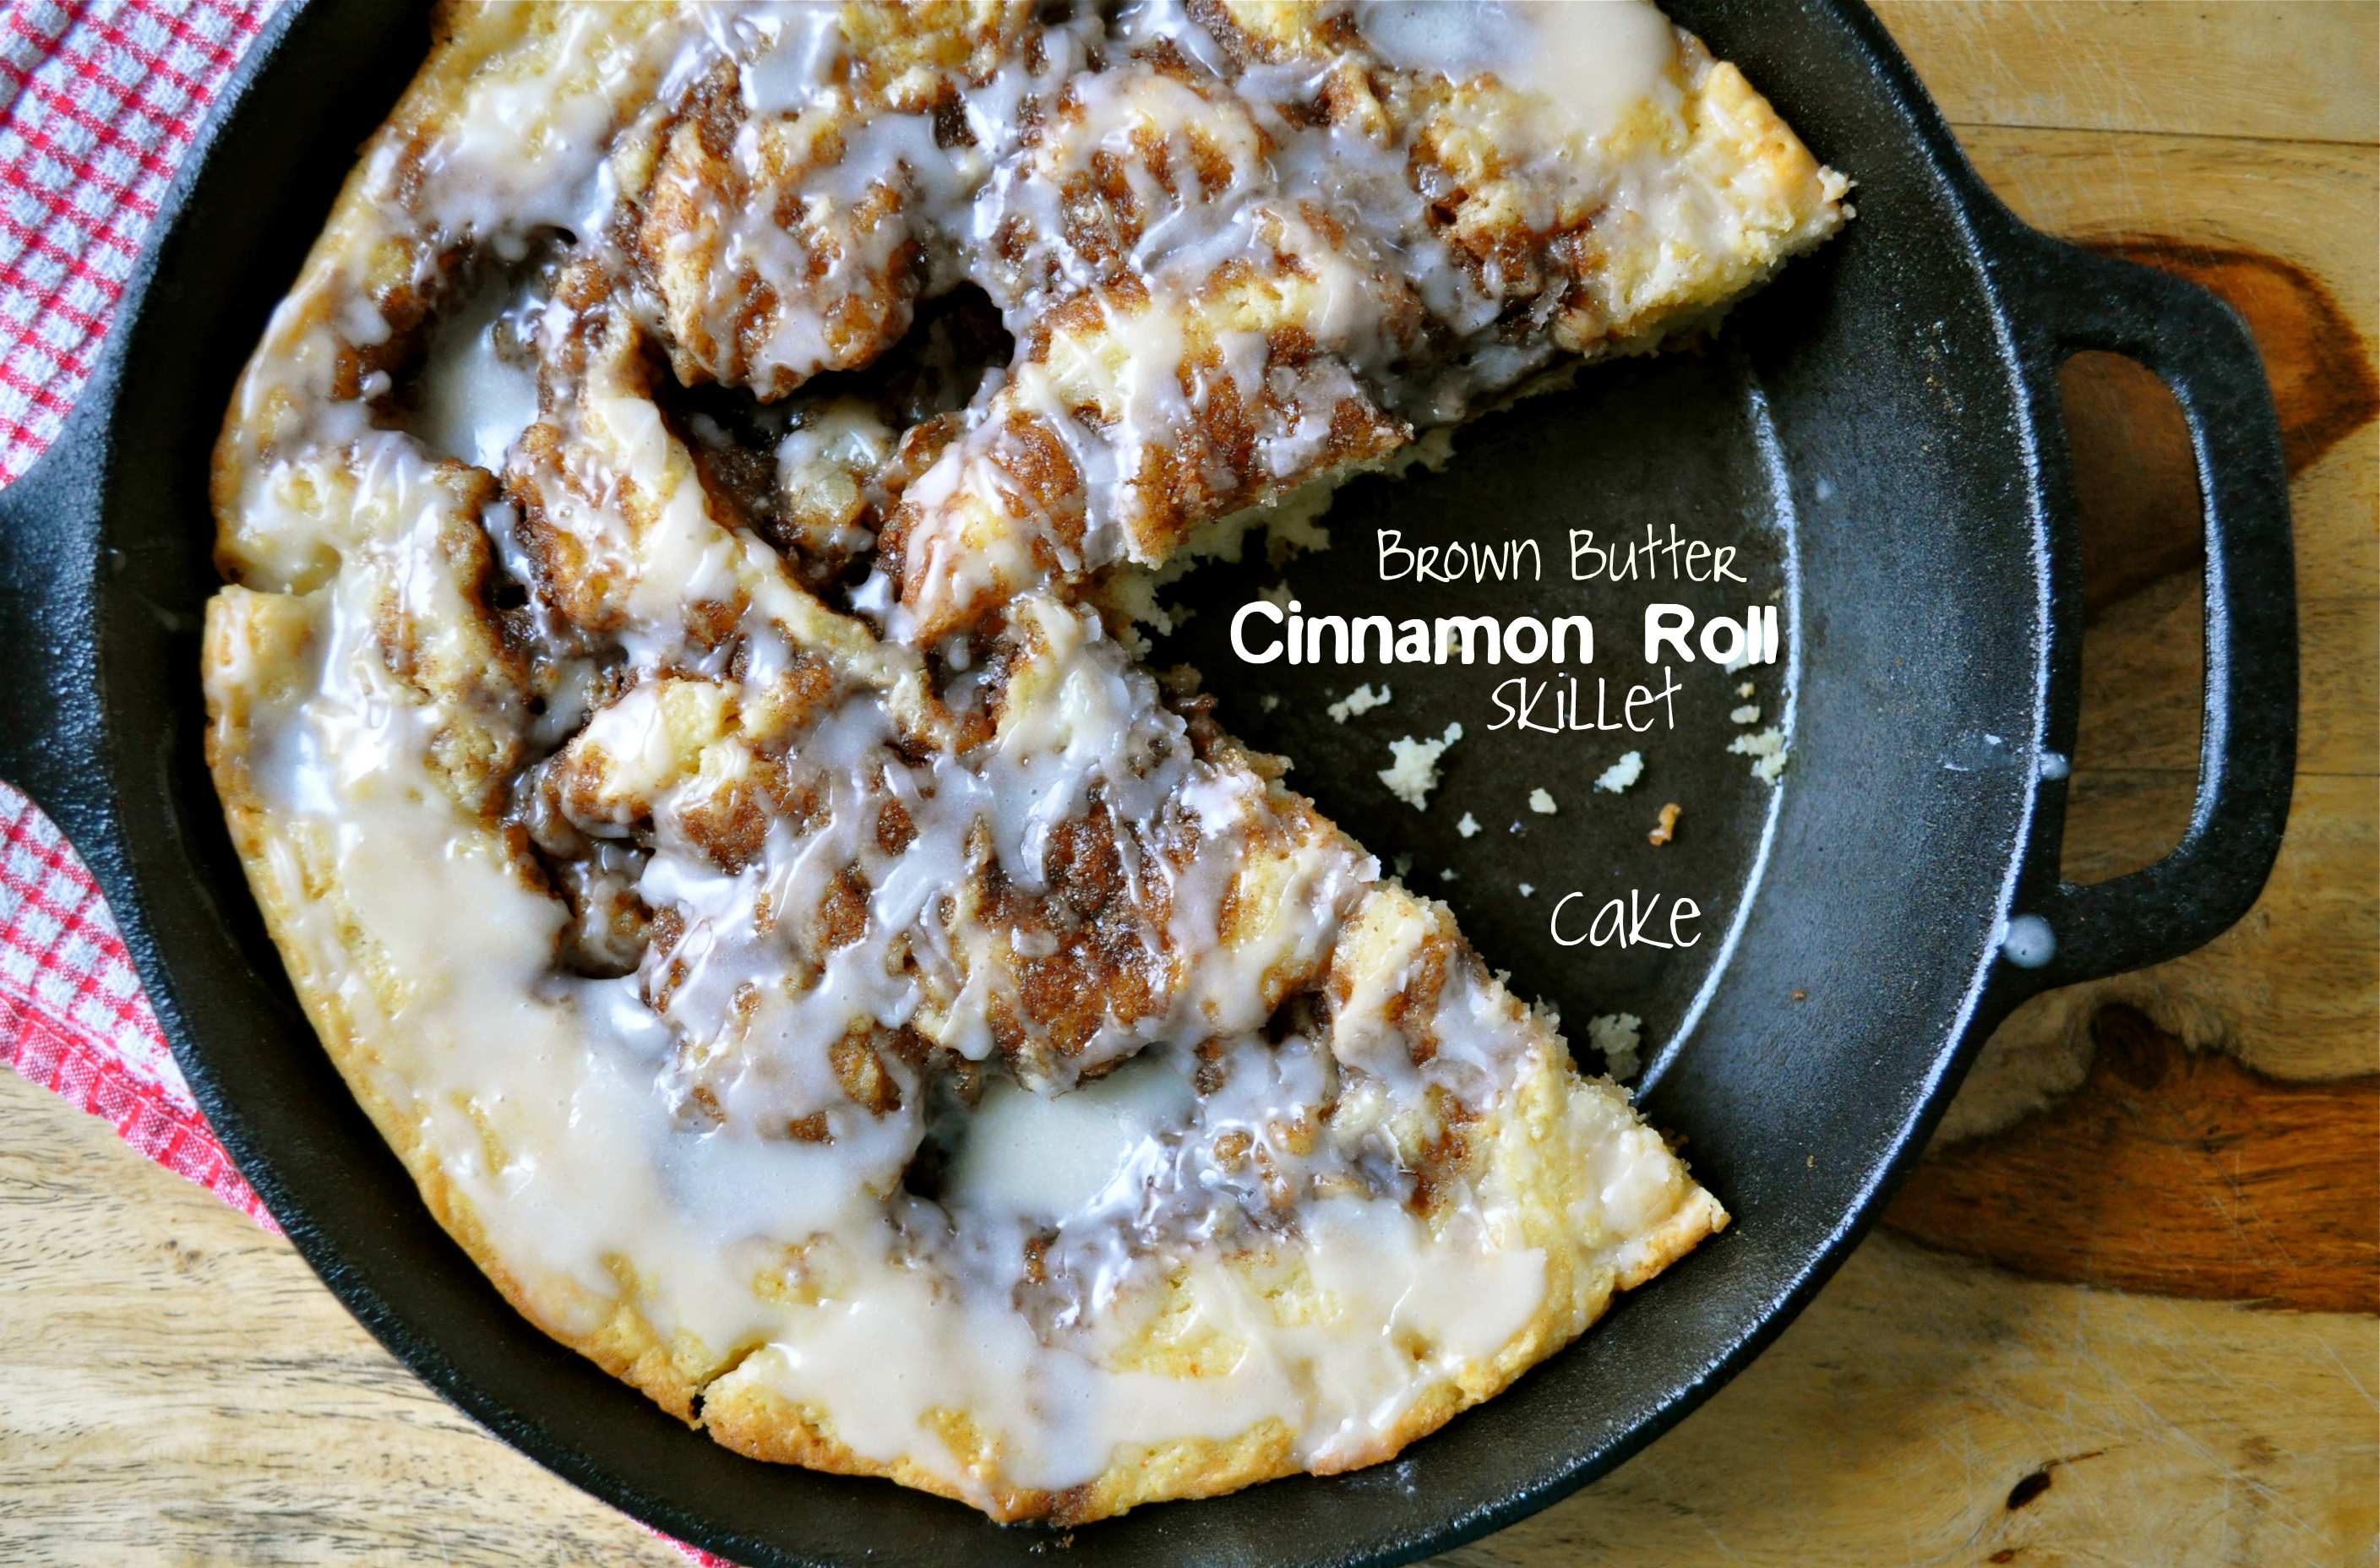
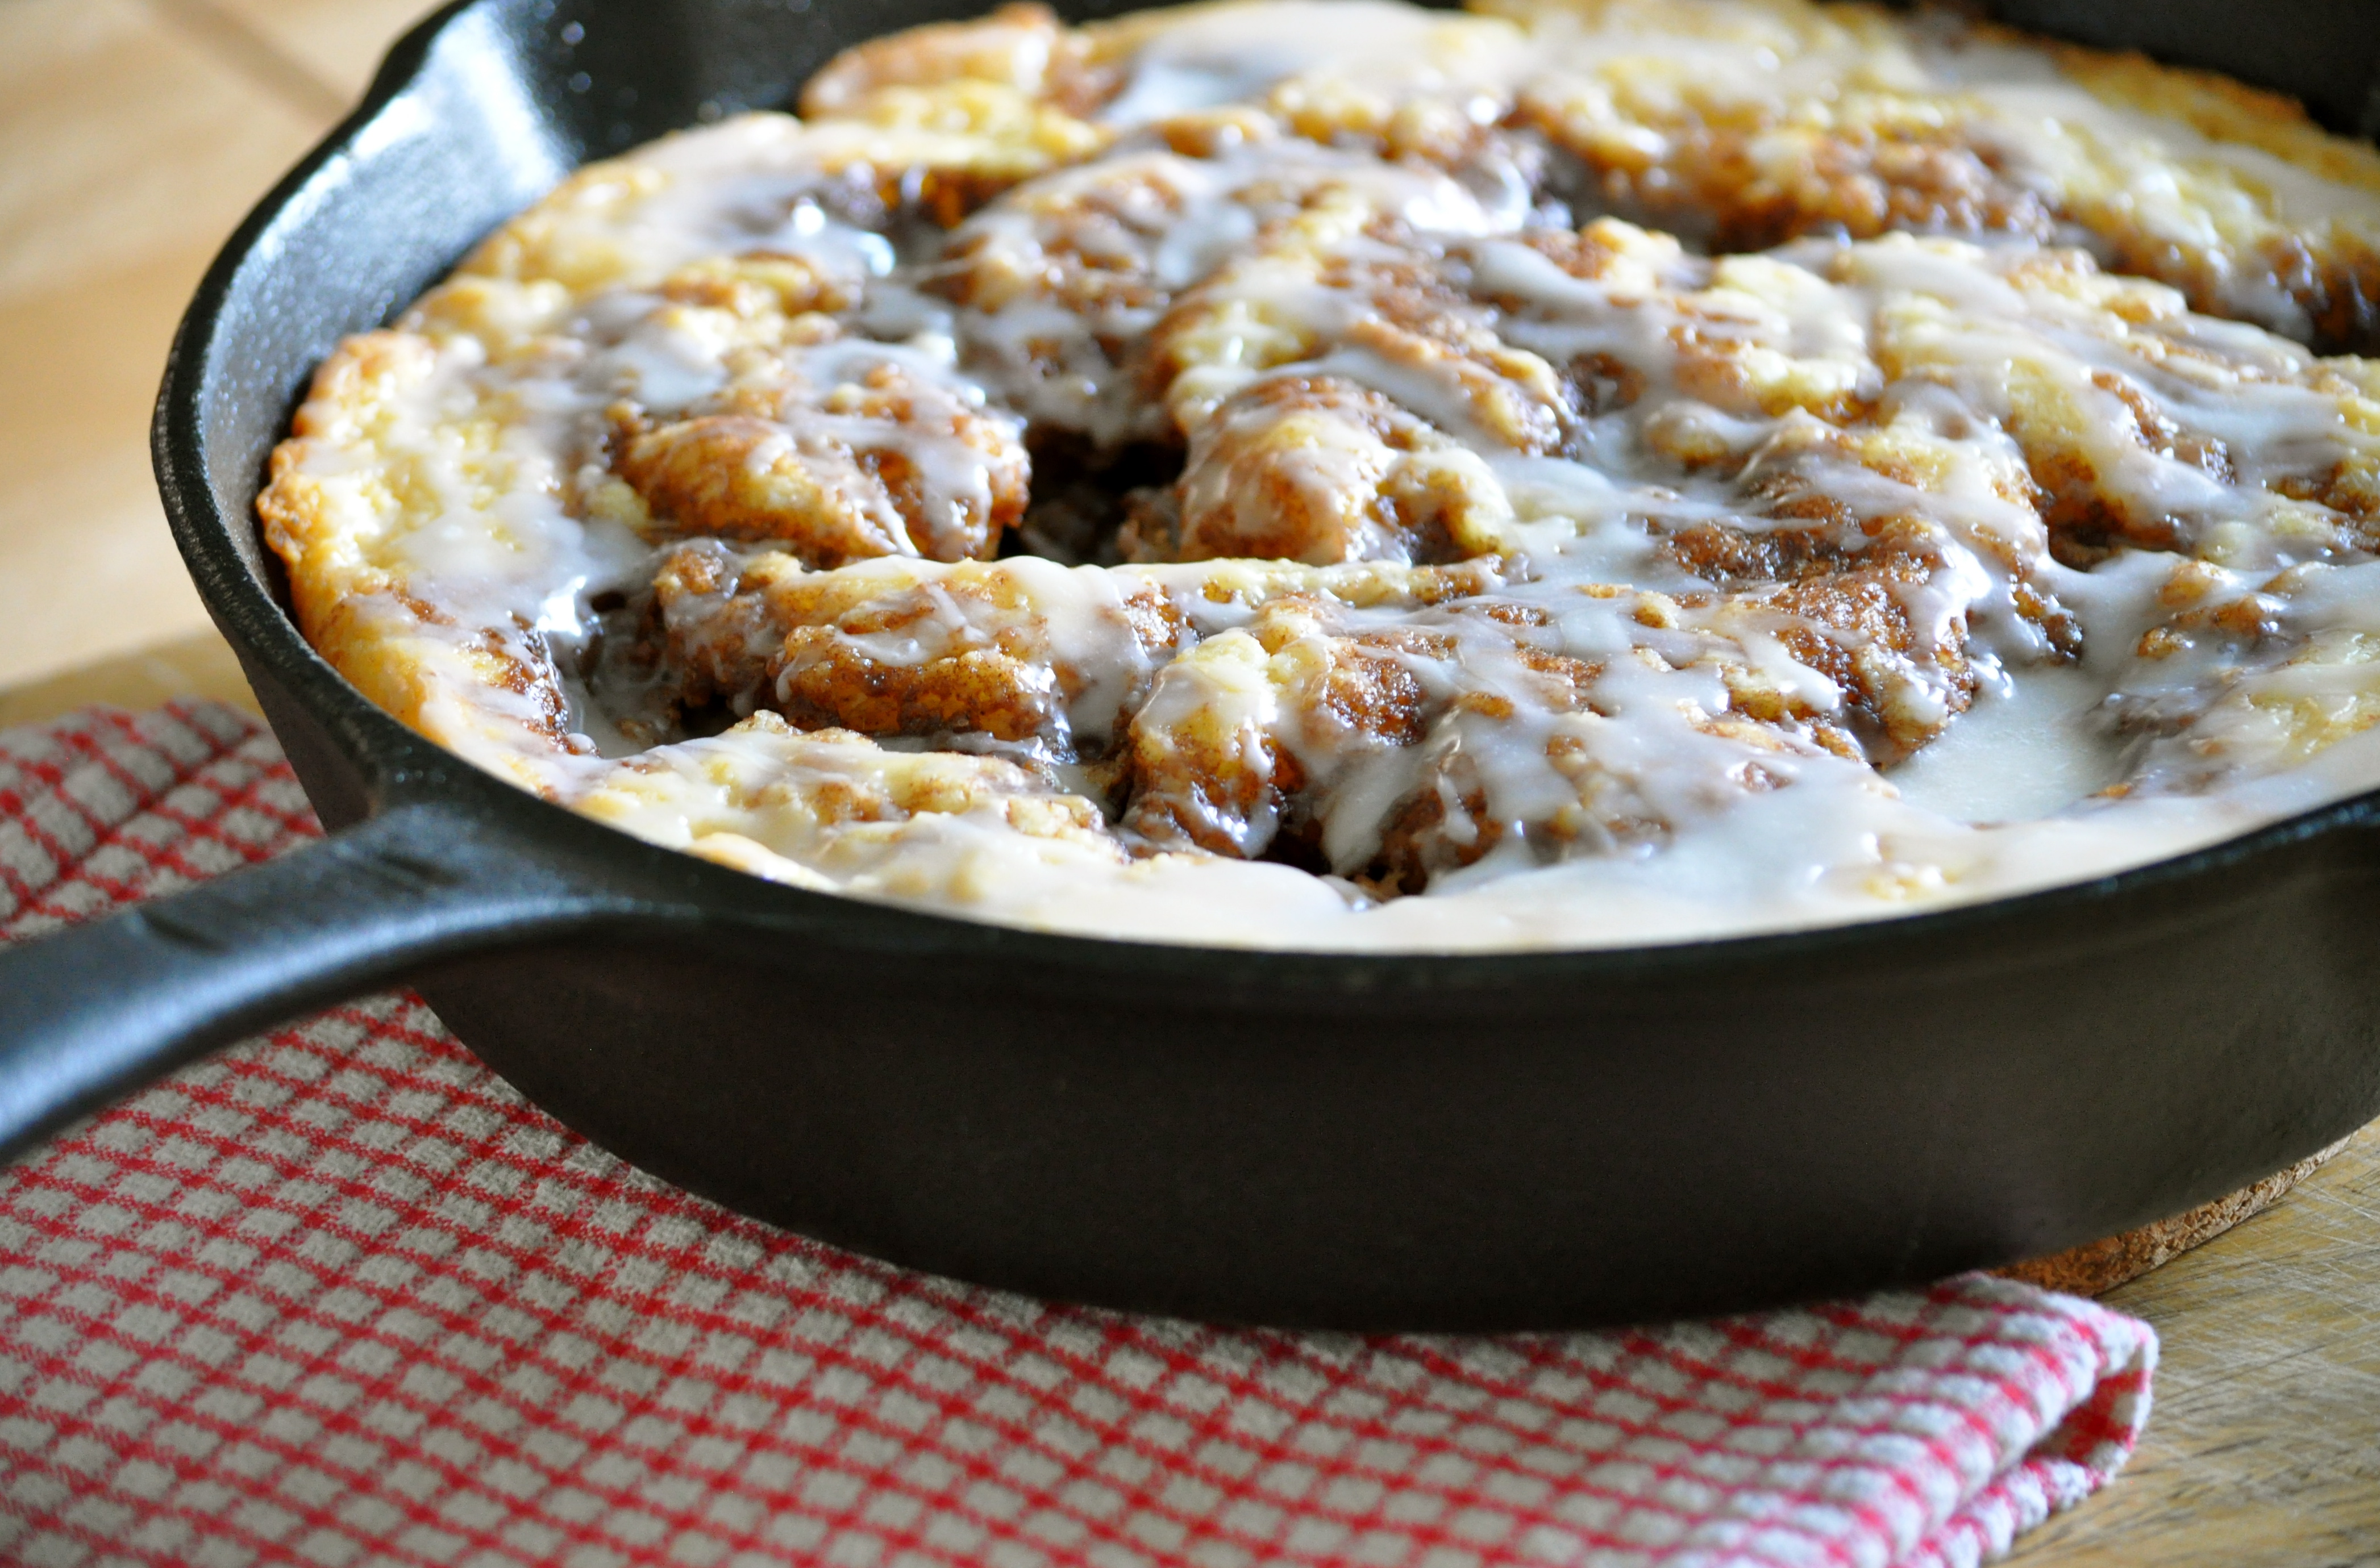
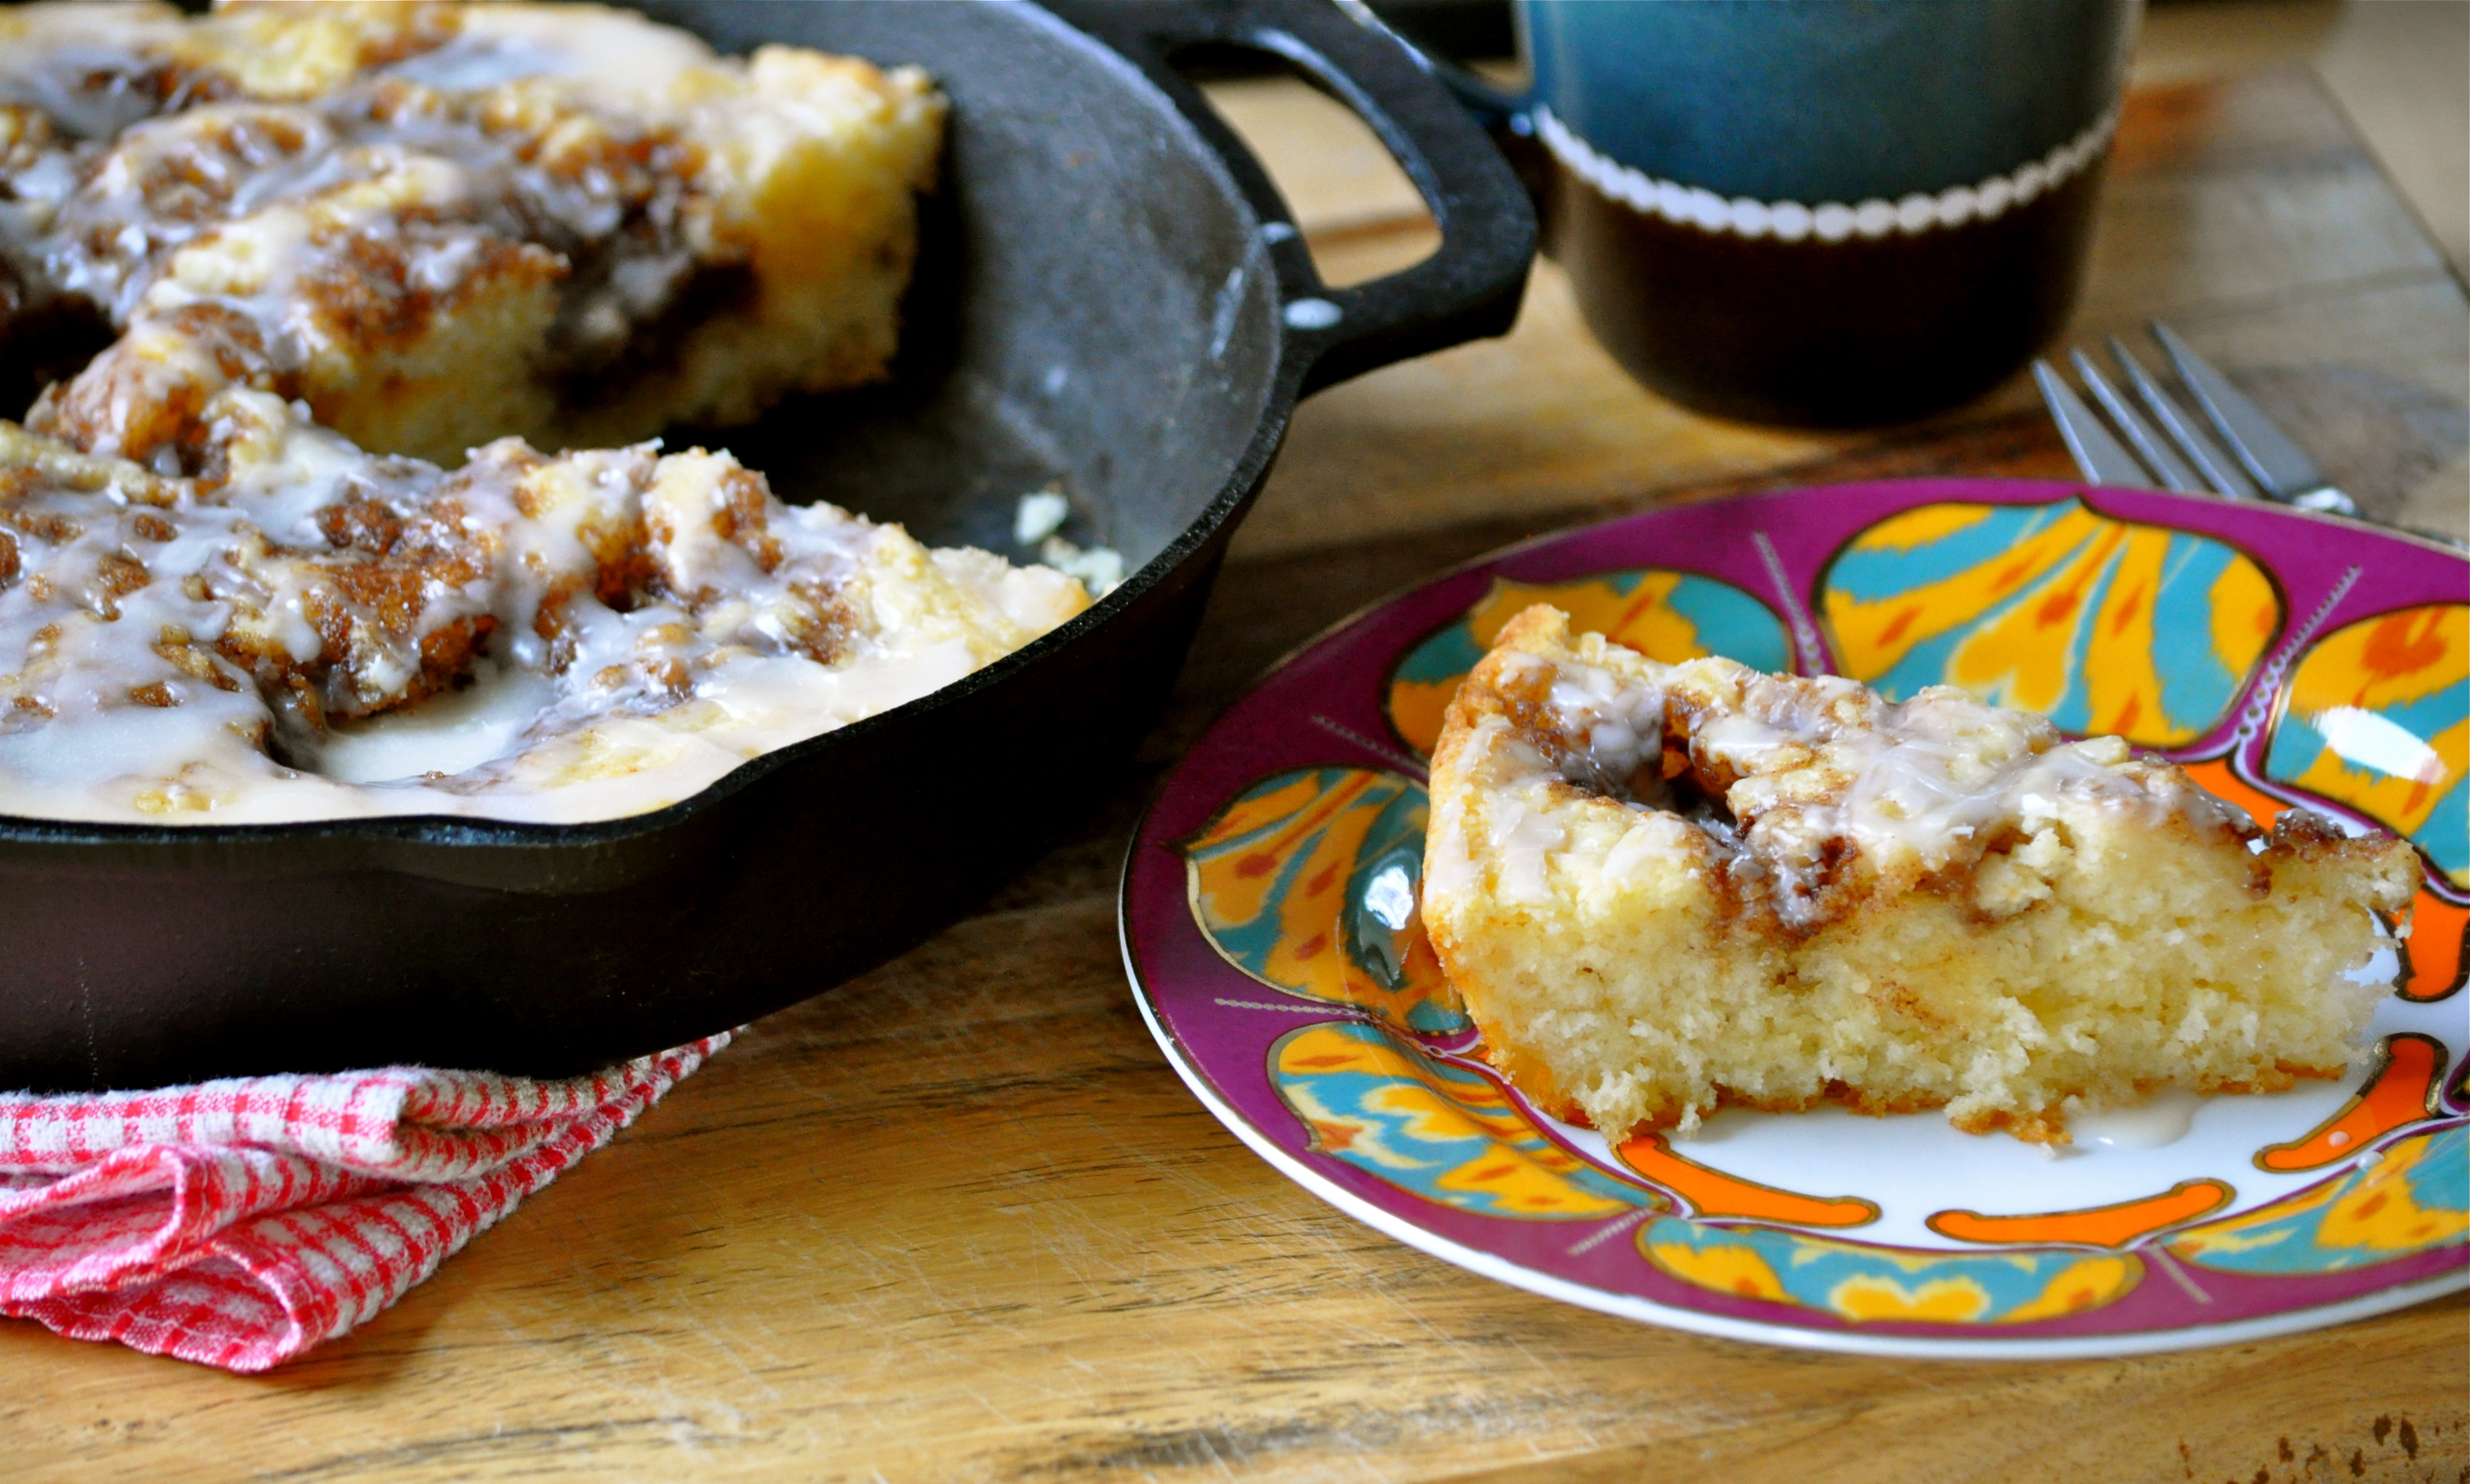
While I certainly don’t have the answer, I do have a new trick up my sleeve. One thing I definitely don’t have time for is making homemade cinnamon rolls on the regular. But imagine having a warm slice of cake that tastes exactly like a freshly baked cinnamon roll to stuff into your pie hole in only a fraction of the time?! Yes friends, that is what we call a win.

Brown Butter Cinnamon Roll Skillet Cake | Once Upon a Recipe

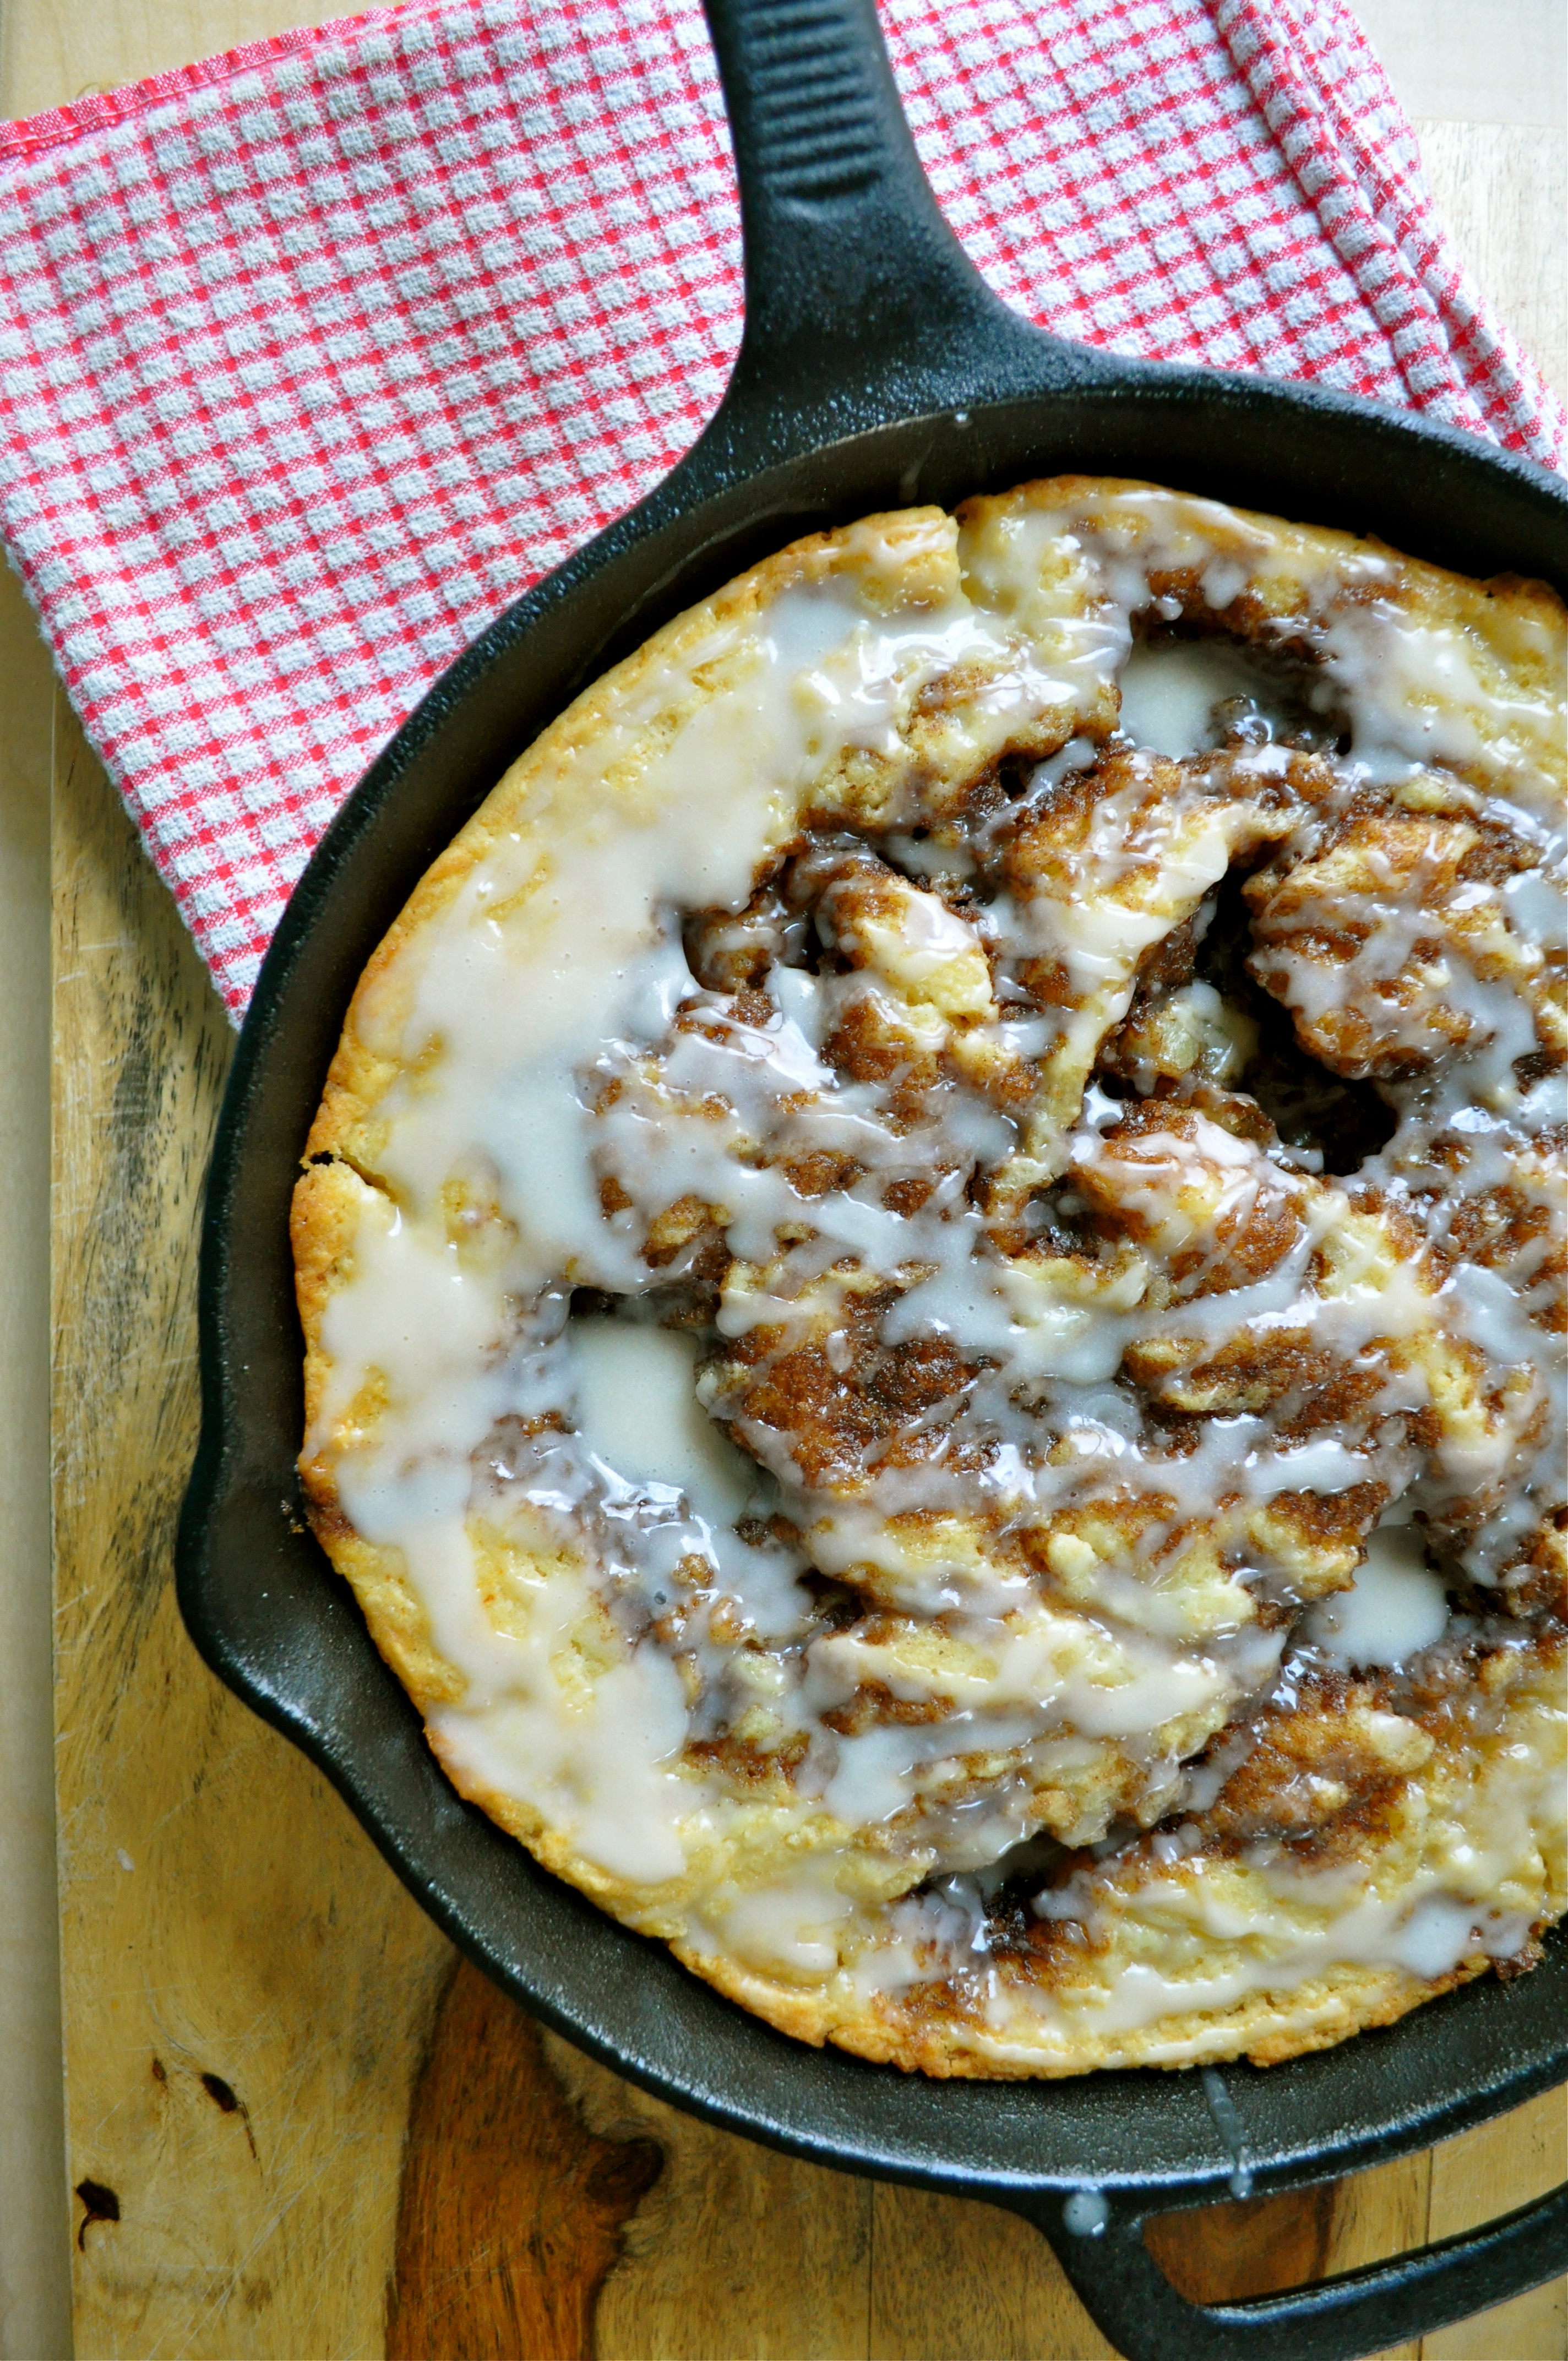
This skillet cake comes together lickety-split, quicker than you can say “but I don’t have time!” The first time I made this, I whipped it up when I woke up in the morning and baked it while I got ready for work. By the time I had to leave, it was cool enough to handle and transport. Dudes, it was still warm when we ate with our morning coffee. Now if that doesn’t make a work day better, I’m out of ideas.

Now, I recommend that you throw this cake together one morning when you need a little pick-me-up. Even during the crazy holiday season that is descending upon us, you can make the time. Browning the butter isn’t even necessary, but it does add a little something extra. However, I promise you it’s still completely delicious if you forego that step. Enjoy, sweet friends!

Brown Butter Cinnamon Roll Skillet Cake | Once Upon a Recipe

Brown Butter Cinnamon Roll Skillet Cake (recipe adapted from Crunchy Creamy Sweet)

A warm, fluffy cake, filled with little craters of brown sugar and cinnamon, reminiscent of a freshly baked cinnamon roll. If you don’t have a skillet, you can bake it in a 8 x 8 pan, or you can double the recipe and bake it in a 9 x 13 pan. Be sure to grease the pan well. And if you want to skip the step of browning the butter, just make sure it’s melted before you incorporate it into the rest of the batter. Serves 6.

Cake:

1 1/2 cups all-purpose flour

1/2 cup granulated sugar

2 tsp. baking powder

Pinch of salt

3/4 cup milk

1 egg

1 tsp. vanilla

1/4 cup brown butter*

Topping:

1/2 cup butter, softened

1/2 cup brown sugar, packed

1 TBSP. all-purpose flour

1 1/2 tsp. cinnamon

Glaze:

1 cup powdered sugar

1 tsp. vanilla

2 TBSP. milk

Preheat the oven to 350°F. Mix all of the cake ingredients together, except for the butter. Slowly stir in the butter and mix just until incorporated (don’t overmix). Pour into a greased 10-inch skillet and spread out evenly. Mix the topping ingredients together until well combined. Drop by spoonfuls evenly over the batter and swirl with a knife. Bake for 25-28 minutes, or until golden brown around the edges.

Combine the glaze ingredients and drizzle over top of the cake while still warm. Serve immediately. Leftover cake can be stored for a couple of days if well-wrapped.

*If you’ve never browned butter before, here is a really great tutorial.

Brown Butter Cinnamon Roll Skillet Cake | Once Upon a Recipe

Gettin’ Tarty | Brûléed Lemon Tart

Brûléed Lemon Tart | Once Upon a Recipe

Ladies and gentlemen, behold one of the most fabulous things I have ever baked and eaten. The brûléed lemon tart.

I think I may have just made that word up: brûléed. I’m rather certain that brûlée is a noun and that I just used it as a verb. Wait, is that right? Suddenly, I am having difficulty recalling the basics of English grammar. But I don’t care. It sounds kinda catchy.

Bruleed Lemon Tart | Once Upon a Recipe

And this tart is pretty damn catchy. As in, you’ll want to catch it in your mouth because it’s damn delicious.

My apologies, the words aren’t exactly flowing well at the moment. My mind is a bit preoccupied with the fact that in less than 24 hours, I will be on a plane en route to Hawaii, where I will enjoy two weeks of uninterrupted bliss with some very fun people. My body is here, but my brain is already in the sun, sand, and Mai Tais.

Bruleed Lemon Tart | Once Upon a Recipe

But before I go, I must share this tart with you. It may look simple, but it is rather magnificent. A buttery shortbread crust filled with a sweet/tart creamy lemon filling, topped with a sugar crust akin to the one you’d find atop another delectable dessert, crème brûlée. I first made this tart last summer for my mom’s birthday. I topped it with blackberries. It received rave reviews. I made it again as part of the rather gluttonous Easter Feaster a couple of weeks ago, and it did not survive the Easter Feaster table.

Bruleed Lemon Tart | Once Upon a Recipe

If you’ve never made a tart before, fear not. It’s ridiculously simple. The crust comes together in a flash in a food processor. After chilling out in the fridge for a couple of hours, it gets rolled out and pressed into a tart pan. Bake ‘er up. Mix the filling ingredients together. Pour over crust. Bake again. Sprinkle with sugar. Torch it up. Badabing, badaboom.

Brûléed Lemon Tart | Once Upon a Recipe

Despite the large quantities of cream, butter, sugar, and eggs in this recipe, the end result is surprisingly light. And this tart comes with a guarantee: It will not survive more than 24 hours. You have been warned. Either invite some friends over or be prepared to eat this thing until it’s gone. No judgment here if you choose the latter.

Brûléed Lemon Tart | Once Upon a Recipe

A quick note: I will be spending the next two weeks in paradise, and while I would love to promise that I will update the blog a time or two, if the Mai Tais and Pina Coladas are calling to me, I’m not going to ignore them. However, I can guarantee that I will be sharing tidbits from my adventures on Instagram and Twitter, so follow me there if you’re so inclined. The adventures will include a visit here. Have a fabulous couple of weeks, friends! xo.

Brûléed Lemon Tart | Once Upon a Recipe

Brûléed Lemon Tart (from Epicurious, originally printed in Bon Appétit, April 2004)

Makes one 10-inch tart. Feel free to jazz up the finished product with fresh fruit, such as blackberries or blueberries. With that said, it’s just as delicious without any additions. 

For the crust:

1 cup all-purpose flour

1/4 cup icing sugar

Pinch of salt

6 TBSP. unsalted butter, cold and cut into cubes

6 tsp. whipping cream

For the filling:

3/4 cup + 2 TBSP. sugar, divided

3/4 cup whipping cream

4 egg yolks (reserve one egg white)

2 whole eggs

Juice + zest from 2 large lemons (about 1/2 cup juice + 1 TBSP. zest)

For the crust: Combine the flour, icing sugar, and salt in a food processor and pulse for a few seconds until blended. Add the butter and pulse until the mixture looks like coarse meal. Add the whipping cream and blend until moist clumps form. If the dough is too dry, add more whipping cream one teaspoon at a time. Gather the dough into a ball, flatten into a disc, and then wrap in plastic wrap and refrigerate for two hours.

Preheat the oven to 350°F. Remove the dough from the fridge and roll out onto a floured surface. I used a 10-inch tart pan with a removable bottom, but a 9-inch tart pan would work fine too. Roll the dough thin enough to cover the bottom of the pan and create double-thick sides. Press into the tart pan. Poke the bottom of the tart shell all over with a fork. Bake for 18 minutes. Brush the inside of the tart shell with the reserved beaten egg white. Maintain the oven temperature.

For the filling: Combine the 3/4 cup sugar, whipping cream, egg yolks, eggs, and lemon juice and zest in a large bowl and whisk together until combined. Pour the filling into the warm tart shell and return to the oven. Bake for 30-35 minutes, or until the filling is slightly puffed at the edges and set in the center. Cool for about an hour.

Sprinkle the remaining 2 TBSP. of sugar over the filling. Use a kitchen torch to caramelize the sugar, as if you were making crème brûlée. If you do not have a kitchen torch, you can use your broiler to achieve a similar effect. Be very careful, checking the tart after a minute or two, and turning the pan for even browning. It may also be wise to cover the edges of the crust with tin foil to prevent the crust from getting too brown. Allow the tart to cool for another hour, until the topping is crisp. Slice and serve!

Brûléed Lemon Tart | Once Upon a Recipe

Stuffed to the Gills | Salmon Stuffed with Spinach, Sun-Dried Tomatoes, and Feta

Stuffed Salmon | Once Upon a Recipe

Da-dun-tss. I’m not sure what is more hilarious – my lame pun (stuffed to the gills) or the fact that da-dun-tss is actually defined by Urban Dictionary and my name is totally used in the example. Check it. Anyways…

Want to know how to really impress someone? Anyone…a family member? A friend? A member of the opposite sex (or same sex, if that’s your thing)? (whether or not you’re trying to woo said person is totally optional, but preferred)

…cook for them! And don’t just cook anything. Cook something that totally looks and tastes like you put way more effort into it than you actually did!

Stuffed Salmon | Once Upon a Recipe Stuffed Salmon | Once Upon a Recipe

This salmon is a fine example. I mean, look at it. Two thick salmon fillets, perfectly cooked, and sandwiched around a ridiculously delicious filling of spinach, sun-dried tomatoes, and feta cheese. It’s beautiful! And totally looks and tastes gour-met. I’m confident enough in the wow-factor of this salmon that I’m prepared to give you a money-back guarantee. If you make this for someone and they don’t like love it, I will have a batch of freshly baked cookies couriered to your doorstep. Call it a cookie-back guarantee. (But play nice and refrain from testing my theory on someone who is opposed to fish, ’cause obviously that ain’t gonna work).

Stuffed Salmon | Once Upon a Recipe

Seriously. My Dad makes a mean grilled salmon, but this comes in at a very close second. And it’s as easy as can be! The inspiration came from a dinner I had at a friend’s place (hi Bev!), where she made a similar stuffed salmon, but with goat cheese. I never got her recipe but tried to recreate it at home and decided to use feta, since that’s what I had on hand. The feta is a little bit less overpowering than goat cheese, which worked really well here, since some of the other flavors (like the sweetness of the sun-dried tomatoes) were able to shine through. Serve the salmon with Orzo with Parmesan and Basil, and a steamed green like broccoli or asparagus, and you’ve got yourself an incredible, yet supremely easy meal. Sure to win over the hearts of many.

Please take me up on my offer. I like being right.

Stuffed Salmon | Once Upon a Recipe

Salmon Stuffed with Spinach, Sun-Dried Tomatoes, and Feta

Serves 2-3 generously. If feeding a larger group, increase the size of the salmon fillets and double or triple the filling ingredients. Also be prepared to adjust the baking time. Make sure that your fillets are very similar in size and have a relatively even thickness throughout. If the fillets are thick in the centre and thin at the ends, you will end up with cooked ends and an uncooked centre, or a cooked centre and overcooked ends, which would be a real shame. 

2 fresh salmon fillets (skinless), about 1/2 pound each and 1 inch thick

1 TBSP. olive oil

2 heaping cups of fresh baby spinach, roughly chopped

1/3 cup sun-dried tomatoes, packed in oil (drained and roughly chopped)

1/3 cup + 2 TBSP. crumbled feta cheese

2 cloves of garlic, minced

1 lemon, halved

Salt and pepper, to taste

Preheat the oven to 375°F. Spray a shallow casserole dish or baking sheet with non-stick spray. Lay one of the fillets down in the baking dish. Heat the olive oil in a skillet over medium-heat and saute the spinach until just wilted, about 1 minute. Add the sun-dried tomatoes and the garlic, and stir for another minute. Remove from heat and stir in 1/3 cup of feta cheese.

Spread the mixture evenly on top of the fillet. Squeeze half of the lemon over top of the filling. Lay the second fillet over top of the first, lining it up as evenly as possible. Squeeze the other half of the lemon over top, and then liberally sprinkle with salt, pepper, and the remaining feta cheese. Bake for 25-30 minutes, or until the salmon is just cooked through. Please note that the baking time will vary greatly depending on the size and thickness of your salmon fillets, so adjust accordingly. I suggest keeping a close eye on it after the first 20 minutes.

Stuffed Salmon | Once Upon a Recipe

Now get to that woo-ing.

There’s An App for That | Pasadena Pinwheels

Pasadena Pinwheels | Once Upon a Recipe


Aloha mes amigos!

‘Tis the holidays! At this time of year, every good host and hostess needs a few recipes in his or her entertaining arsenal – tried and true crowd pleasers that can be counted on time and time again. For me, Pasadena Pinwheels is one of those reliable appetizers that everyone seems to love. They are easy to prepare ahead of time, only need a quick nip in the oven before serving, and well, they’re kind of delicious.

Why not give ’em a try this holiday season? Whether you’re hosting a party or attending one and need something easy to take along (yes, we’re all going to be good guests this year), Pasadena Pinwheels are money.

I’ll even walk you through it. Let’s get started!

Pasadena Pinwheels | Once Upon a Recipe


The ingredient list is trés simple. Cream cheese, a lil’ mayo, green chiles, tomato, onion, garlic, chili powder, salt, and tortillas. And some salsa for dipping.

Pasadena Pinwheels | Once Upon a Recipe


Pasadena Pinwheels | Once Upon a Recipe

Pasadena Pinwheels | Once Upon a Recipe

Pasadena Pinwheels | Once Upon a Recipe


Mix it all together. Spread it on the tortillas. Roll ’em up. Slice. Arrange them all pretty on a platter. Snack on the ends as you’re working. Refrigerate until you’re almost ready to serve. Pour yourself a glass of wine before your guests arrive. You deserve it.

Ten minutes before you want to serve your Pasadena Pinwheels, heat up your oven to broil, pop the whole shebang into the oven for a couple of minutes, just until things are getting toasty and golden. Boom. Dinner Appetizer is served. You can thank me later.

Pasadena Pinwheels | Once Upon a Recipe


Pasadena Pinwheels

8 ounces of cream cheese, softened

2 TBSP. mayonnaise

1 4-ounce can of diced green chiles

1 large tomato, finely chopped

1/4 cup onion, finely chopped

2 garlic cloves, minced

1 tsp. chili powder

1/4 tsp. salt

10 large flour tortillas

Mix everything together (an electric mixer works well). Refrigerate for at least two hours or overnight (to let those flavors mingle!). Spread evenly onto the tortillas, roll each tortilla up tightly, then slice into 1-inch rounds. Arrange on a platter or cookie sheet. Broil until golden brown before serving. Dip into salsa, if desired.

Pasadena Pinwheels | Once Upon a Recipe


What is your favorite go-to holiday appetizer recipe? 

How To: Easter Fun | Chocolate Nests

How to have fun this Easter…

Grab some easy ingredients and throw ’em all together. We’re talking four ingredients, friends. Easy as pie. Actually, way easier than pie. Do it!

Whatever way you’re spending this Easter weekend, I hope it involves much food, love, and happiness. And most importantly, chocolate!


Chocolate Nests (from The Pastry Affair)

Makes 8 nests. 

1/2 cup peanut butter

1 cup chocolate chips

3 cups chow-mein noodles

Mini-eggs (or jelly beans)

In a saucepan over low heat, melt the chocolate and peanut butter and stir until smooth. Pour over top of the chow mein noodles and stir until evenly coated. Drop by spoonfuls onto a cookie sheet lined with waxed or parchment paper. Try to create “nest” shapes as you work, leaving an indentation on the top of each nest. Allow the nests to set in the refrigerator for at least 30 minutes before decorating with chocolate eggs or jelly beans.

PS. The fun level of this activity is exponentially higher when you have help from little hands. 🙂

%d bloggers like this: