One Bowl Banana Bread

One Bowl Banana Bread | Once Upon a Recipe

Hello, beautiful friends! It’s been nearly nine months since my last blog post. NINE months! Let’s start with a little review of some of the things that a person can do in nine months.

  1. Grow a baby. (I didn’t).
  2. Learn another language (I didn’t).
  3. Grow 4.5 inches of hair. (Maybe?)
  4. Train your dogs to not attack (with love) any person that comes to the door or any other living creature you come upon on a walk. (We didn’t).
  5. Get engaged and plan most of a wedding. (Working on it!)
  6. Finish unpacking the house you moved into almost a year ago. (Nope).
  7. Do everything but write a blog post. (Clearly I’m an expert at this).

One Bowl Banana Bread | Once Upon a Recipe

In all seriousness, I’ve really let this old blog down over the past nine months. Life just kept getting in the way of blogging (mostly because I let it), and with every passing week it became harder to get back in the saddle. Even taking the photos for this post was a lesson in patience. I’m not even kidding when I say that I forgot how to use my camera, how to style photos, and quickly became frustrated. So frustrated that I almost threw in the towel. But after few deep breaths and sticking with it,  I slowly started to feel a little bit more comfortable. I realized how much I’ve missed this space and cooking and baking things and sharing them with you.

One Bowl Banana Bread | Once Upon a Recipe

I’ve said it a hundred times before – that I’ll get better about blogging and get back into a routine of regularly posting recipes. But the truth is, I don’t know if I can keep that promise. So instead of telling you (for the umpteenth time) that I’m going to get back to a schedule of posting weekly or even monthly, I’m just going to make an effort to get back here as often as possible, realizing that the frequency of posting will fluctuate depending on what else is going on in my life. We’re all just doing the best that we can, right?

One Bowl Banana Bread | Once Upon a Recipe

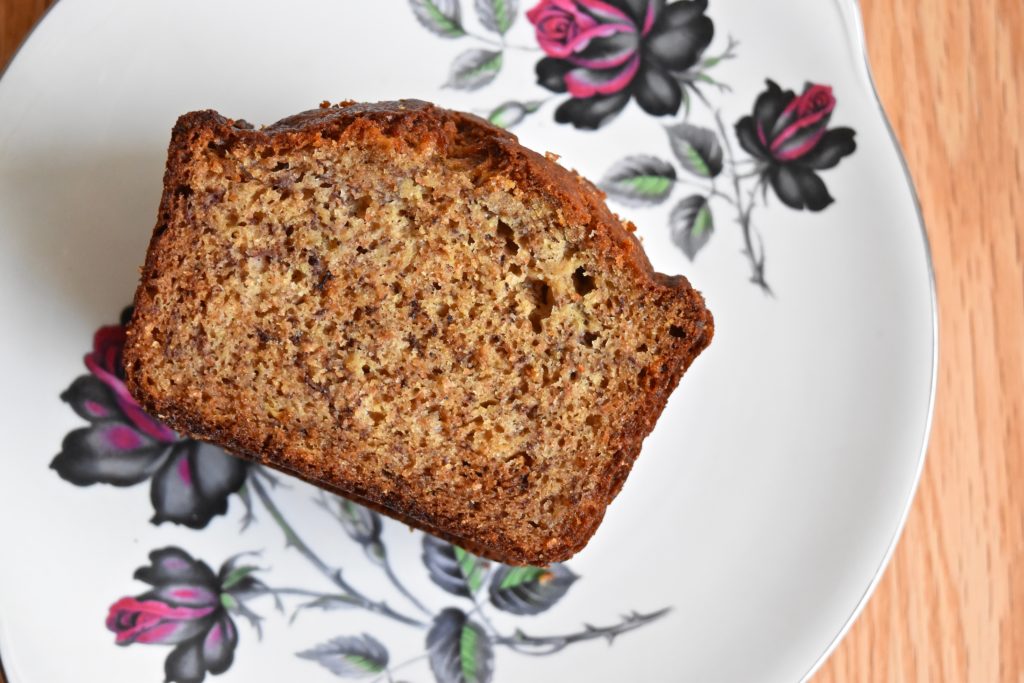
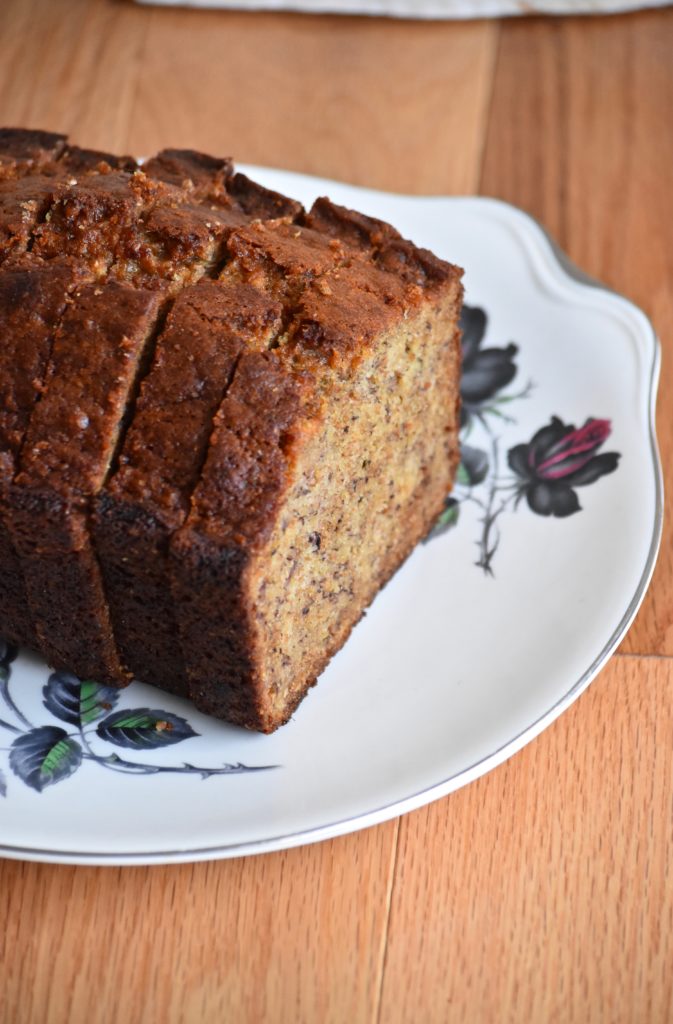
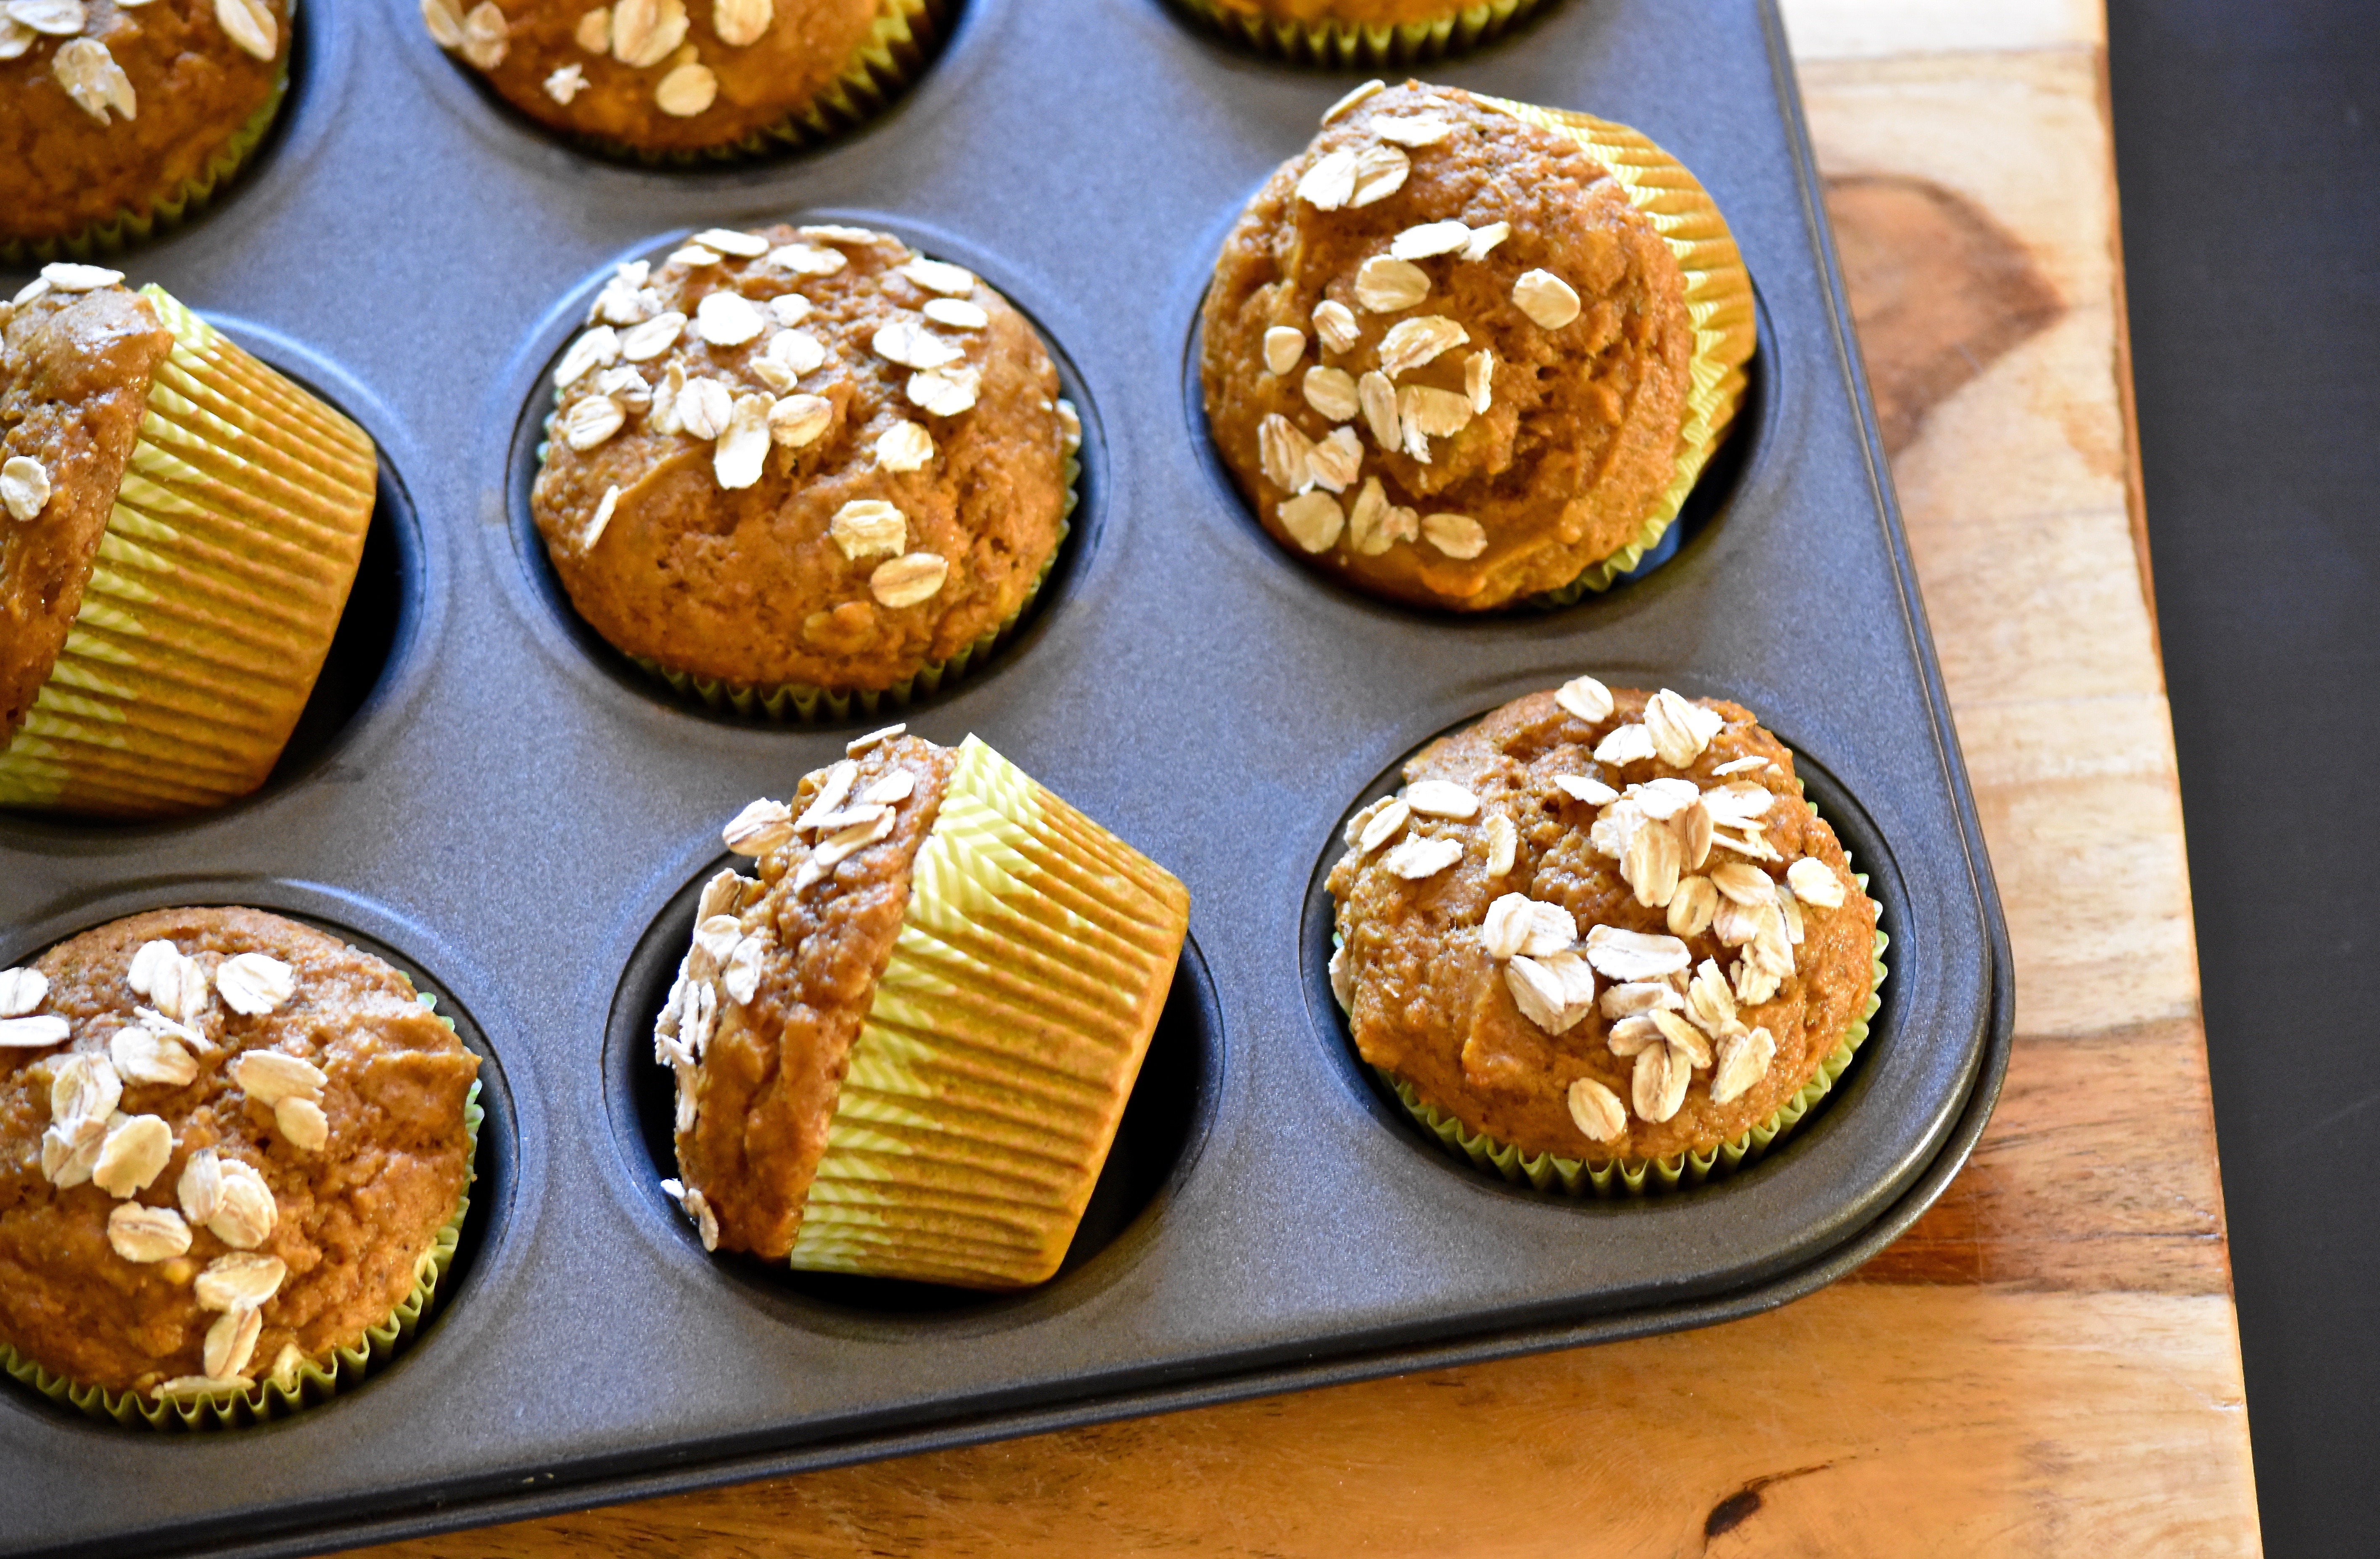
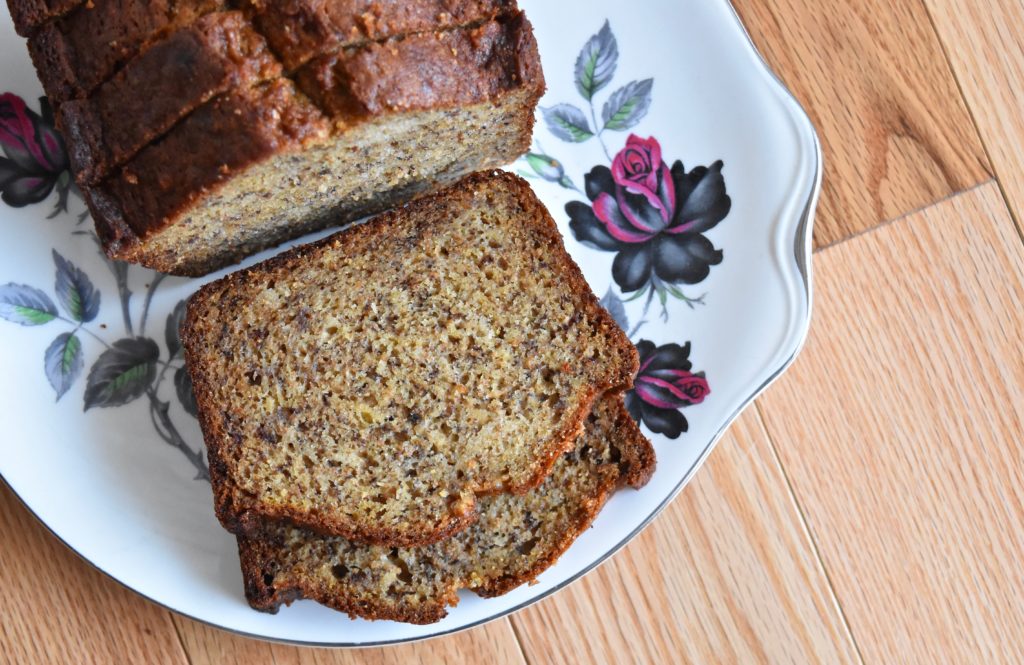
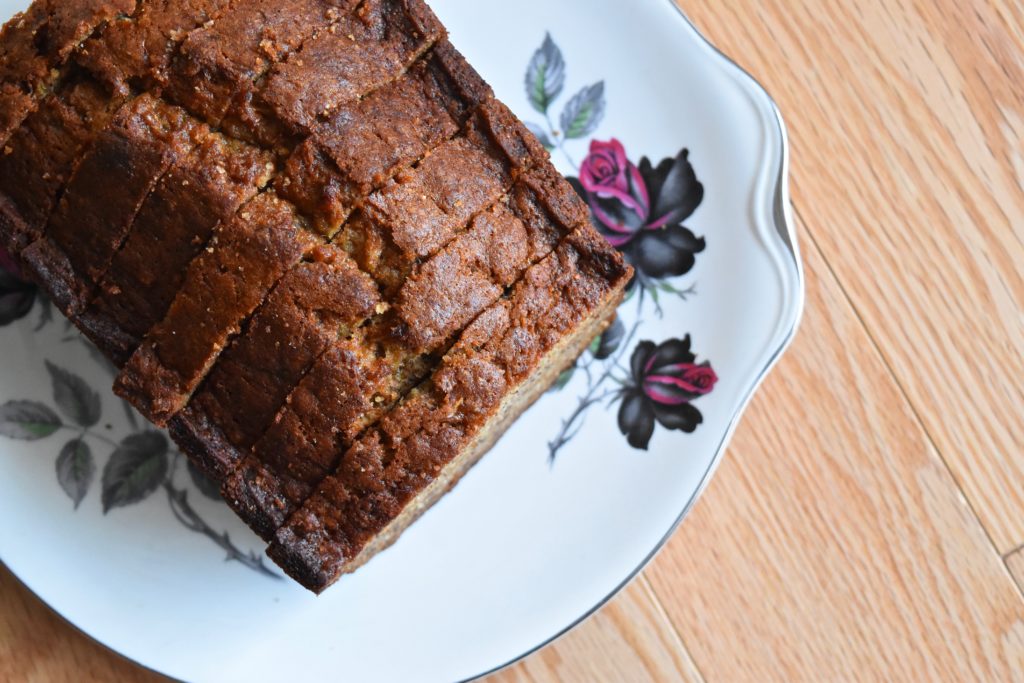
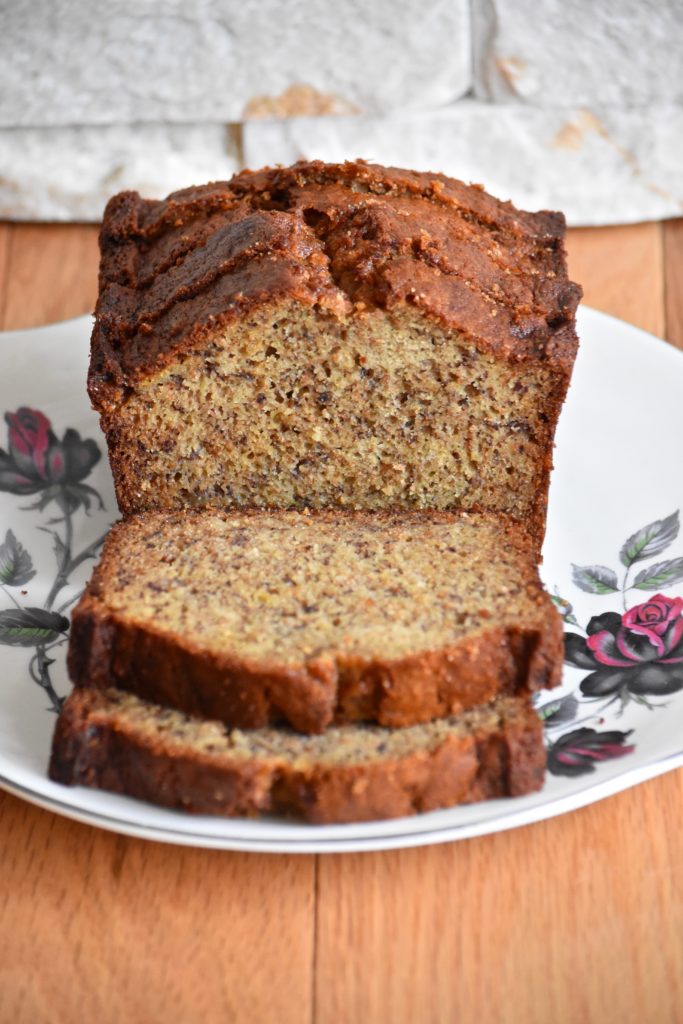
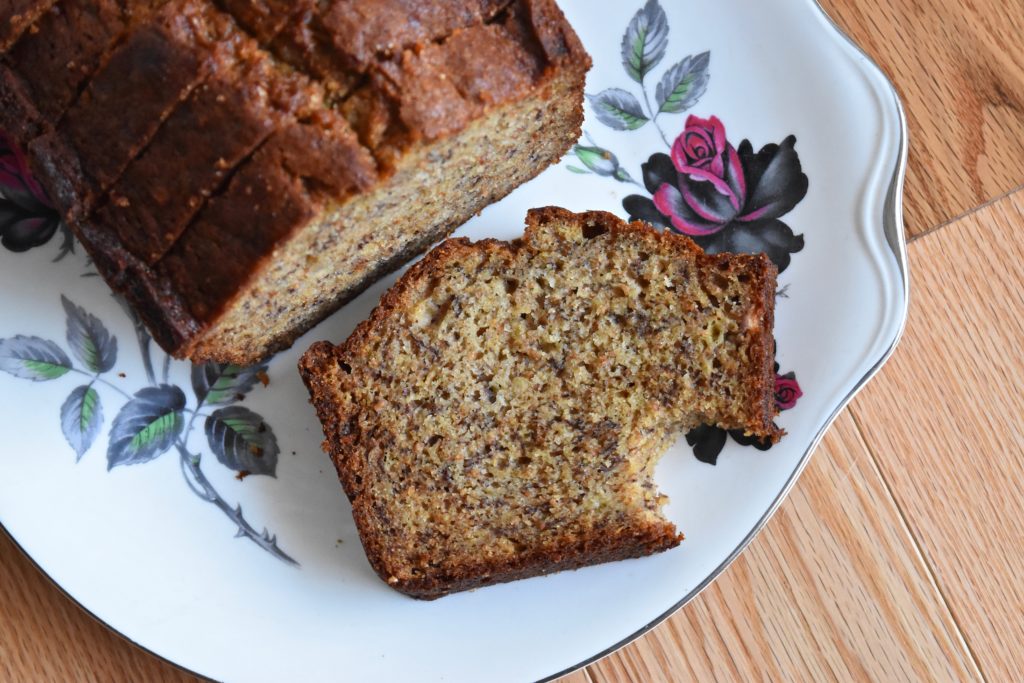
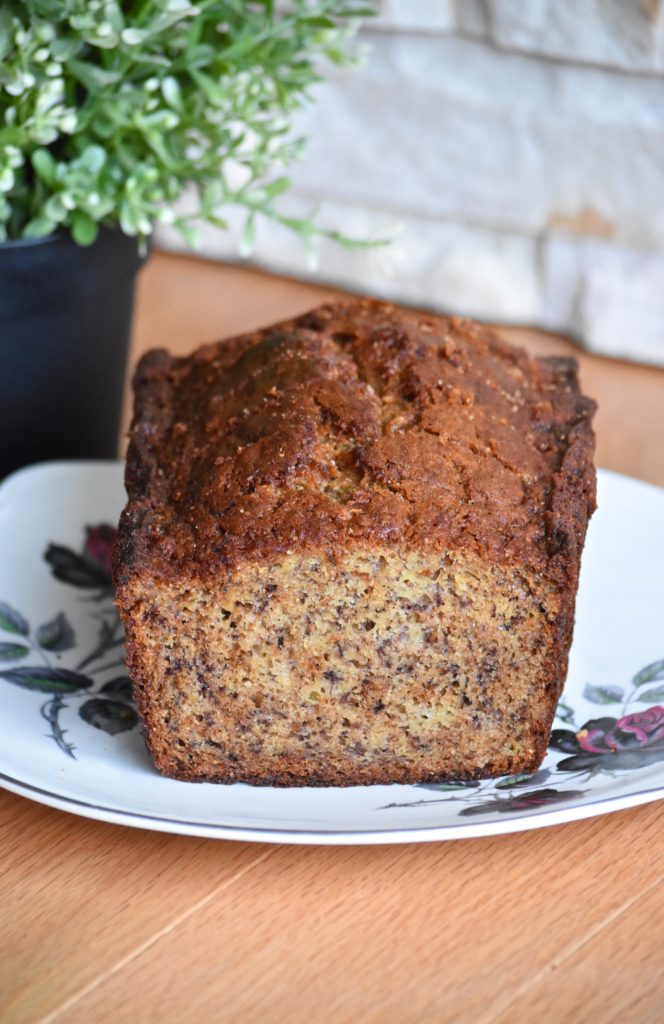
So I come to you today with a simple recipe – this One Bowl Banana Bread. Everyone should have a foolproof banana bread recipe in their baking arsenal. It’s quick to whip up, made with ingredients that you most likely have on hand (the most important of which is a few ripe bananas!), and is generally loved by all. I had assumed that most people already have a well-loved banana bread recipe, but I recently made a couple loaves and took them to work to share with my colleagues and had a number of requests for the recipe.

One Bowl Banana Bread | Once Upon a Recipe

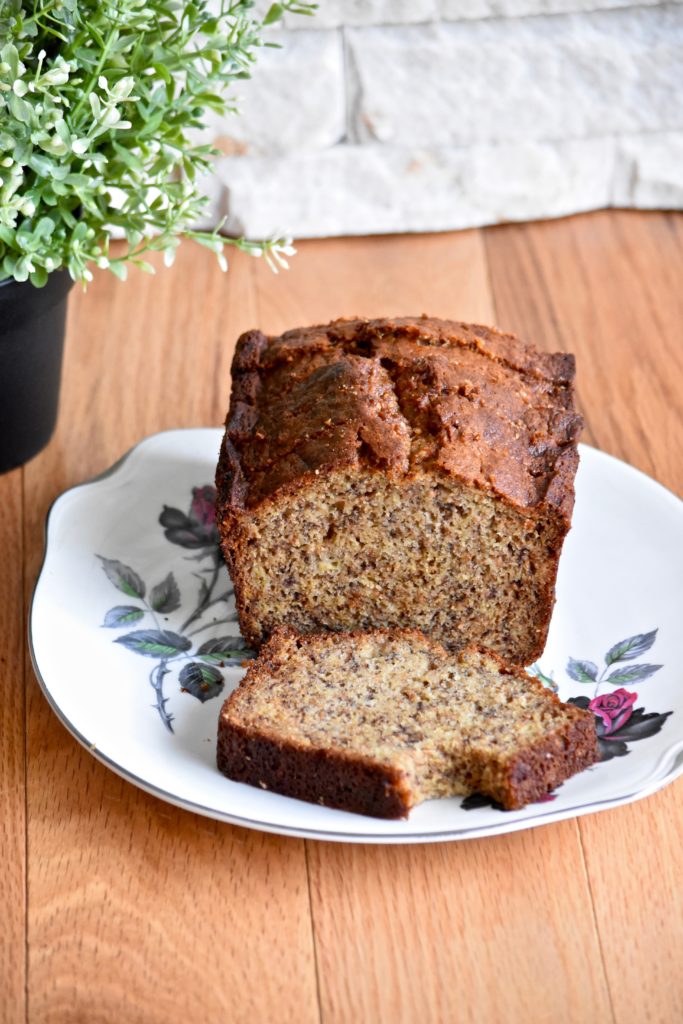
So on the chance that you are one of those people who has yet to find the perfect banana bread recipe, or if you’re looking to shake things up with a new recipe, I urge you to give this one a try. It’s so quick and easy to put together – all in one bowl, no less! – and can be modified according to what you have on hand. You can use just all-purpose flour or just whole wheat flour, or a combination of the two. You can use a different oil if you prefer, but I like using vegetable oil because of it’s mild flavour. You could add in some cinnamon if you so desired, or chocolate chips to make this loaf a little bit more of a treat. But I love it as I’ve written it here, without chocolate chips or other flavours. It’s perfect when enjoyed with a cup of coffee in the morning or an afternoon snack.

One Bowl Banana Bread | Once Upon a Recipe

One Bowl Banana Bread | Once Upon a Recipe

In other news, if anyone has any tips on how to stay sane and stress-free during the wedding planning process, please send them my way. Just a little less than six months to go!

One Bowl Banana Bread | Once Upon a Recipe

One Bowl Banana Bread

This banana bread recipe is very forgiving. You can play around with the white to whole wheat flour ratio depending on your preference. I’ve had success with using just whole wheat flour, but mixing the two gives the bread a more delicate crumb. You can also use just all-purpose flour if you prefer. If you’re feeling sassy, add in up to 1/2 cup of chocolate chips. Makes one loaf (8 1/2-inch x 4 1/2-inch). 

3/4 cup whole wheat flour

1/2 cup all-purpose flour

1 tsp. baking soda

1/2 tsp. baking powder

1/4 tsp. salt

1/2 cup vegetable oil

3/4 cup light brown sugar, packed

3 large ripe bananas, mashed

2 eggs

1 tsp. vanilla

Preheat the oven to 350°F. Spray a loaf pan with non-stick spray and set aside.

In a large bowl, whisk together the oil, brown sugar, bananas, eggs, and vanilla. Add in the flours, baking powder, baking soda, and salt, and stir until just combined. Spoon the batter into the prepared loaf pan and bake for 55-60 minutes, or until a toothpick inserted into the center of the loaf comes out clean. Cool completely, then remove from the pan and slice. Store in an airtight container for up to three days. This loaf also freezes well.

One Bowl Banana Bread | Once Upon a Recipe

Rhubarb Crumble Ice Cream

Rhubarb Crumble Ice Cream | Once Upon a Recipe

Well, hello July!

The last few months have flown by in a flurry of boxes, trips to the eco-station and Good Will, buying furniture, and unpacking. I always forget just how much I detest moving until I’m right in the thick of it. It’s amazing just how much stuff one can accumulate after living in a space for a few years and how much crap can fit into the tiniest nooks and crannies of a home.

Rhubarb Crumble Ice Cream | Once Upon a Recipe

However, all annoyances aside, we moved into our new home in the middle of May and we are completely in love with it! The house is still coming together, we are still organizing and setting up particular rooms, but we are slowly getting there. The new place has so much more space and light than either of us are used to, and it has been really fun (and a bit overwhelming) to start to make it our own. Blending the styles of two different people certainly has its challenges, but thankfully my love and I are both pretty laid back people. Plus, he can totally sense when he’s fighting a losing battle and leaves the final decision to me. (What can I say, the man is a saint.) The fur children are also adjusting, but I’d say overall they love their new backyard and don’t seem to be having any difficulties with making their mark on the new space (and by mark I mean pee spots on the lawn and scratches on the hardwood floors). They have certainly added a bit of, erm…character to our home.

Rhubarb Crumble Ice Cream | Once Upon a Recipe

Rhubarb Crumble Ice Cream | Once Upon a Recipe

As soon as we moved in I was itching to make use of the kitchen. So much counter space, so much light! It’s wonderful. And just when I thought life couldn’t get any better, I discovered that our backyard has a rhubarb plant that is practically the size of a small car. Naturally, I am in heaven. I have already made several batches of rhubarb strawberry jam, rhubarb coffee cake, rhubarb compote, and several rhubarb berry crisps. And my latest creation: this rhubarb crumble ice cream. Aka. heaven on a spoon.

You start with a creamy vanilla base. I used this base from my peach cinnamon swirl ice cream from a few summers ago, but added a vanilla bean for a little oomph. Then you make a quick and easy rhubarb compote, bake up an addictive cookie crumble, and swirl it all together. The end result is basically rhubarb crumble à la mode, and you might just find yourself unable to stop eating the stuff. Plus, how pretty is that pink rhubarb swirl?!

Rhubarb Crumble Ice Cream | Once Upon a Recipe

I know I’ve said it a million times over the past year or so, but now that we are finally getting settled, I really do hope to be able to pay a little bit more attention to this blog. I’ve got so many recipes that I’d like to share. It really is just a matter of carving out the time to do it. Wish me luck!

Rhubarb Crumble Ice Cream | Once Upon a Recipe

Rhubarb Crumble Ice Cream (ice cream base slightly adapted from saveur.com by Jeni Britton, and cookie crumble from Take a Megabite)

For the ice cream:

2 cups whole milk
4 tsp. cornstarch
1 1/4 cups heavy cream
2/3 cup sugar
2 tbsp. light corn syrup
1 vanilla bean, scraped out
1/4 tsp. salt
3 tbsp. cream cheese, softened

Combine 1/4 cup of the milk and the cornstarch in a small bowl and mix well; set slurry aside. In a large saucepan, whisk together the remaining milk along with the cream, sugar, corn syrup, vanilla bean, and salt. Bring the mixture to a boil over medium-high heat. Cook for 4 minutes, then add in the slurry. Return to a boil and cook, stirring, until thickened, for about 2 minutes. In a large bowl, combine the cream cheese with about 1/4 cup of the hot milk mixture and whisk until smooth, then whisk in the remaining milk mixture. Cover the bowl and refrigerate until the mixture is chilled, or overnight. Churn the ice cream in your ice cream maker according to manufacturer’s instructions until it has the consistency of soft serve (mine took about 25 minutes).

For the rhubarb compote:

6 cups rhubarb (approx. 8-10 stalks), chopped
1/2 cup sugar
1/2 cup honey
1/4 cup water
1 tsp. vanilla

Combine the rhubarb, sugar, honey, water and vanilla in a large saucepan. Bring to a boil, then lower the heat and simmer for about 20 minutes (the rhubarb will break down). Remove the pan from the heat and cool completely.

For the crumble:

1 cup flour
1 cup sugar
1/4 tsp. salt
1/2 cup (1 stick) butter
1/2 tsp. cinnamon

Preheat oven to 350°F. Line a cookie sheet with parchment paper. Whisk together the flour, sugar, salt and cinnamon into a medium bowl. Cut butter into flour mixture with a pastry blender until mixture resembles a coarse meal. Transfer to the prepared baking sheet, spread out, and bake for about 30 minutes, tossing every 10 minutes, or until golden. Cool completely.

Layer the ice cream, rhubarb compote, and cookie crumble in a container. Use a knife or spoon to swirl the layers together. Cover with plastic wrap and allow the plastic to touch the ice cream – this will help prevent ice crystals from forming. Freeze for at least 4 hours. Scoop and enjoy!

What are your favourite rhubarb recipes? If you’ve got a good one, please send it my way!

Per La Famiglia: Balsamic Roasted Pear Wedges with Prosciutto + A Giveaway! {Giveaway Closed}

Per La Famiglia: Balsamic Roasted Pear Wedges with Prosciutto + A Giveaway! | Once Upon a Recipe

Nothing screams family to me quite as loudly as food.

For as long as I can remember, the special events in my family have always revolved around food – wonderfully, ridiculously, excessively so. A birthday doesn’t go by without the birthday girl or boy having the opportunity to pick the meal for their special day; Christmas isn’t complete without an absolute feast that has been preceded by a handful of appetizers and is followed by an absurd selection of sweets; and Mother’s Day provides the perfect opportunity for me to cook a meal (usually brunch) for my amazing mom, who is so often responsible for filling our bellies at Sunday family dinner. Because of my Norwegian roots on my mom’s side, it is our family tradition to make flat bread and spritz cookies every Christmas, to serve lefse at family gatherings, and a jar of pickled herring occasionally graces the table (something I have not yet developed a taste for and am not sure that I ever will). On my dad’s side of the family, you could almost always expect German cabbage rolls, platz, and my Grandma’s buns at our family gatherings.

Some traditions are not to be messed with. My extended family on my mom’s side has developed a brunch menu that tends to be strictly followed when we get together: gooey pull-apart bread, quiche (at least two varieties), sausage/bacon, and a massive fruit plate, at minimum. It is not uncommon for me to receive a horrified glance if I suggest that we change the menu up a bit and try something new.

Per La Famiglia: Balsamic Roasted Pear Wedges with Prosciutto + A Giveaway! | Once Upon a Recipe

These balsamic roasted pear wedges with prosciutto (and a gorgonzola cream dip) have nothing to do with brunch. However, they come from professional home economist and author, Emily Richards’ latest cookbook, Per La Famiglia: Memories and Recipes of Southern Italian Home Cooking. The Italian translation of Per La Famiglia simply means “for the family.” Many of the recipes I make with regularity today I learned from the women in my family. A wonderful excerpt from Emily’s book states: “Sharing time in the kitchen with mothers, aunts and Nonnas is a way to gather your history in the kitchen. By not spending time in the kitchen with your family members, recipes can be lost. When possible try to get in the kitchen with them and take notes, take part and taste what can become of the ingredients. It’s a special moment to have.” (page 4). I cannot put into words how much I value the time I was able to spend in the kitchen with my Nana, learning to make cinnamon buns, or the times, past and present, spent cooking with my mom or my aunts. I regret not making the opportunity to cook more with my grandma (she recently passed away) and learn how to make her famous rhubarb platz. Per La Famiglia is a wonderful collection of family recipes that highlight the importance of learning how to carry on the food traditions in your family.

These sweet and savoury pear wedges are incredibly simple to prepare and boast so much flavour! The pears are quickly marinated in a balsamic mixture, then wrapped in prosciutto and roasted to perfection. The gorgonzola cream dip adds another dimension of flavour and provides a creamy and cool accompaniment to the pears.

Per La Famiglia: Balsamic Roasted Pear Wedges with Prosciutto + A Giveaway! | Once Upon a Recipe

You can find the recipe for these tasty little morsels on page 87 in Per La Famiglia: Memories and Recipes of Southern Italian Home Cooking by Emily Richards. I recall watching Emily on Canadian Living Cooks on the Food Network years ago! I love her approach to food and her emphasis on passing those special family recipes on from generation to generation. I cannot wait to spend more time with this book and try more of Emily’s recipes. She includes recipes for a variety of different holidays (Easter and Christmas), plus sections for antipasti, pizza, bread, first courses and light meals, main courses, veggies and salads, desserts (my fave, obvi), and cookies. And I love the little snippets that Emily shares throughout the book about growing up in a loving Italian family.

Per La Famiglia: Balsamic Roasted Pear Wedges with Prosciutto + A Giveaway! | Once Upon a Recipe

It was not an easy task to choose a recipe to share. With options like Balsamic Lamb Chops, Ricotta Cannoli, and Spinach Ricotta Gnocchi, how was I to pick just one? I want to make everything! I chose these balsamic roasted pears with prosciutto simply because I thought the flavours in the recipe sounded wonderful. And they were! I shared these pears at a family gathering last weekend and they were enjoyed by all.

Per La Famiglia: Balsamic Roasted Pear Wedges with Prosciutto + A Giveaway! | Once Upon a Recipe

Oh, and I have great news! There is an opportunity for one of you lovelies out there to win this amazing cookbook along with a gnocchi board and a three-piece Microplane Elite Grater/Zester set. Oh, happy day!

Good luck to all of you and Happy Easter! I hope you all have the chance to spend time with loved ones this weekend and enjoy some delicious food!

Please be sure to check out more incredible treats from my fellow Per La Famiglia blogger pals in celebration of Emily’s wonderful cookbook!

Jenny from The Brunette Baker made Ricotta Cannoli

Julie from Dinner with Julie made Ricotta and Spinach Gnocchi

Chrissie from The Busy Baker made Amaretti Cookies

Heather from The Tasty Gardener made Squash and Hazelnut Rotelle/Polenta with Sausage and Rapini

Britt from My Daily Randomness made Tiramisu

Libby from Libby Roach made Nonna Ortenzia’s Meatballs

Kristy from She Eats made Egg and Raisin Bread

Gwen from Devour and Conquer made Sweet Potato Gnocchi with Sage Butter

Tiffany from Eating Niagara made Potato Doughnuts

Nancy from Gotta Get Baked made Hazelnut Chocolate-Filled Cookies

Nicole from Culinary Cool made Spinach Ricotta Cannelloni

Carole from The Yum Yum Factor made Pickled Eggplant

Kelly from kellyneil.com made Roasted Tomatoes

Christina from Strawberries for Supper made Baked Pasta with Sausage and Ricotta

And now, for the giveaway!

One lucky reader will win a personally signed Per La Famiglia cookbook by Emily herself along with a gnocchi board (which Emily is best known for), and a three-piece Microplane Elite Grater/Zester set. More details are listed below. Good luck!

Simply leave a comment below and tell me your favourite family recipe. Be sure to click the widget options below for both mandatory and optional bonus entries.

a Rafflecopter giveaway

This giveaway is open to all legal residents of Canada who have reached the age of majority at the time of the contest in the province or territory in which they reside.

Void in Quebec.

No purchase necessary to enter.

Giveaway will run from Wednesday, March 23, 2016 at 12:01am to end on Wednesday, March 30, 2016 at 11:59pm. Winner is chosen at random via Rafflecopter. Winner will be contacted via email and given 48 hours to respond. If not, a new winner will be chosen. Winner selected MUST correctly answer a skill-testing mathematical question. Winner’s name will be displayed on Rafflecopter widget. Email address will never be given out to any third party or anyone for that matter.

Prize value is approximately $75CDN.

A big warm thank-you to Jenny Jack of the Brunette Baker for organizing this blog hop and Emily Richards, Whitecap Publishing, and Microplane for providing this tasty giveaway!

Per La Famiglia: Balsamic Roasted Pear Wedges with Prosciutto + A Giveaway! | Once Upon a Recipe

Disclosure: The Per La Famiglia: Memories and Recipes of Southern Italian Home Cooking cookbook was provided to me by Whitecap Publishing for review at no cost. All opinions are my own.

(The Best) Buttermilk Pancakes

(The Best) Buttermilk Pancakes | Once Upon a Recipe

Well, hello beautiful!

I mean, is that a beautiful stack of pancakes or what?

I have enjoyed these pancakes twice in the last month – once when I was incredibly hung over and another time when I was not even a little bit hung over. They tasted equally fantastic both of those times. However, if there’s one thing I’ve come to learn in my thirties, it’s that having more than a couple of drinks in one evening is just not worth the pain that follows the next day. And tequila shots are never a good idea. Even if they seem like a good idea at the time, they are not a good idea. Put down the tequila!

(The Best) Buttermilk Pancakes | Once Upon a Recipe

Hangovers aside, these buttermilk pancakes really are the way to make your weekend magical. Imagine yourself slowly waking up on a Saturday or Sunday morning, at your own pace, and not to the annoying ring of an alarm. You’re still in your pyjamas. You put on some good tunes, start the coffee. And as it brews, the smell of coffee and magic and rainbows fills the air, and you start to gather the ingredients to make the fluffiest, most tender pancakes you’ve ever made. The recipe is simple – chances are you’ve got everything you need already sitting in your fridge and cupboards. The batter comes together easily, and soon enough you’re spooning it into a hot frying pan, and its sweet aroma is enough to wake the others in the house (furry others included). And before you know it, you’re settling down to enjoy a stack of hot buttermilk pancakes, swimming in butter and maple syrup. Life is good.

(The Best) Buttermilk Pancakes | Once Upon a Recipe

(The Best) Buttermilk Pancakes | Once Upon a Recipe

In case you haven’t been counting down to the weekend like I have, I’m here to let you know that we’ve only got one more day to go before these pancake dreams can become a reality!

(The Best) Buttermilk Pancakes (adapted from The Food Lab by Kenji Lopez-Alt)

The trick to making these pancakes tender and fluffy is to whisk the egg whites separately and then fold into the pancake mixture. It’s a quick and easy step that makes a big difference. These pancakes reheat well – just store in an airtight container in the fridge and enjoy within a couple of days. Makes about 10 large pancakes. 

2 cups all-purpose flour

1 tsp. baking powder

1/2 tsp. baking soda

1 tsp. salt

1 TBSP. sugar

2 eggs, separated

1 1/2 cups buttermilk

1 cup plain 2% Greek yogurt

1 tsp. vanilla

4 TBSP. unsalted butter, melted

Combine the dry ingredients in a large bowl and whisk together. In a small bowl, whisk the egg whites until stiff peaks form. In a medium bowl, whisk together the egg yolks, buttermilk, Greek yogurt, and vanilla. Slowly add the melted butter while whisking. Gently fold in the egg whites with a rubber spatula. Pour the mixture over the dry ingredients and fold until just combined (do not overmix). The batter will be thick and lumpy.

Heat a large nonstick skillet over medium heat. Place 1/2 cup of batter into the skillet and gently spread out evenly. Allow to cook until small bubbles start to appear on the top and the bottoms are golden brown (about 2 minutes). Gently flip over and cook the other side until golden brown (about 2 minutes). Serve the pancakes immediately with butter and maple syrup.

(The Best) Buttermilk Pancakes | Once Upon a Recipe

The Great Food Blogger Cookie Swap: Beurre and Sel Jammers

The Great Food Blogger Cookie Swap: Beurre and Sel Jammers | Once Upon a Recipe

Son of a bee sting, it’s that time of year again!  This year I had the pleasure of participating in the Great Food Blogger Cookie Swap for the third time. The swap is hosted by two lovely ladies, The Little Kitchen and Love & Olive Oil. If you have no idea what the Great Food Blogger Cookie Swap is, allow me bring you up to speed. It’s a worldwide food blogger cookie swap! Basically, you sign up, get matched with three other bloggers, and send each blogger a dozen homemade cookies. Then you must wait patiently to receive three dozen delicious cookies from the bloggers that received your name. The swap also raises money for Cookies for Kids’ Cancer! Sending cookies around the world + supporting a good cause = Christmas magic and lots of fun.

The Great Food Blogger Cookie Swap: Beurre and Sel Jammers | Once Upon a Recipe

This year I chose to make these Beurre and Sel Jammers from Dorie Greenspan. I actually received these cookies during my first year in the swap and have not been able to get them off my mind since! Imagine a buttery deep dish shortbread cookie topped with tart jam that has been nestled within a ring of buttery streusel. Have I got your attention yet?

The Great Food Blogger Cookie Swap: Beurre and Sel Jammers | Once Upon a Recipe

These cookies are absolute magic. Sweet, buttery, jammy magic. They do take a bit of work as there are several steps involved, but I promise you they are worth it! I used a tart cherry jam and an apricot jam, and loved both. You can use any jam you like, just make sure it’s a bit thick so that it stays in the centre of the cookie and doesn’t spread out too much. I am officially adding these cookies to my Christmas baking rotation. I’ve already made them twice this month and am tempted to squeeze in a third round! The cookies freeze beautifully, so they are perfect for baking ahead and taking them out when you need them.

Interested in participating in next year’s swap? Check the Great Food Blogger Cookie Swap website for more details. Happy holiday baking!

The Great Food Blogger Cookie Swap: Beurre and Sel Jammers | Once Upon a Recipe

Beurre and Sel Jammers (from Dorie Greenspan)

These beurre and sel jammers are a cookie lover’s dream. They can be made in parts if tackling the whole recipe in one day seems like too much. They freeze very well when stored in an airtight container, so make them ahead of time to have on hand for all your holiday celebrations! Makes about 36 cookies.

For the cookie dough:

1 cup (2 sticks) unsalted butter, room temperature

1/2 cup sugar

1/4 cup powdered sugar, sifted

1/2 tsp. fine sea salt

2 egg yolks, room temperature

2 tsp. vanilla

2 cups all-purpose flour

For the topping:

3/4 cup all-purpose flour

1/3 cup sugar

1/4 tsp. fine sea salt

5 1/2 TBSP. unsalted butter, cold and cut into pieces

1/4 tsp. vanilla

3/4 cup thick jam

For the cookies: Place the butter in the bowl of an electric mixer. Mix on medium speed for about 3 minutes, until the butter is smooth and creamy. Add in both sugars and the salt, and beat until well blended, for about a minute. Add the egg yolks and vanilla and beat on low speed until combined. Finally, add the flour and mix on low until just combined. Divide the dough in half. Place each half between two sheets of wax paper and flatten into discs. Roll each disc into 1/4-inch thickness. Place on cookie sheets and freeze between the wax paper until firm, for at least two hours (or overnight). The dough can be kept frozen for up to two days if you’d like to do this part ahead of time.

For the streusel topping: Mix the flour, sugar, and salt together in a bowl. Using your fingers, rub the butter and vanilla into the flour mixture until well combined and no lumps of butter remain. The streusel will be sandy in texture and will hold its shape when pressed between your fingers. Cover and chill.

To assemble the cookies: Preheat the oven to 350°F. Remove the cookie dough from the freezer. Using a 2-inch round cookie cutter (or a tall narrow glass, like me!), cut the dough into rounds and press each round into the bottom of each muffin cup. Gather the scraps and repeat the process until you have used up your dough. Doris’s recipe suggests freezing the dough in the muffin tin for another 30 minutes before baking, but I skipped this step. When mama wants cookies, she wants them now.

Spoon about 1 teaspoon of jam into the center of each round of dough. Using your fingers or a small spoon, sprinkle about a tablespoon of streusel around the edges of each cookie, trying not to get any in the jam. Bake the cookies for about 20-22 minutes, until the tops are golden. Cool in tins for 15 minutes. Run a small knife around edges of each muffin cup and gently remove cookies. Allow to cool completely on a wire rack. Store the cookies in an airtight container. Freeze if the cookies will not be consumed within a few days.

The Great Food Blogger Cookie Swap: Beurre and Sel Jammers | Once Upon a Recipe

Looking for more amazing cookie recipes? Check out the lovely cookies I received from Marie at Food Nouveau (Maple Syrup Fudge cookies), Jane at Jane’s Adventures in Dinner (Jammy Pudding cookies), and Sharana at Living the Sweet Life (Cranberry Orange Dark and Stormy cookies). Also be sure to check out the bloggers that I had the pleasure of sending a box of these cookies to: Laurel at Wanna Come With, Claude at a la Claude, and Alicia at Bird House Diaries. xo

Butter Celebrates! Banana Pecan Caramel Cake and a Giveaway! {Giveaway Closed}

Butter Celebrates! Banana Caramel Pecan Cake

So I have this friend. She likes cake.

She likes cake so much that she eats a slice every. single. day. She takes her cake eating very seriously. If she’s out for dinner, she’ll order a slice of cake for dessert. If she’s eating in she’ll buy a slice of cake on the way home. If she comes over for dinner, she’ll always bring a cake. She’s a good friend to have.

(I seriously have a friend like this. I’m not talking about myself. Although you can usually count on me for sweet treats. I also really really like cake.)

And this banana pecan caramel cake is the perfect cake for cake lovers. Just look at it. First of all, the layers. There’s four of them. FOUR! Four layers of moist (yep, I said it) banana cake studded with pecans. And in between each layer is a thick schmear of caramel buttercream frosting. CARAMEL BUTTERCREAM. Also known as the lovechild of fluffy buttercream and caramel sauce. Four layers of cake means four layers of buttercream. It’s just math.

Butter Celebrates! Banana Caramel Pecan Cake

You can find the recipe for this luxurious cake on page 113 in the “Welcome Wagon” chapter of Butter Celebrates! Rosie Daykin’s latest cookbook. In case you don’t already know Rosie, allow me to introduce you. Rosie Daykin is the owner of the Butter Baked Goods bakery in Vancouver. Next time I find myself in Vancouver, you can bet I will be making a stop at Butter. Rosie’s first cookbook, Butter Baked Goods was released in 2013 and is a national best seller. Her latest creation, Butter Celebrates! A Year of Sweet Recipes to Share takes us through the seasons and shares recipes for delectable treats to enjoy during various holidays and special occasions. Rosie covers everything from Valentine’s Day to Mother’s Day to Summer Celebrations to Halloween to Christmas, and even shares a few recipes for our furry friends, inspired by her rescue pup, Zelda. (My girl Bella is already begging me to test out those treats). It might be the most beautiful cookbook I have ever owned, with 259 pages of gorgeous photos and mouthwatering recipes. And can I get an amen for a cookbook that includes a photo of every single recipe? I mean, how can I be sure that a recipe wasn’t a massive fail if I have no idea what the thing is supposed to look like when I’m finished? Rosie’s got us covered.

Butter Celebrates! Banana Caramel Pecan Cake

In her book, Rosie encourages us all to take the time to celebrate the little and big moments in life, preferably with cake. Now that’s a life goal that I can get behind.

Butter Celebrates! Banana Caramel Pecan Cake

Choosing a recipe to share was damn near impossible, as I flagged nearly every other page during my first flip through the book. I honestly cannot wait to try everything. Alas, I had to make a decision, and settled on this banana pecan caramel cake. My inability to consume bananas before they get too ripe for every day eating means I almost always have bananas on hand to bake with. The idea of an indulgent cake instead of my usual healthy banana muffins or banana bread just seemed too good to pass up. And holy heck, this cake did not disappoint.

The good news is that there is an opportunity for one of you lucky devils to win this glorious cookbook along with a box of goodies from Rosie’s bakery. If that isn’t an early Merry Christmas, I don’t know what is!

Butter Celebrates! Banana Caramel Pecan Cake

Good luck to all of you and happy holidays!

Please be sure to check out more incredible treats from my fellow Butter Celebrates! blogger pals in celebration of this gorgeous cookbook!

And now, for the giveaway!

One lucky reader will win a personally signed Butter Celebrates! cookbook from the lovely Rosie herself along with a delicious box of goodies from her bakery in Vancouver. Umm, yum! More details are listed below. Good luck!

Simply leave a comment below and tell me your favourite holiday tradition (mandatory). Be sure to click the widget options below for both mandatory and optional bonus entries.

a Rafflecopter giveaway

This giveaway is open to all legal residents of Canada who have reached the age of majority at the time of the contest in the province or territory in which they reside. Void in Quebec.

Winner must answer a skill-testing question.

No purchase necessary to enter.

Giveaway will run from Wednesday, November 25, 2015 at 12:01am to Wednesday, December 2, 2015 at 11:59pm. Winner will be contacted via email and name will be displayed on Rafflecopter widget. Email address will never be given out to any third party or anyone for that matter.

Prize value is approximately $125.

Butter Celebrates! Banana Caramel Pecan Cake

A big warm thank-you to Jenny Jack of the Brunette Baker for organizing this blog hop and Rosie Daykin of Butter Baked Goods for providing this super sweet giveaway!

Disclosure: The Butter Celebrates! A Year of Sweet Recipes to Share cookbook was provided to me by Random House of Canada Limited for review at no cost. All opinions are my own. I truly adore this book.

Candy Bar Popcorn (Happy Halloween!)

Candy Bar Popcorn | Once Upon a Recipe

Happy Halloween!

It’s the scariest day of the year. Also known as the day when it’s acceptable to eat as much candy as you want and definitely more than you should. I look forward to this day and dread it simultaneously. Not because of the candy part, but because of the costume part. Creating amazing costumes is not my forte. Every year I make a promise to create an incredible and creative costume for Halloween. I make a plan to start early and not leave everything to the very last minute, but my procrastination always gets the best of me and I find myself scrambling to pull things together. And repeat. I know what I’m good at, and making costumes is not one of those things.

Candy Bar Popcorn | Once Upon a Recipe

But not this year! No siree, this year I made it real easy on myself and decided to just nix the costume idea altogether. Don’t get me wrong, I think costumes are fantastic, and if I was any good at actually putting something amazing together, I would. But sometimes you just have to create realistic expectations for yourself, you know? Fortunately, not having to worry about a costume left me more time and energy for what I’m somewhat better at – the food!

This popcorn was created as a way to put leftover Halloween candy to good use. I don’t personally know much about having leftover candy as it seems to find its way into my pie hole before I have the chance to stop it, but if I did have leftover candy, hypothetically speaking, this is how I would use it. This candy bar popcorn comes together in minutes! Popcorn is mixed with melted white chocolate and peanut butter and loaded with chopped candy bars and candy corn. Halloween crack, if you will.

Candy Bar Popcorn | Once Upon a Recipe

In the midst of your last-minute preparations for tonight’s festivities – the costume-making, the pumpkin carving, the decorating, the party planning – I have one very important task for you. You must ensure that you save some of that Halloween candy so that you can make this candy bar popcorn. In fact, buy some extra candy so that you can make this twice. And truth be told, if you get a hankering for this stuff at another time of year, just chop up some regular size candy bars. Using the mini sizes is great because you can use an assortment of chocolate bars and then you get a nice variety of little bites. You’re going to love this stuff. You’re welcome and I’m sorry.

Candy Bar Popcorn | Once Upon a Recipe

Candy Bar Popcorn 

Any kind of candy works in this popcorn, so use whatever you have on hand. My favourite combination was Mars, Snickers, Reese’s pieces, and candy corn. The popcorn can be stored in an airtight container for several days, if it lasts that long!

8 cups of popped corn

1 cup white chocolate pieces

3 TBSP. peanut butter

2 cups candy (chopped chocolate bars, candy corn, Smarties, etc.)

1/4 cup milk chocolate pieces

Prepare a large baking sheet with wax paper. Put the popped corn into a large bowl, being sure to remove any unpopped kernels. In a double boiler over medium heat, gently melt the white chocolate and peanut butter, stirring until smooth.

Pour the white chocolate mixture over the popcorn, add the candy pieces, and stir to combine. Turn the mixture out onto the baking sheet and spread into a single layer.

Melt the milk chocolate pieces in a small bowl in the microwave (start with 30 seconds, then 10 second increments until melted). Drizzle over the popcorn. Place the baking sheet in the fridge for 15 minutes until cool and set. Break into pieces. Store in an airtight container. Enjoy!

Candy Bar Popcorn | Once Upon a Recipe

Whole Wheat Pumpkin Oat Muffins

Whole Wheat Pumpkin Oat Muffins | Once Upon a Recipe

Hello Ladies and Gents! Happy Wednesday!

Oh, and happy back to the future day! The Internets tell me that today (Oct. 21, 2015) is the day that Marty McFly and Doc Brown traveled to in Back to the Future Part 2. I may or may not have googled Back to the Future to figure out the names of those two guys. Should I feel ashamed that I’ve never seen Back to the Future (Part 1 or 2)? For some reason I feel like I should.

Whole Wheat Pumpkin Oat Muffins | Once Upon a Recipe

Anyways, just a quick little post here today. I feel like I’m neglecting this space again, but sometimes it’s just unavoidable! In the past few weeks I celebrated a birthday (hello 3-1…this number seems so much more daunting to me than 30 did) and Canadian Thanksgiving, went to the mountains for a quick but much needed getaway, and have been planning and preparing for a Halloween cooking class that I will be teaching this weekend. And exactly two weeks from today, I will be hopping on a plane to a beach destination for 10 days of rest and relaxation. I’ve resigned myself to the fact that the whole amazing bikini body that I planned to have for this trip when I booked it a couple of months ago just will not be a reality, but I’m kind of over it. There is just too much good food in this world and I believe too strongly in moderation (heavy on the “indulge” end of the spectrum). Plus my 31-year old metabolism doesn’t cooperate quite as well as my 25-year old metabolism did.

Whole Wheat Pumpkin Oat Muffins | Once Upon a Recipe

However, that does not mean that for the next two weeks I don’t plan on exercising a little more restraint when it comes to stuffing my face with all things delicious. These muffins are the perfect way to enjoy a “treat” without the guilt. They are made with whole wheat flour and oats, pumpkin, and are sweetened only with maple syrup. I’ve made these numerous times over the past several weeks and I’m still not tired of them. They are perfect for stashing in the freezer and grabbing for a quick breakfast or snack. Plus, if you’re like me and still all about the pumpkin, you will love these!

Whole Wheat Pumpkin Oat Muffins | Once Upon a Recipe

Whole Wheat Pumpkin Oat Muffins (slightly adapted from Cookie & Kate)

Makes 12 muffins. Feel free to use coconut oil in place of the olive oil, or honey in place of the maple syrup. These muffins freeze beautifully when packed into an airtight container.

1/3 cup extra-virgin olive oil
1/2 cup maple syrup
2 eggs
1 cup pumpkin puree
1/4 cup milk (any kind will do)
1 tsp. baking soda
1 tsp. vanilla
1/2 tsp. salt
1 tsp. cinnamon
3/4 tsp. ground ginger
1/4 tsp. nutmeg
1/4 tsp. ground cloves
1/4 tsp. ground allspice
1 3/4 cups whole wheat flour
1/3 cup oats, plus more for sprinkling on top

Preheat the oven to 325°F. Line a 12-count muffin tin with paper liners or spray with cooking spray.

In a large bowl, combine the olive oil and maple syrup and whisk to combine. Add the eggs and mix well. Add the pumpkin puree, milk, baking soda, vanilla, salt, and spices, and mix well. Add the whole wheat flour and oats, and stir until just combined.

Divide the batter evenly between the muffin cups. Sprinkle with additional oats. Bake for 25-27 minutes, or until a toothpick inserted into the center of the muffin comes out clean. Cool completely. Enjoy!

Whole Wheat Pumpkin Oat Muffins | Once Upon a Recipe

Pumpkin Hand Pies

Pumpkin Hand Pies | Once Upon a Recipe

Hand pies. Mini pies. Pop tarts. Toaster strudels.

I wasn’t sure what to call these little gems of pastry stuffed with pumpkin and spice. Hand pies seemed most appropriate because they’re mini pies that you can most definitely hold in your hand. They’re flakier than pop tarts, and while they do remind me a little of toaster strudels, I’m not sure I’d feel comfortable putting one in the toaster. However, you most certainly should eat one of these hand pies for breakfast, alongside a strong cup of coffee or tea, because no day that starts with pie is going to be a bad one. It’s just science.

Pumpkin Hand Pies | Once Upon a Recipe

You guys, these hand pies are so flaky! Their flakiness is owed to the all-butter crust that has become my go-to crust recipe ever since I first tried it. The dough is so manageable and easy to work with. We have Deb from Smitten Kitchen to thank for that. Don’t fear the dough, it’s friendly and won’t give you a hard time. Oh, and there’s no need to be perfectionists here. I mean, take a peek at the photo below. The perfectionist in me was having a near meltdown, but I just had to tell her shut her face. The good news is that the crust layers will melt into each other and puff up a little during their stint in the oven and no one will be the wiser. Magic!

Pumpkin Hand Pies | Once Upon a Recipe

Now that we are really truly into Fall, a pumpkin filling felt like a must. However, I don’t doubt that these hand pies would taste delicious filled with whatever your little heart desires. So if pumpkin isn’t your thing, change it up. Do what you want!

Pumpkin Hand Pies | Once Upon a Recipe

I made these pies a couple of weeks ago when my cousin was visiting from Ontario. She’s kind of a pie crust junkie – meaning, she’d gladly eat the pie crust and leave the pie filling on her plate. I figured the crust to filling ratio of these pies would really float her boat and I was definitely right. In fact, everyone loved them. Sharing food that you made with your own two hands with people is super fun and amazing, but when they really love what you share, it’s kind of the best.

Pumpkin Hand Pies | Once Upon a Recipe

Pumpkin Hand Pies (crust from Smitten Kitchen, filling and process from Joy the Baker)

This recipe will make 9 pies. However, you may have some dough left over, in which case you can try to make a couple of extra pies, or bake up the pie scraps with a little bit of cinnamon and sugar. (Totally delicious). Feel free to change up the filling if pumpkin isn’t your jam. I think any fruit would work well here, and I’ve kind of been dreaming about a banana/Nutella combination.

For the crust:

2 1/2 cups all-purpose flour

1 TBSP. sugar

1 tsp. salt

1 cup (2 sticks) cold, unsalted butter (cut into cubes)

Cold water

For the filling:

3/4 cup pure pumpkin

1 large egg

1/2 tsp. cinnamon

1/4 tsp. ground ginger

1/8 tsp. ground cloves

1/8 tsp. ground nutmeg

1/4 tsp. salt

1/3 cup granulated sugar

+1 egg (beaten) for sealing the pies

For the glaze:

1 cup powdered sugar

1/2 tsp. vanilla

2 TBSP. milk

To make the crust: Fill a one-cup liquid measuring cup with cold water and add a few ice cubes. In a large bowl, combine the flour, sugar, and salt, and whisk together. Add the butter and start cutting it into the flour mixture using a pastry blender. Once you have a coarse meal, add about 1/2 a cup of cold water. Using a spatula, start to bring the dough together. Add more water as needed – you’ll probably need at least another 1/4 cup, and gently knead the dough to bring it together. The goal here is to minimize the hands-on time on the dough, so as not to melt those lovely little chunks of butter that are dispersed throughout (they are going to make the dough deliciously flaky). Divide the dough in half, press into two discs, and wrap tightly in plastic wrap. Refrigerate the dough for at least an hour or two, but preferably overnight.

To make the filling: In a small saucepan, heat the pumpkin and spices over medium heat, just until fragrant. Remove from heat and transfer to a medium bowl. Whisk in the egg, salt and sugar and refrigerate while you roll out the dough.

To assemble the pies: On a well-floured surface, roll each disc of dough into a 9 x 12-inch rectangle. I used a measuring tape to make sure I had a uniform rectangle. Cut each side into thirds, creating 9 (3 x 4-inch) squares. Refrigerate the first set of squares while you roll out the second disc of dough. We gotta keep that dough cold!

Brush the first set of squares with the beaten egg. Spoon about 1 TBSP. of the pumpkin mixture into the centre of each square. Top with another square of dough, and seal the edges with a floured fork. Use the fork to create vent holes in the tops of each pie. Place the pies on a cookie sheet covered with parchment paper.

Put the pies back in the fridge while you preheat the oven to 350°F. Bake for about 30 minutes, or until golden brown on top.

Combine the glaze ingredients. Drizzle over the pies once they have cooled. Enjoy!

Pumpkin Hand Pies | Once Upon a Recipe

Homemade Acai Bowls

Acai Bowls | Once Upon a Recipe

Oh friends, I have waited so long to share these açai bowls with you! Sadly a series of unfortunate events sabotaged my plans.

But first, allow me to start at the beginning. I first became obsessed with açai bowls during my trip to Maui this past February. And when I say obsessed, I mean eating-an-açai-bowl-every-day obsessed. Feeling-sad-when-the-açai-bowl-was-gone obsessed. Plotting-the-next-opportunity-to-eat-an-açai-bowl obsessed. You get the idea. My friend K and I searched the island for the best açai bowl available and when searching for the best, one must be committed, you know? Açai bowls run aplenty in Maui. I didn’t taste one that I didn’t enjoy, but if you ever find yourself in Maui and in search of a truly satisfying, delicious, and totally good-for-you breakfast, snack, or even dinner, please make your way to one of the Wow Wow Lemonade locations. They offer several different varieties of açai or pitaya (dragon fruit) bowls, all of which are amazing. Apparently their lemonade is bomb as well, but I was too busy eating açai bowls to drink any lemonade.

Acai Bowls | Once Upon a Recipe

What is an açai bowl you ask? Well, an açai bowl is essentially a refreshing, naturally sweet and energizing smoothie bowl topped with fruit and granola and other delicious things. I like to think of it as the healthy cousin to the ice cream sundae. The base is generally comprised of a combination of açai purée and other frozen fruit. Then comes the granola, fresh fruit, and other toppings – and the possibilities here really are endless. Açai – pronounced “ah-sigh-ee” – berries are harvested from açai palm trees, which are native to the rainforests of South America. Açai berries are considered a superfood, and are full of antioxidants, fiber, and heart-healthy fats. They help to promote cardiovascular, digestive, and immune health. Boom! In North America, you can typically find açai berries in the form of puréed smoothie packs in the frozen section of organic grocery stores and health food stores. My favourite frozen açai smoothie packs, and the ones most available to me, are made by Sambazon, and they seem to be widely available throughout Canada and the US. Here in Edmonton, they can be found at places like Planet Organic and Earth’s General Store. In the US, you can find them at Whole Foods. Açai juice and freeze-dried açai powder are other options, although I have not tried them myself. Açai bowls are not a cheap treat – most of the bowls we enjoyed in Maui were around the $12 mark – but you can make them at home for a fraction of the cost.

Acai Bowls | Once Upon a Recipe

When we returned from Maui, K and I set out to perfect our recipe for homemade açai bowls. We have yet to find a spot in Edmonton that sells these bowls of goodness (if you know otherwise, pleeeeeeease let me know asap) so there was definitely some urgency to figuring out how to make them at home. The cravings were intense! After several trials, we figured out our perfect combination. One evening in March, we crafted our perfect bowl and I snapped some photos of the process. A few weeks later, my house was broken into and my laptop and camera (and all of my photos), among other things, were taken. PS. This is an ideal time to recommend routinely backing up your photos on an external hard drive, or via something like iCloud. Idiot me had not done a thorough back-up of my files for longer than I wish to admit, and many of my photos were lost to those punk criminals. It took me several months to replace my laptop and camera, and by that time, my previously mentioned blogging rut had set in.

But alas, K and I had another açai bowl night last week and now I can finally share this recipe with you. Hooray!

Acai Bowls | Once Upon a Recipe

The possibilities for personalizing your açai bowl are limitless. You can change up the frozen fruit in the smoothie base, the fresh fruit you use, as well as the toppings. Next time I might try adding some greens to the smoothie base, like kale or spinach. A high speed blender works best for creating a nice thick smoothie base (aim for a sorbet consistency), but if you don’t have a blender, I’m sure that a food processor would give you similar results. I added maca powder for an extra superfood boost, but it certainly is not essential to this recipe. Maca is also expensive and can be difficult to find, so don’t sweat it if you can’t get your hands on it. For the granola, use your favourite stuff – whether it be store-bought or homemade. Looking for an excellent granola recipe? Might I suggest coconut oil granola, cherry hazelnut granola, or an old favourite, appropriately called favourite granola?

Acai Bowls | Once Upon a Recipe   Acai Bowls | Once Upon a Recipe

Acai Bowls | Once Upon a Recipe    DSC_0470

Alright, enough talk. Let’s make some açai bowls!

Homemade Açai Bowls

Makes 1 small bowl. Double the ingredients for a large bowl or for 2 servings. Exercise your creativity here, and have fun with different fruit and topping combinations!

1-100g pure unsweetened açai berry superfruit pack
1/2 frozen banana
1/2 cup frozen berries
1/4 cup almond milk
1 tsp. maca powder (optional)

Toppings:
1/2 cup granola, divided
Sliced strawberries, bananas, and blueberries
1 tsp. shredded coconut
1 tsp. hemp hearts
1 tsp. cacao nibs
A drizzle of honey

While you are assembling your smoothie base, place the serving bowl in the freezer. This will help to keep your smoothie thick and cold, and will prevent it from melting too quickly. In a high-speed blender, combine the açai purée, frozen banana, frozen berries, almond milk, and maca powder. Blend until smooth.

Remove your bowl from the freezer. Sprinkle some of the granola on the bottom of the bowl. Spread your smoothie base into an even layer in the bowl. Top with the remainder of the granola, fresh fruit, and your desired toppings. Enjoy immediately!

Acai Bowls | Once Upon a Recipe

%d bloggers like this: