Berry Delicious Potato Salad

Berry Delicious Potato Salad | Once Upon a Recipe

Hello friends! How’s life? Please tell me you’re out there enjoying the crap out of Summer. Can you believe we’re nearing the end of July?!

Today I have a special summer potato salad recipe for you. A couple of weeks ago I was contacted and given the opportunity to share a recipe developed by one of Canada’s foremost chefs for the Dairy Farmers of Canada’s 2014 Real Cream program.

Berry Delicious Potato Salad | Once Upon a Recipe

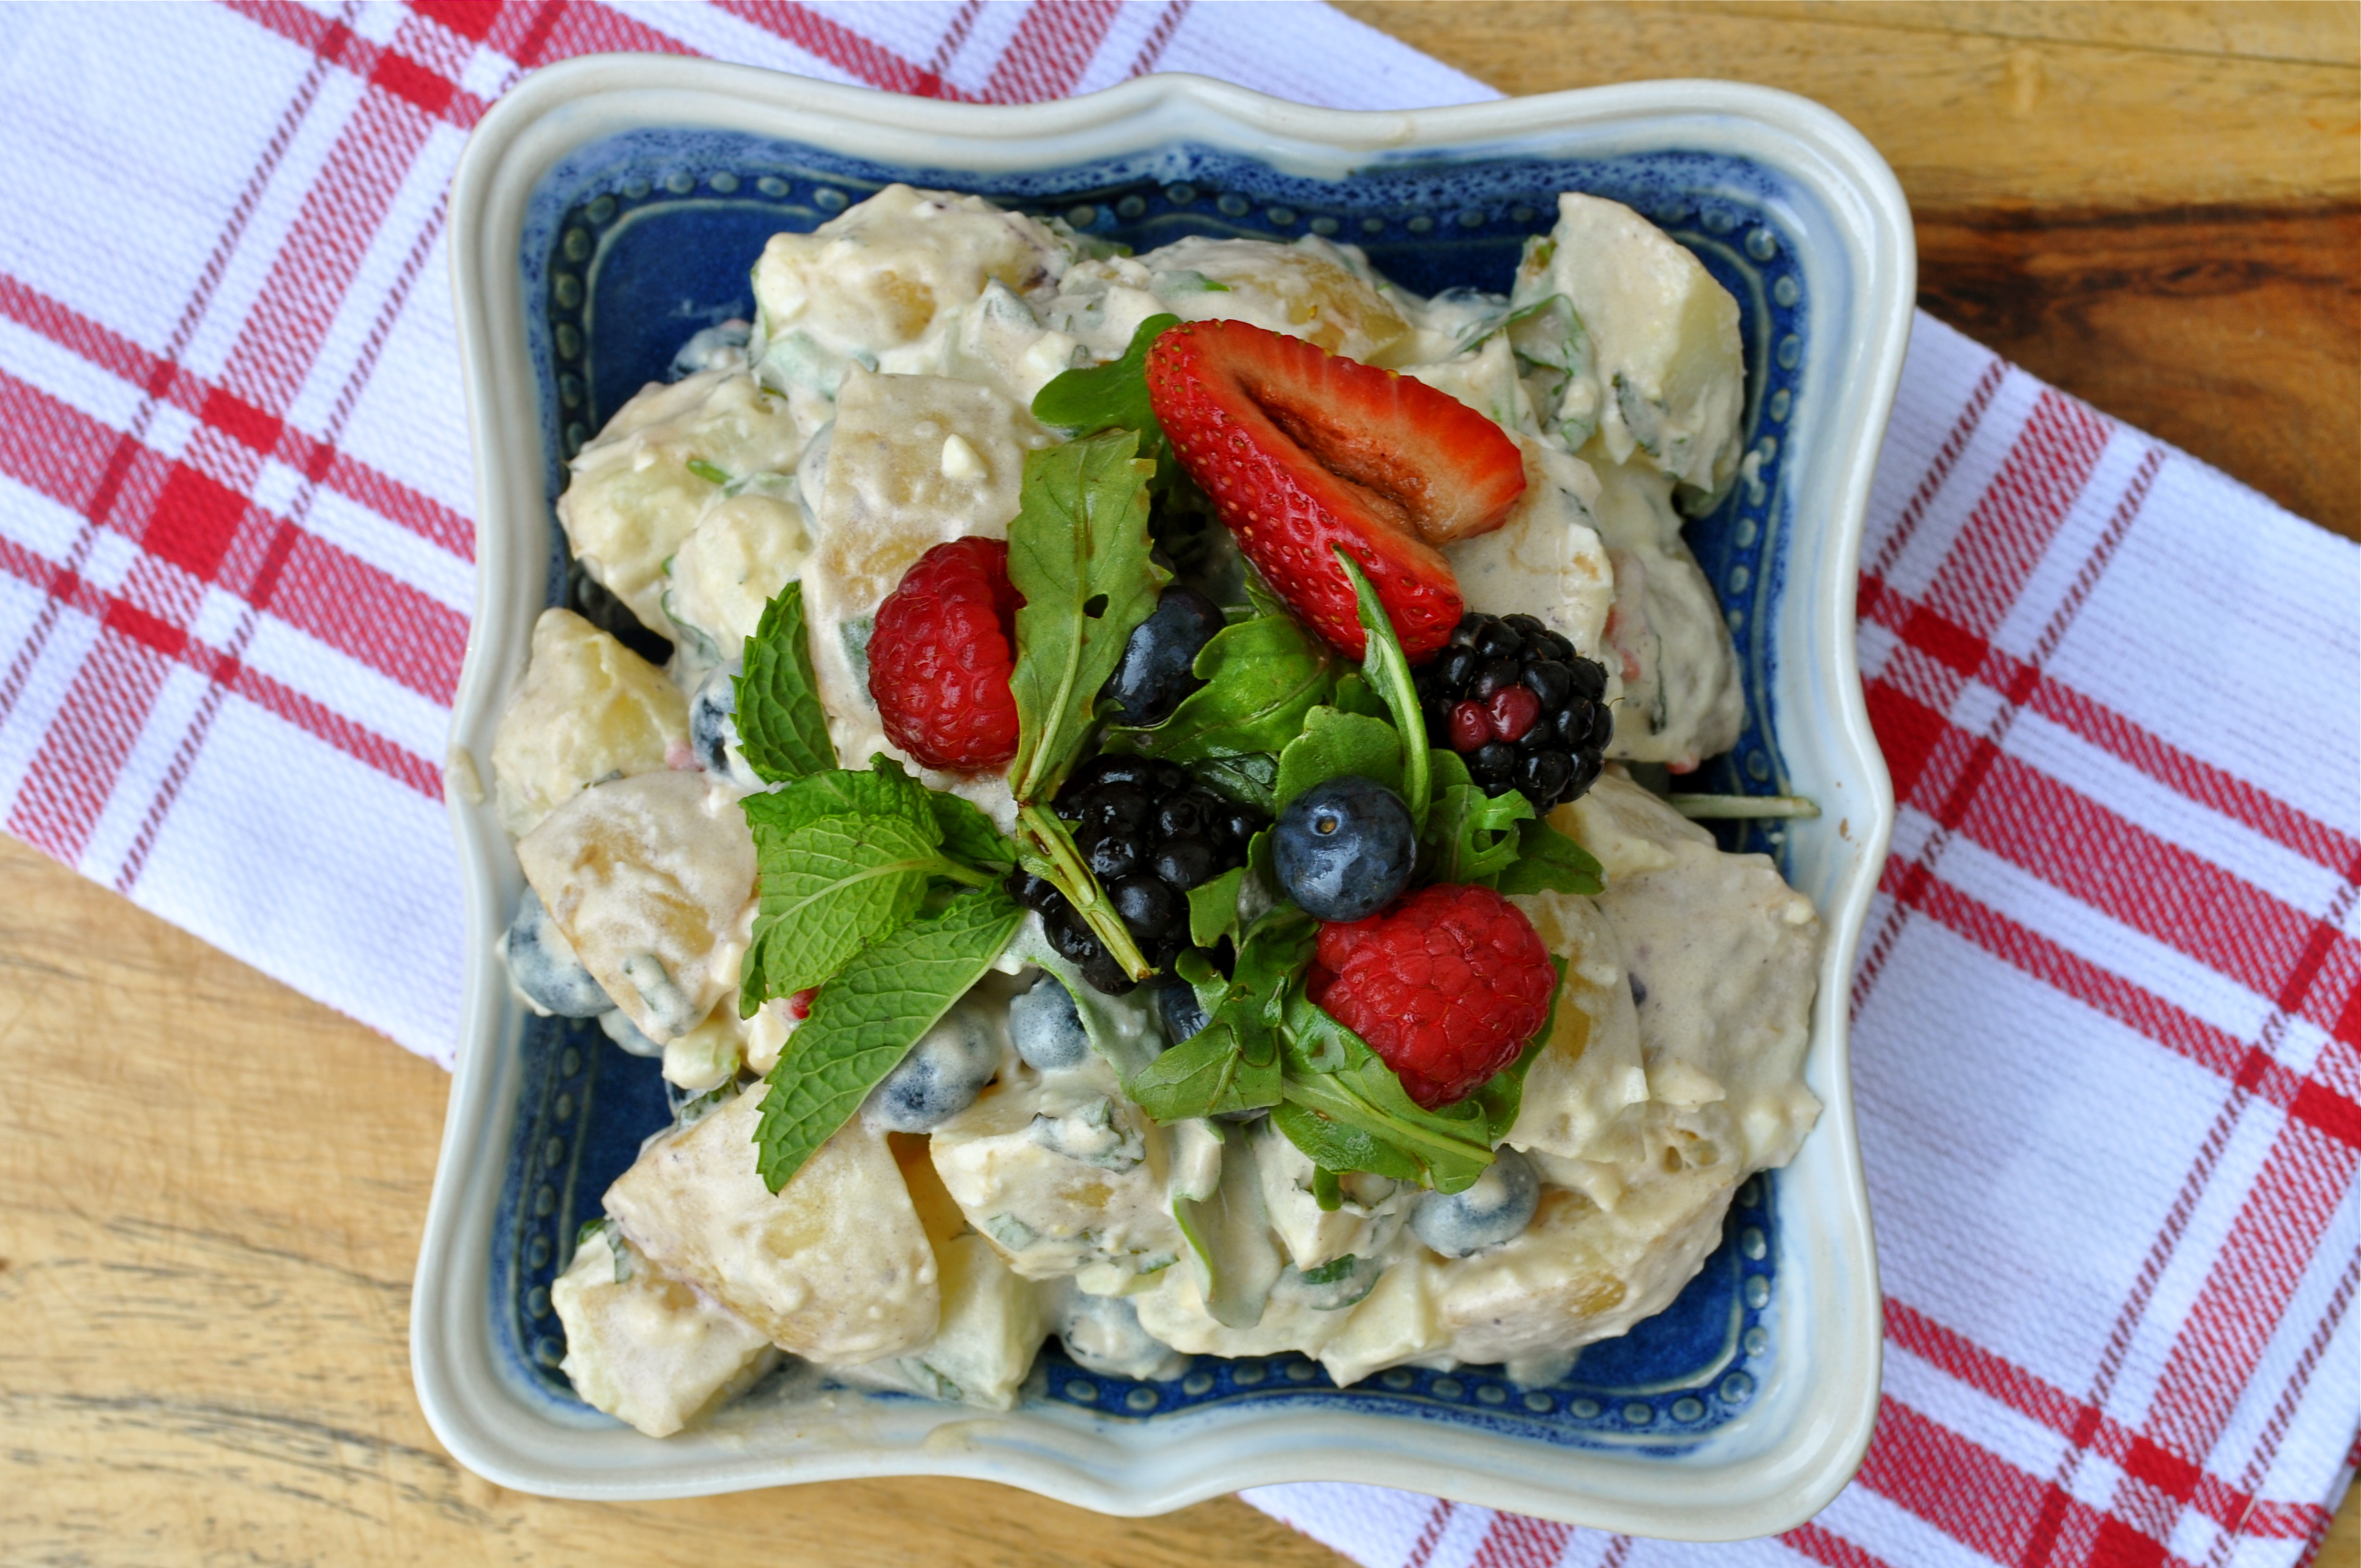
There’s real whipping cream in this potato salad, folks. And it’s divine.

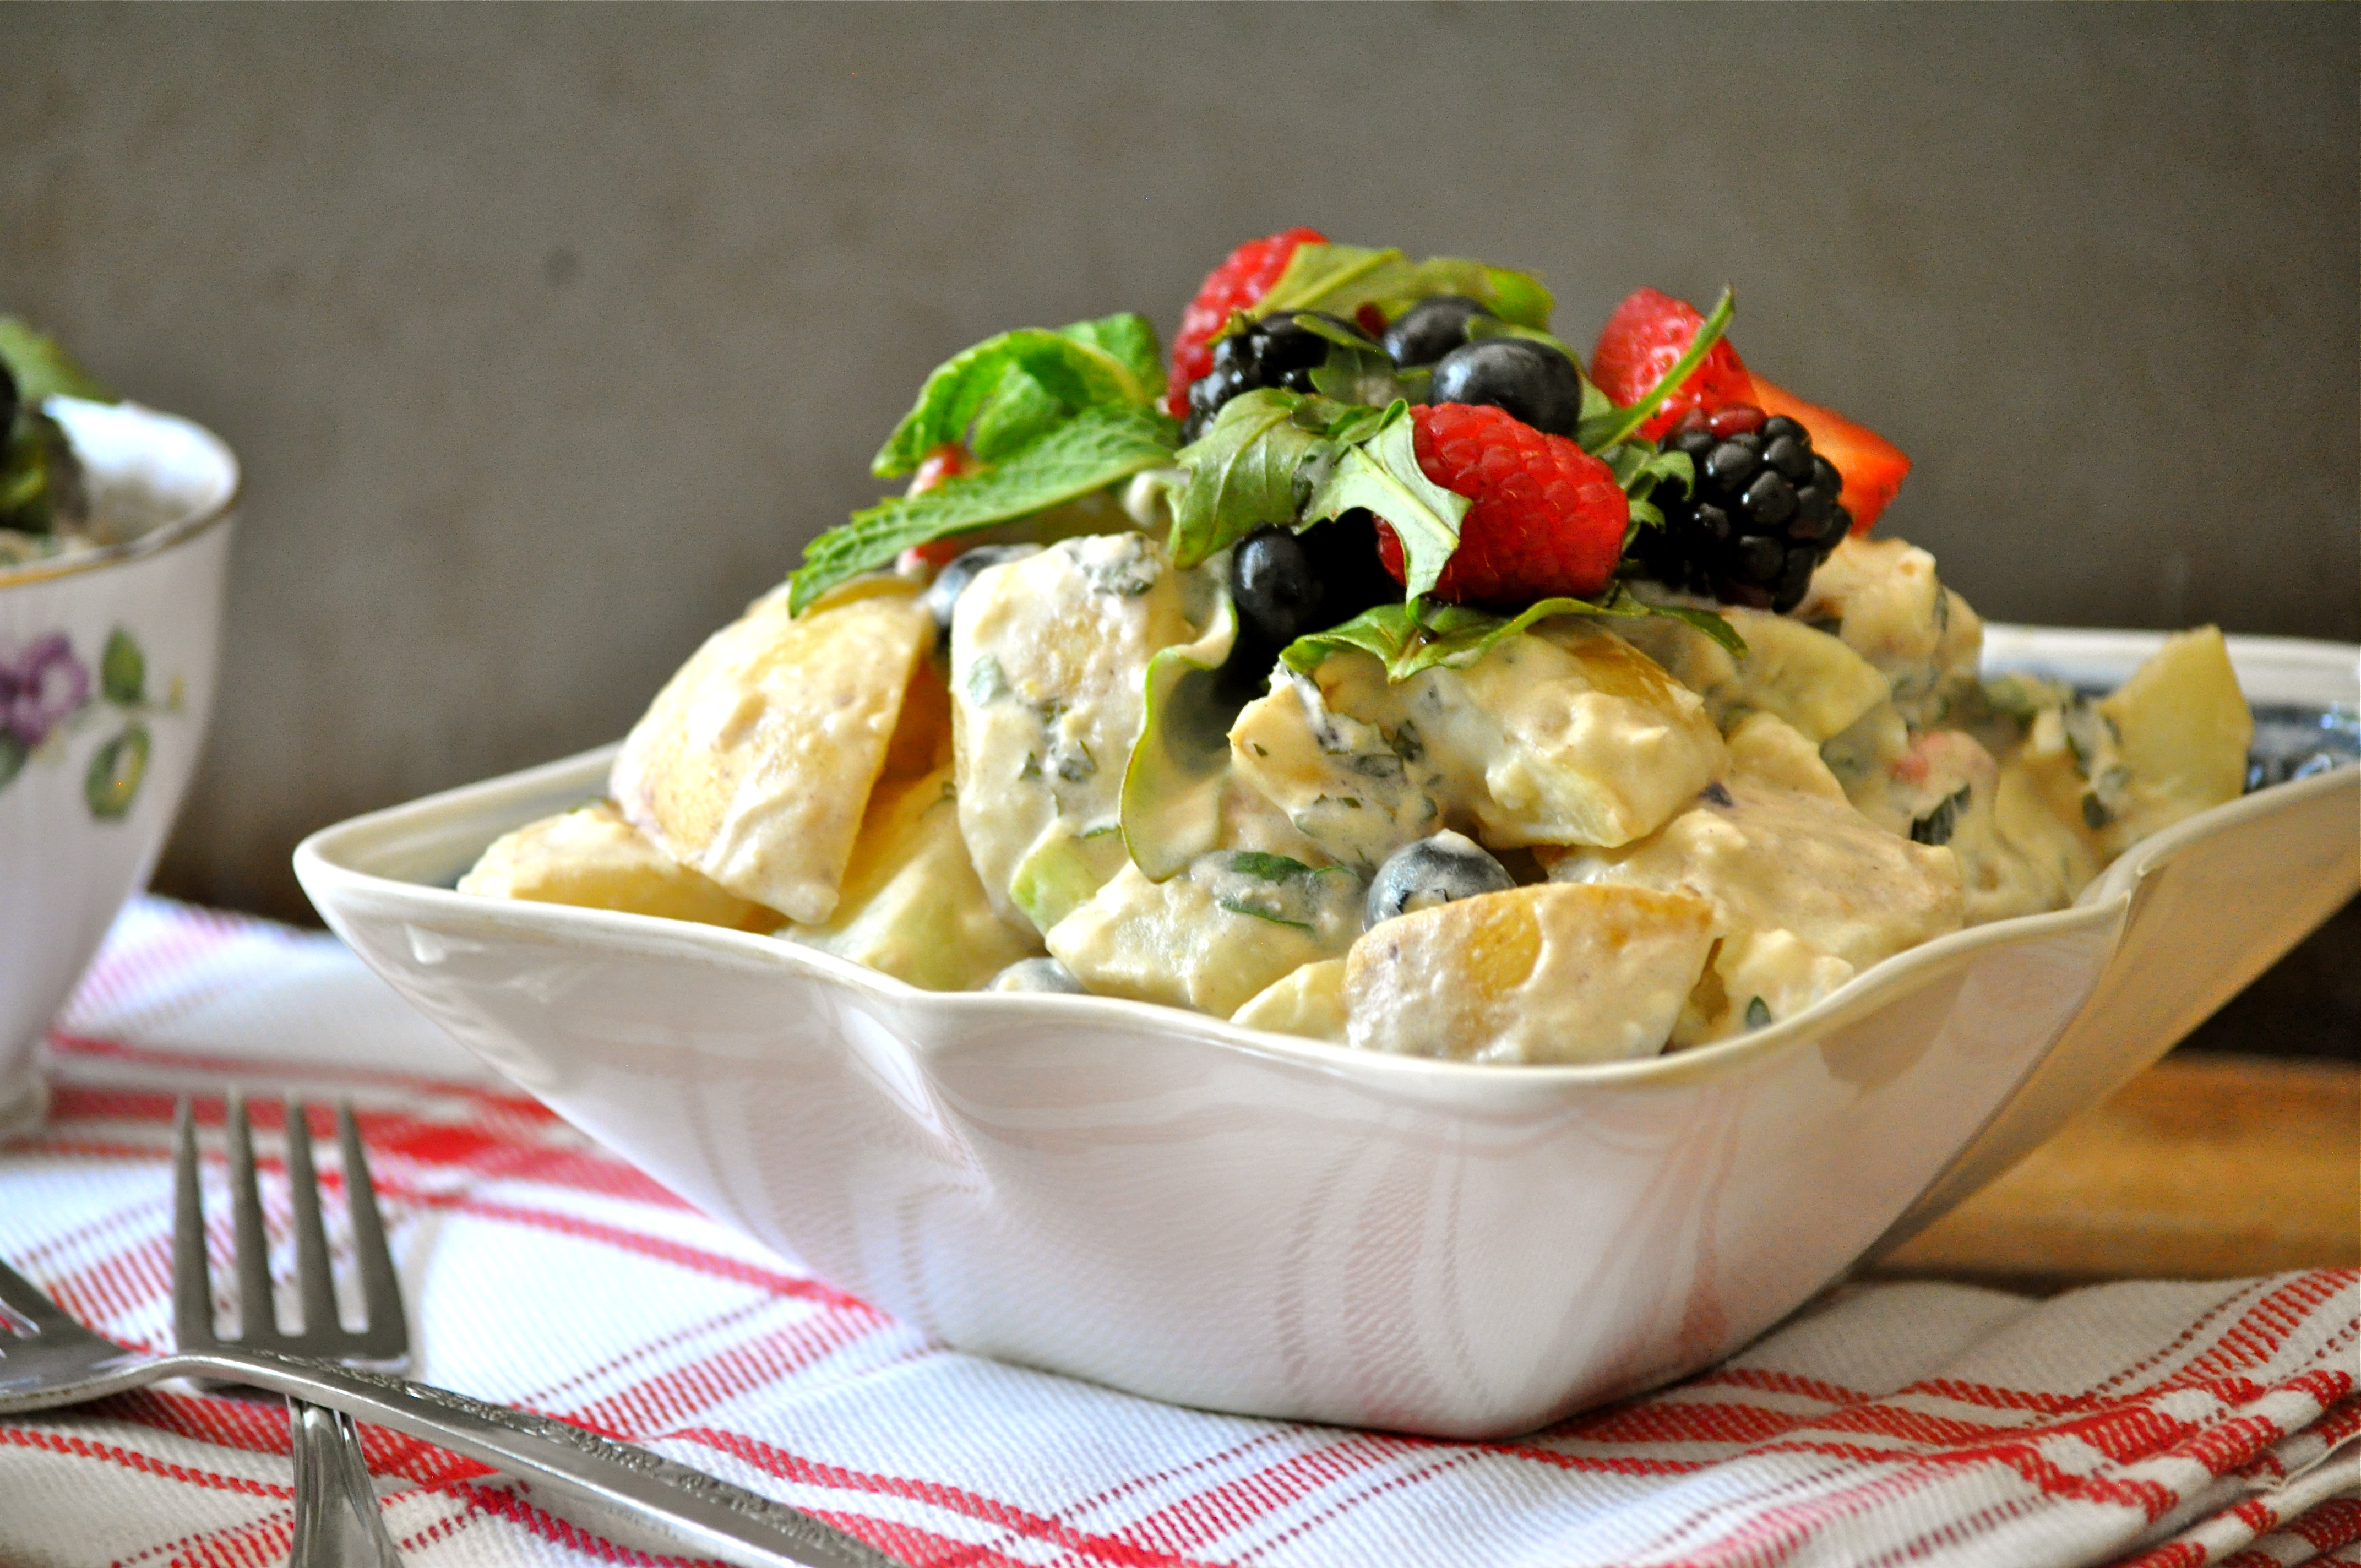
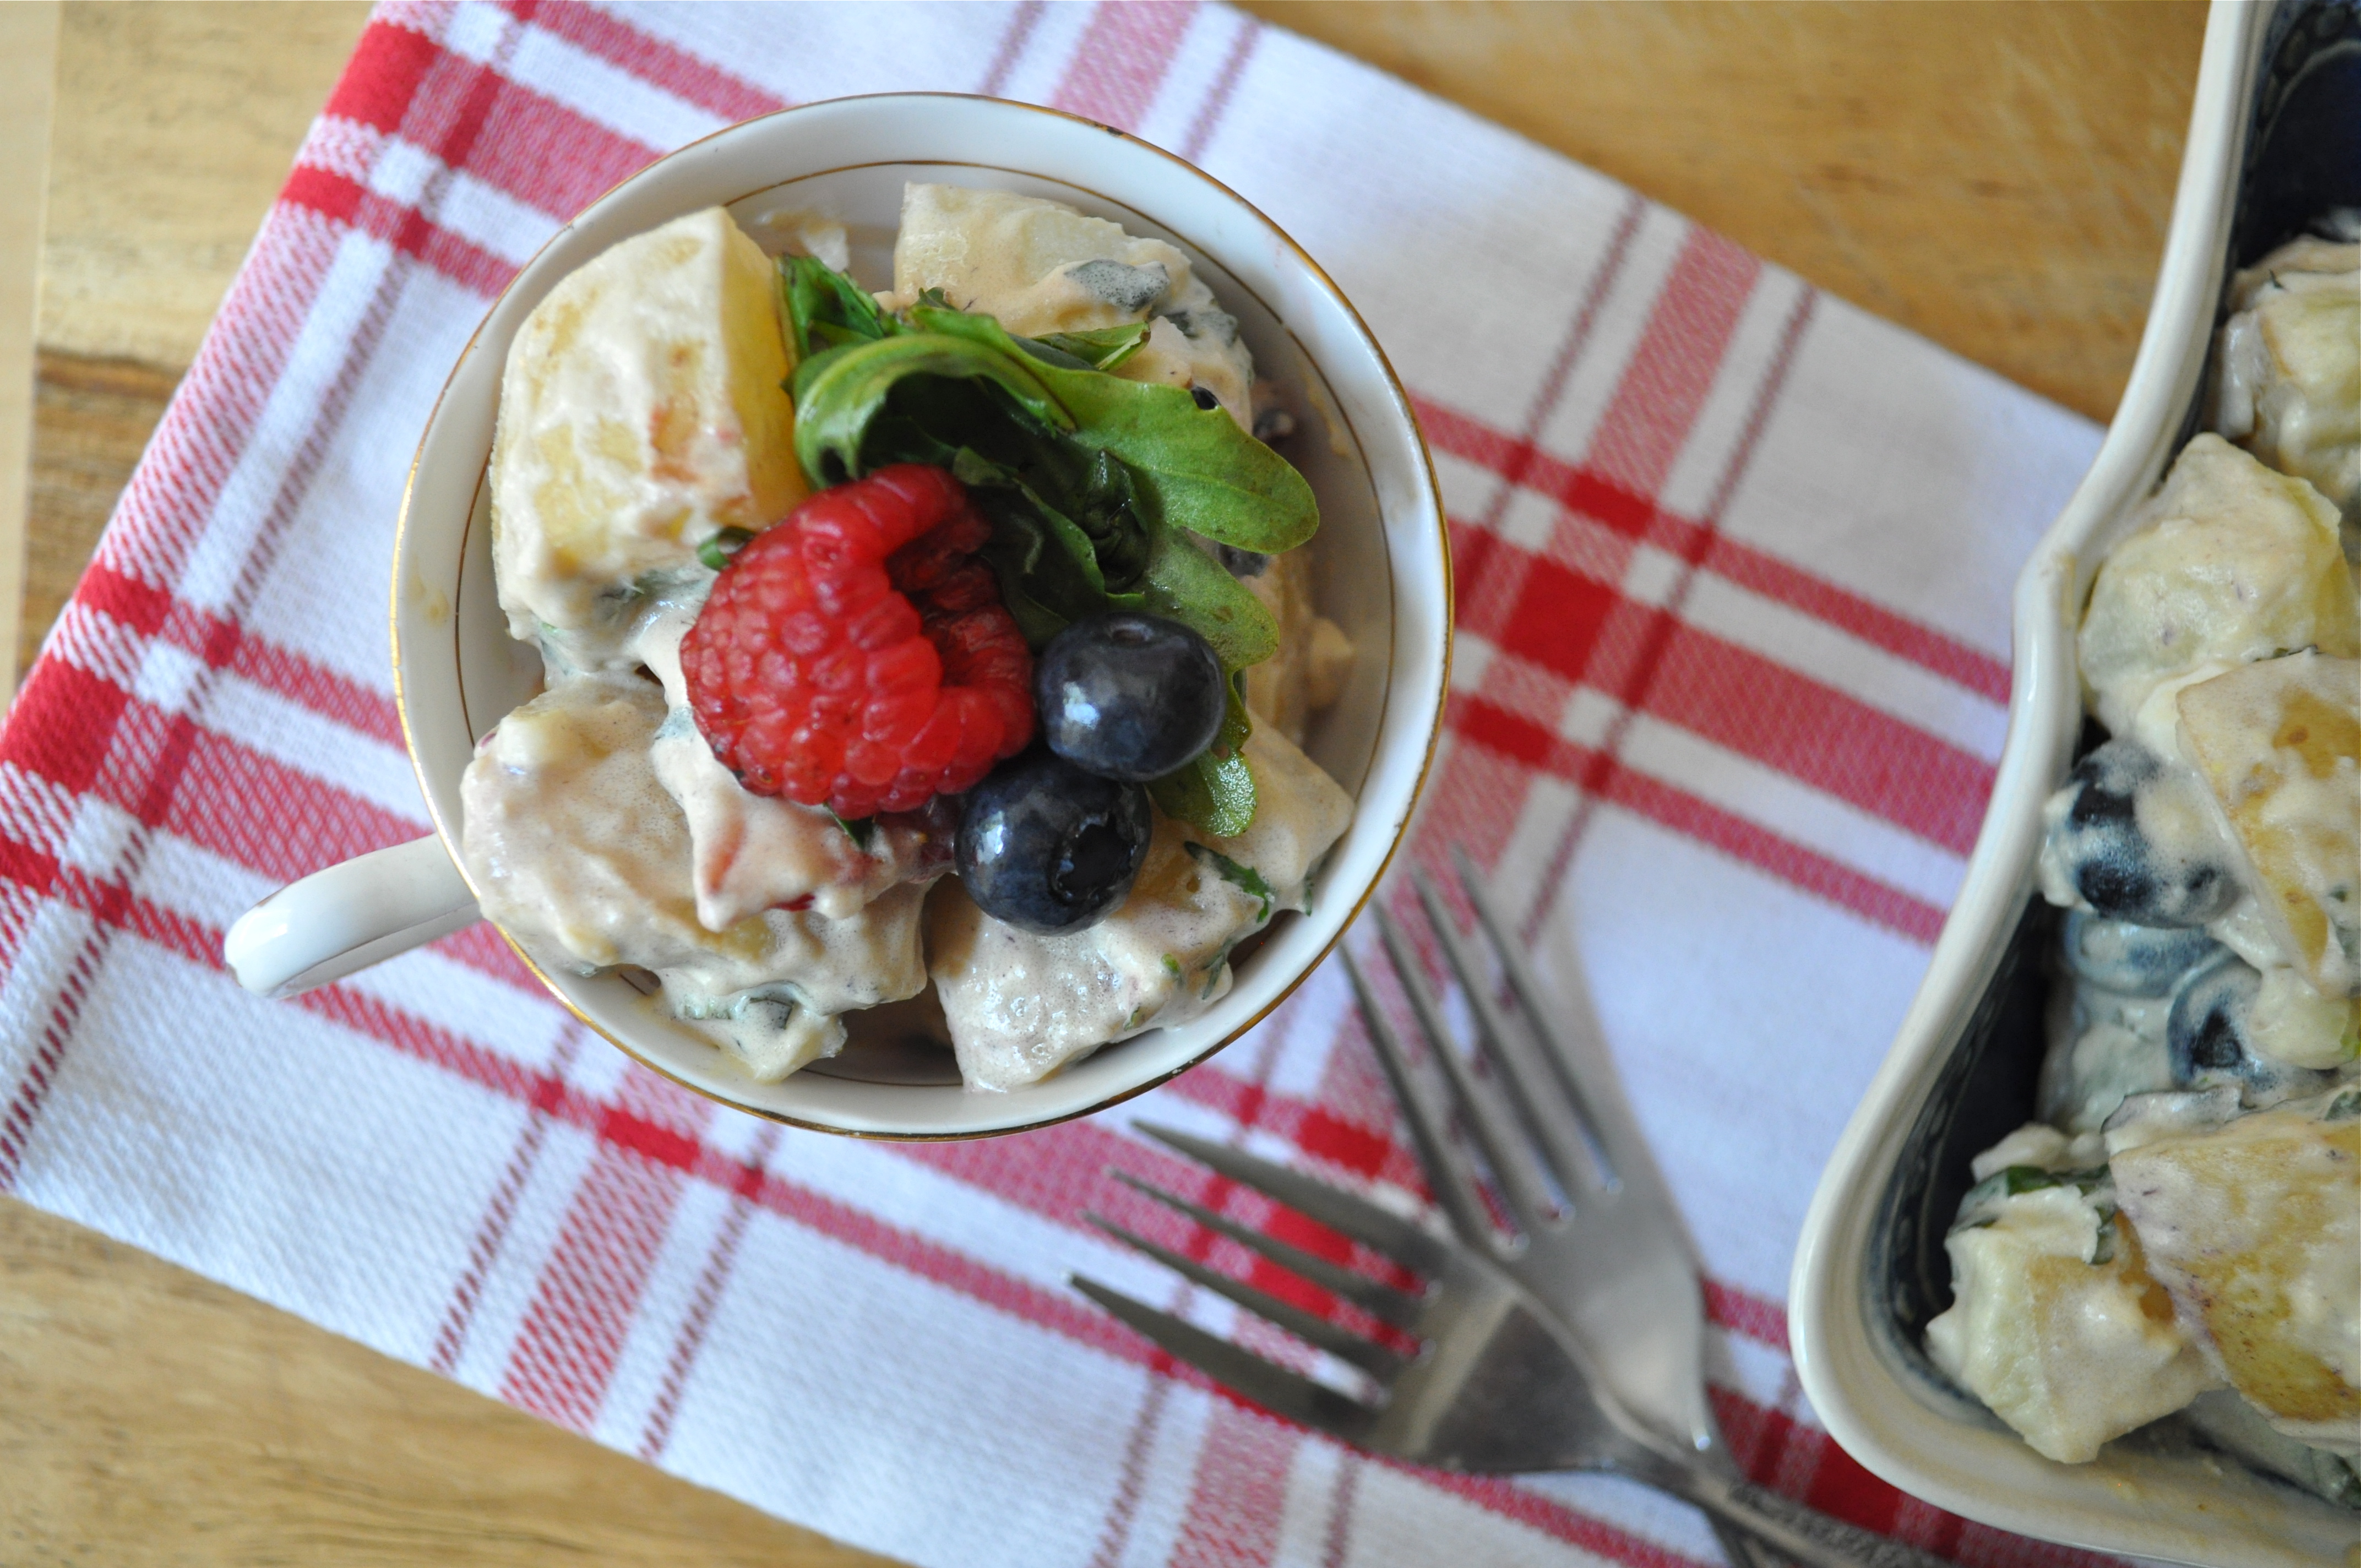
Allow me to be totally honest here – I’ve never been a huge fan of potato salad. I don’t dislike it, but it’s not something I typically fill my plate with. I take a small spoonful and carry on. In fact, I had never made potato salad before, or even really considered it. Typically potato salads are very mayonnaise-heavy, and I’m not a big mayo lover. I like a little smear on my sandwich, or a little spoonful in my tuna or egg salad, but that’s about it. When I read this recipe, I was really intrigued by the unique ingredients and flavours. The Dijon mustard, real whipping cream, and fresh lemon juice and mint really come through and help to downplay the mayonnaise in the dressing for the salad, and the fresh berries and arugula provide a fun twist. I ended up enjoying a bowl full of this potato salad once it was put together – and let me tell you, I ain’t never eaten more than a few bites of potato salad in one sitting before.

Berry Delicious Potato Salad | Once Upon a Recipe

Berry Delicious Potato Salad | Once Upon a Recipe

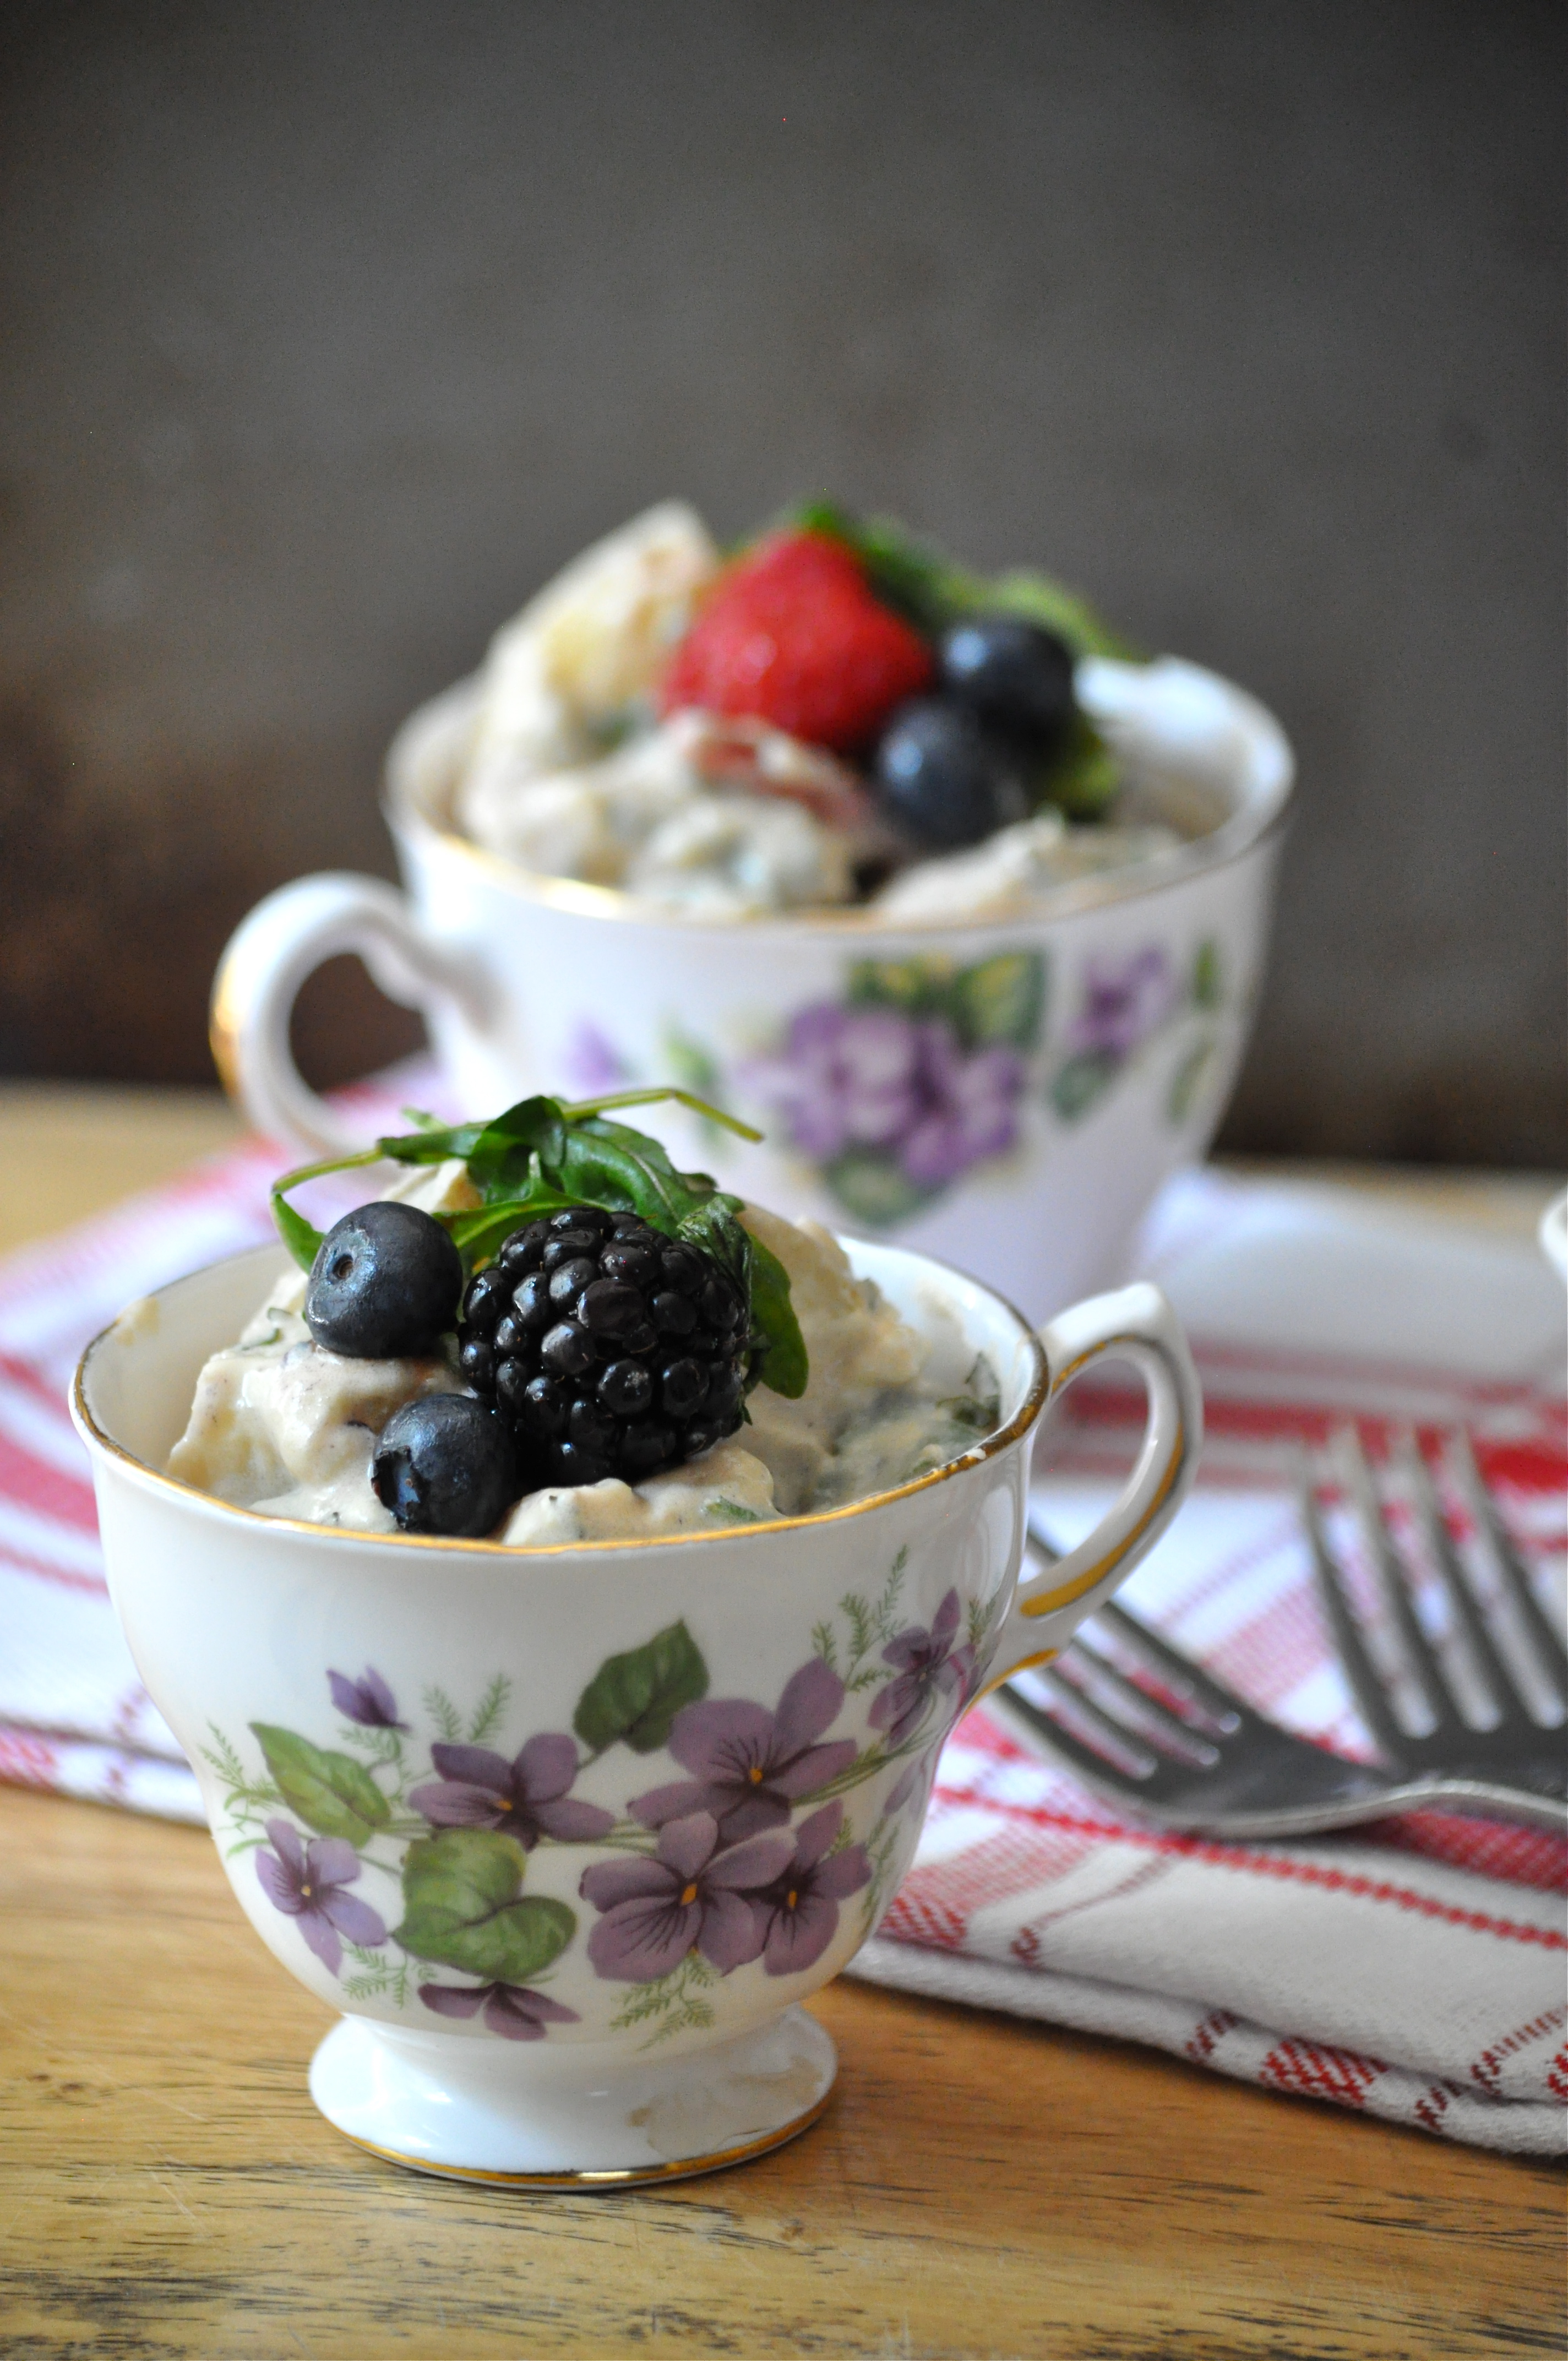
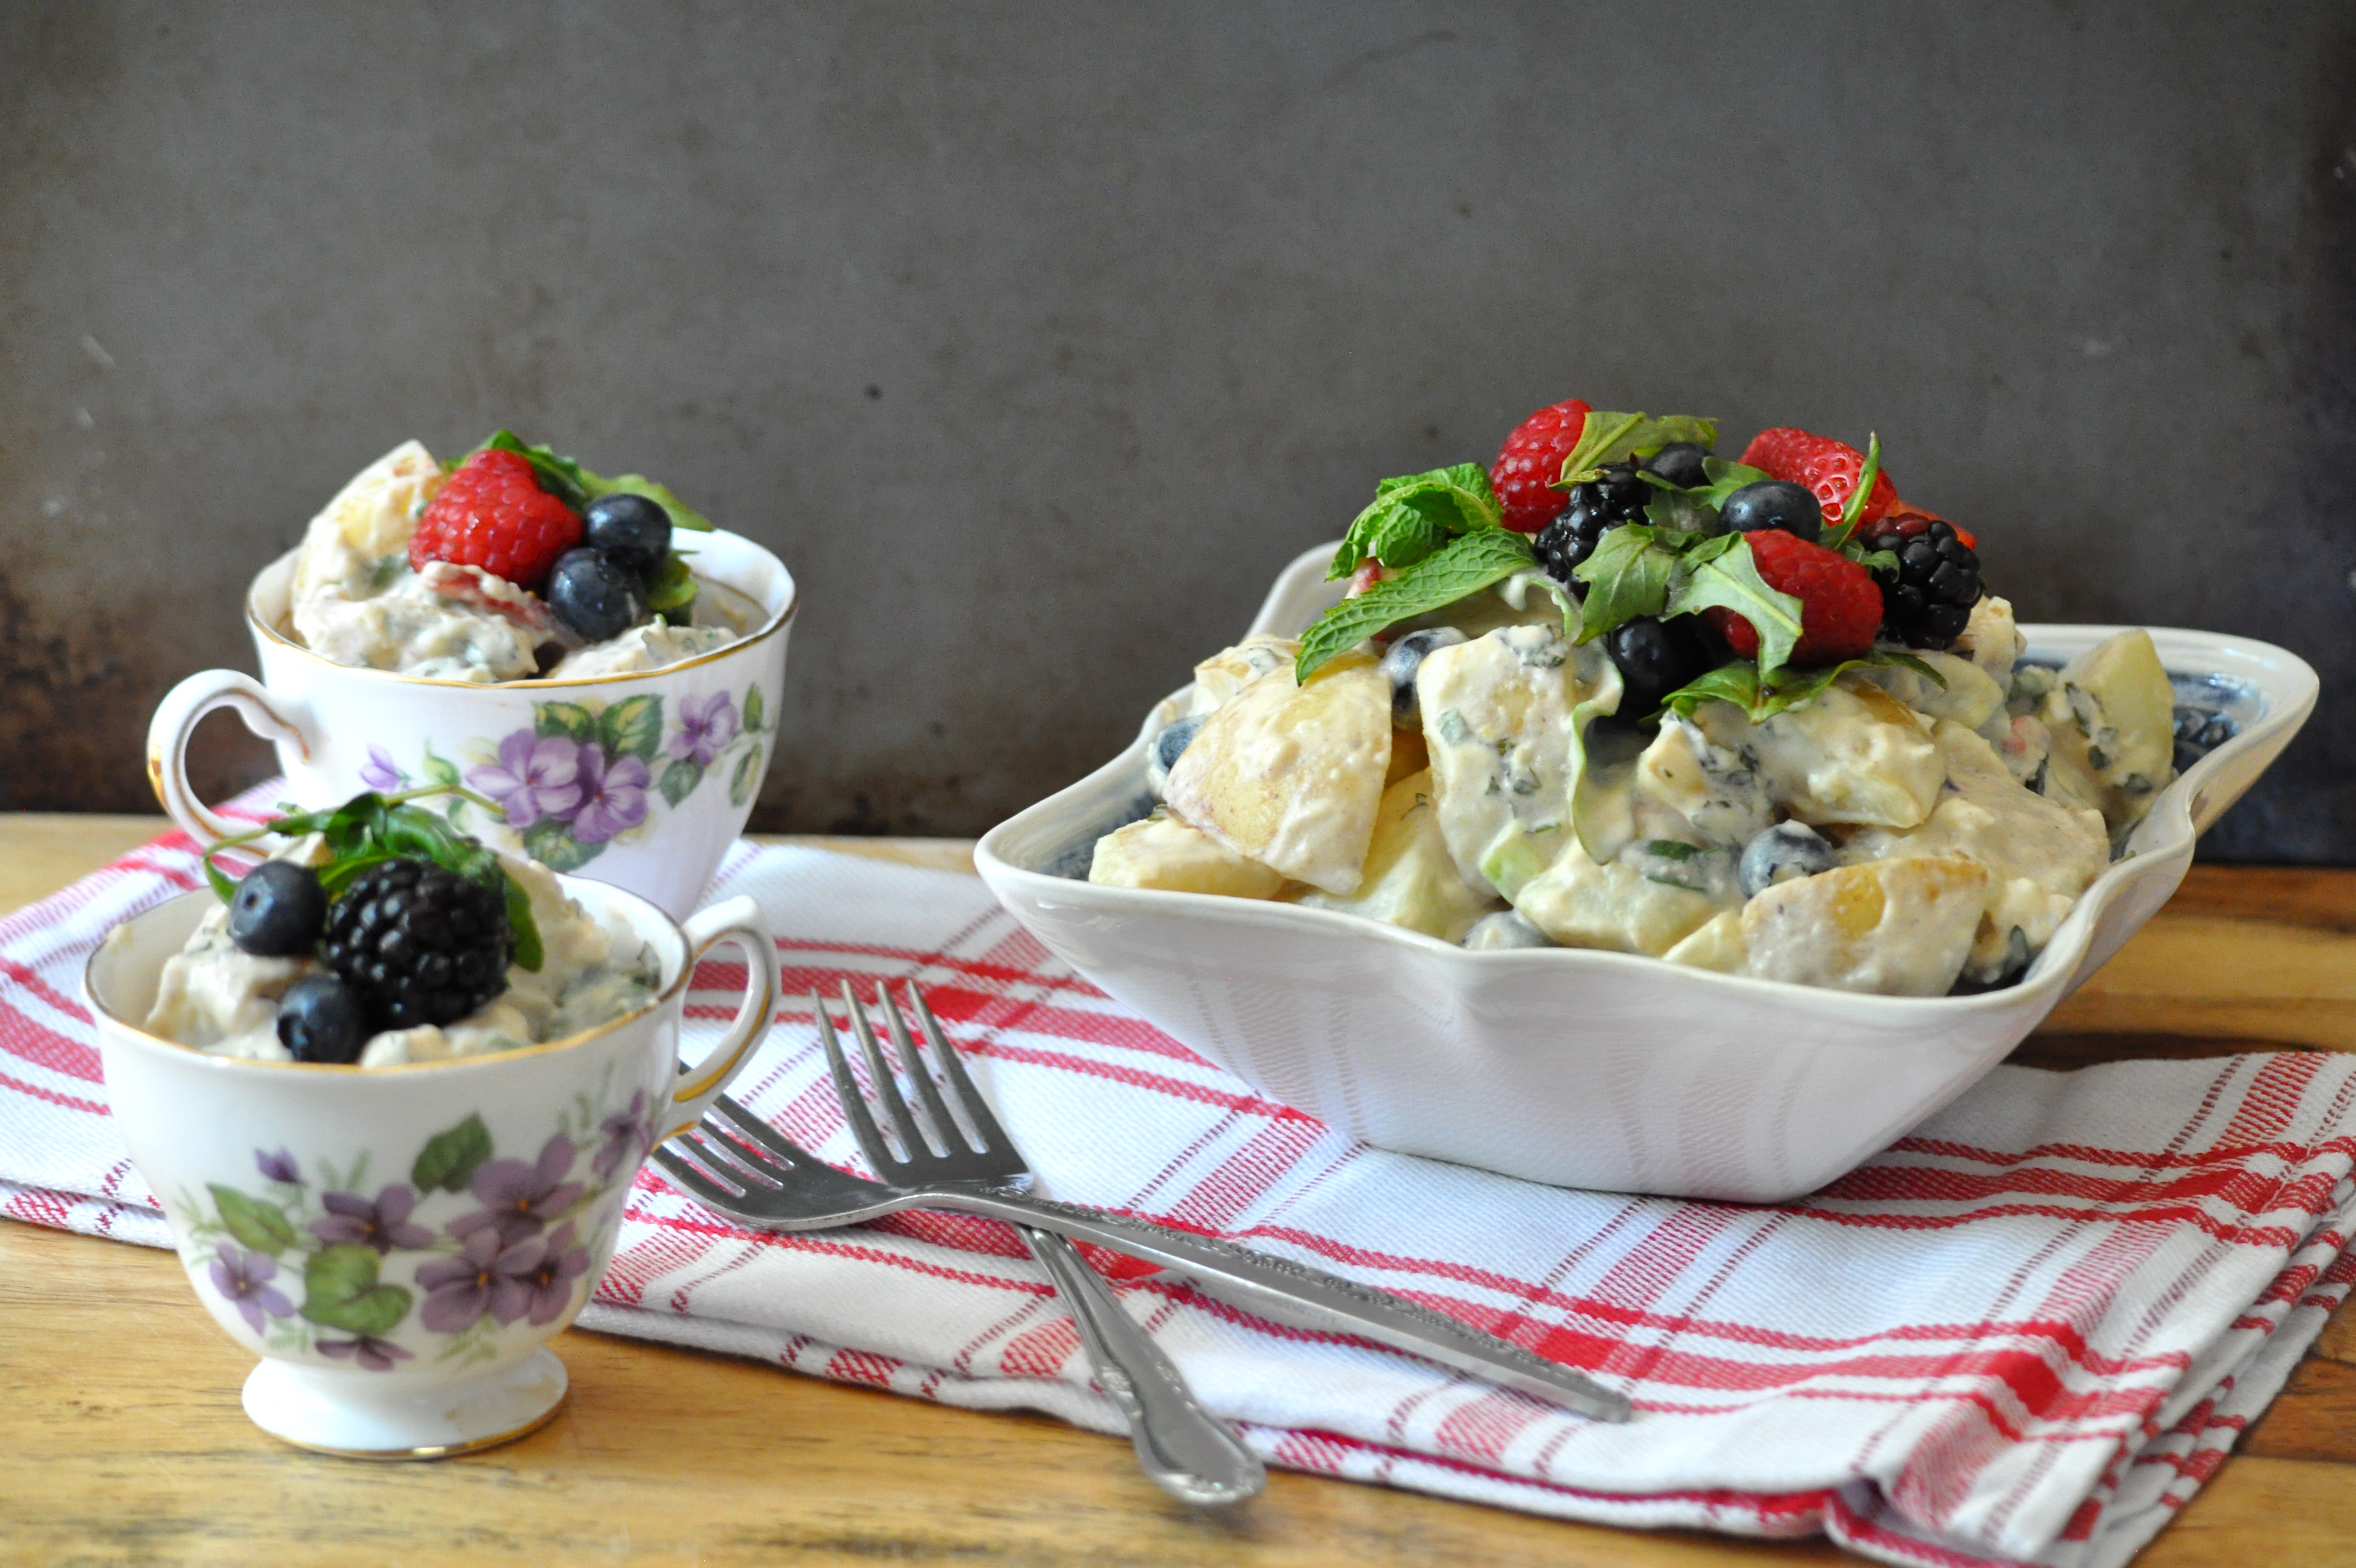
This potato salad would make a great addition to a summer picnic or BBQ, or even a regular ol’ weekday meal. I think it looks super pretty served in little tea cups. Don’t you think it would be fun to serve it this way at a bridal or baby shower? *idea alert!*

Even if adding sweet berries and whipping cream to a potato salad sounds bit wild, I really encourage you to give this recipe a try. What’s living if you don’t walk on the wild side from time to time?

Berry Delicious Potato Salad | Once Upon a Recipe

Berry Delicious Potato Salad (recipe by Chef Michael Allemeier from the Southern Alberta Institute of Technology)

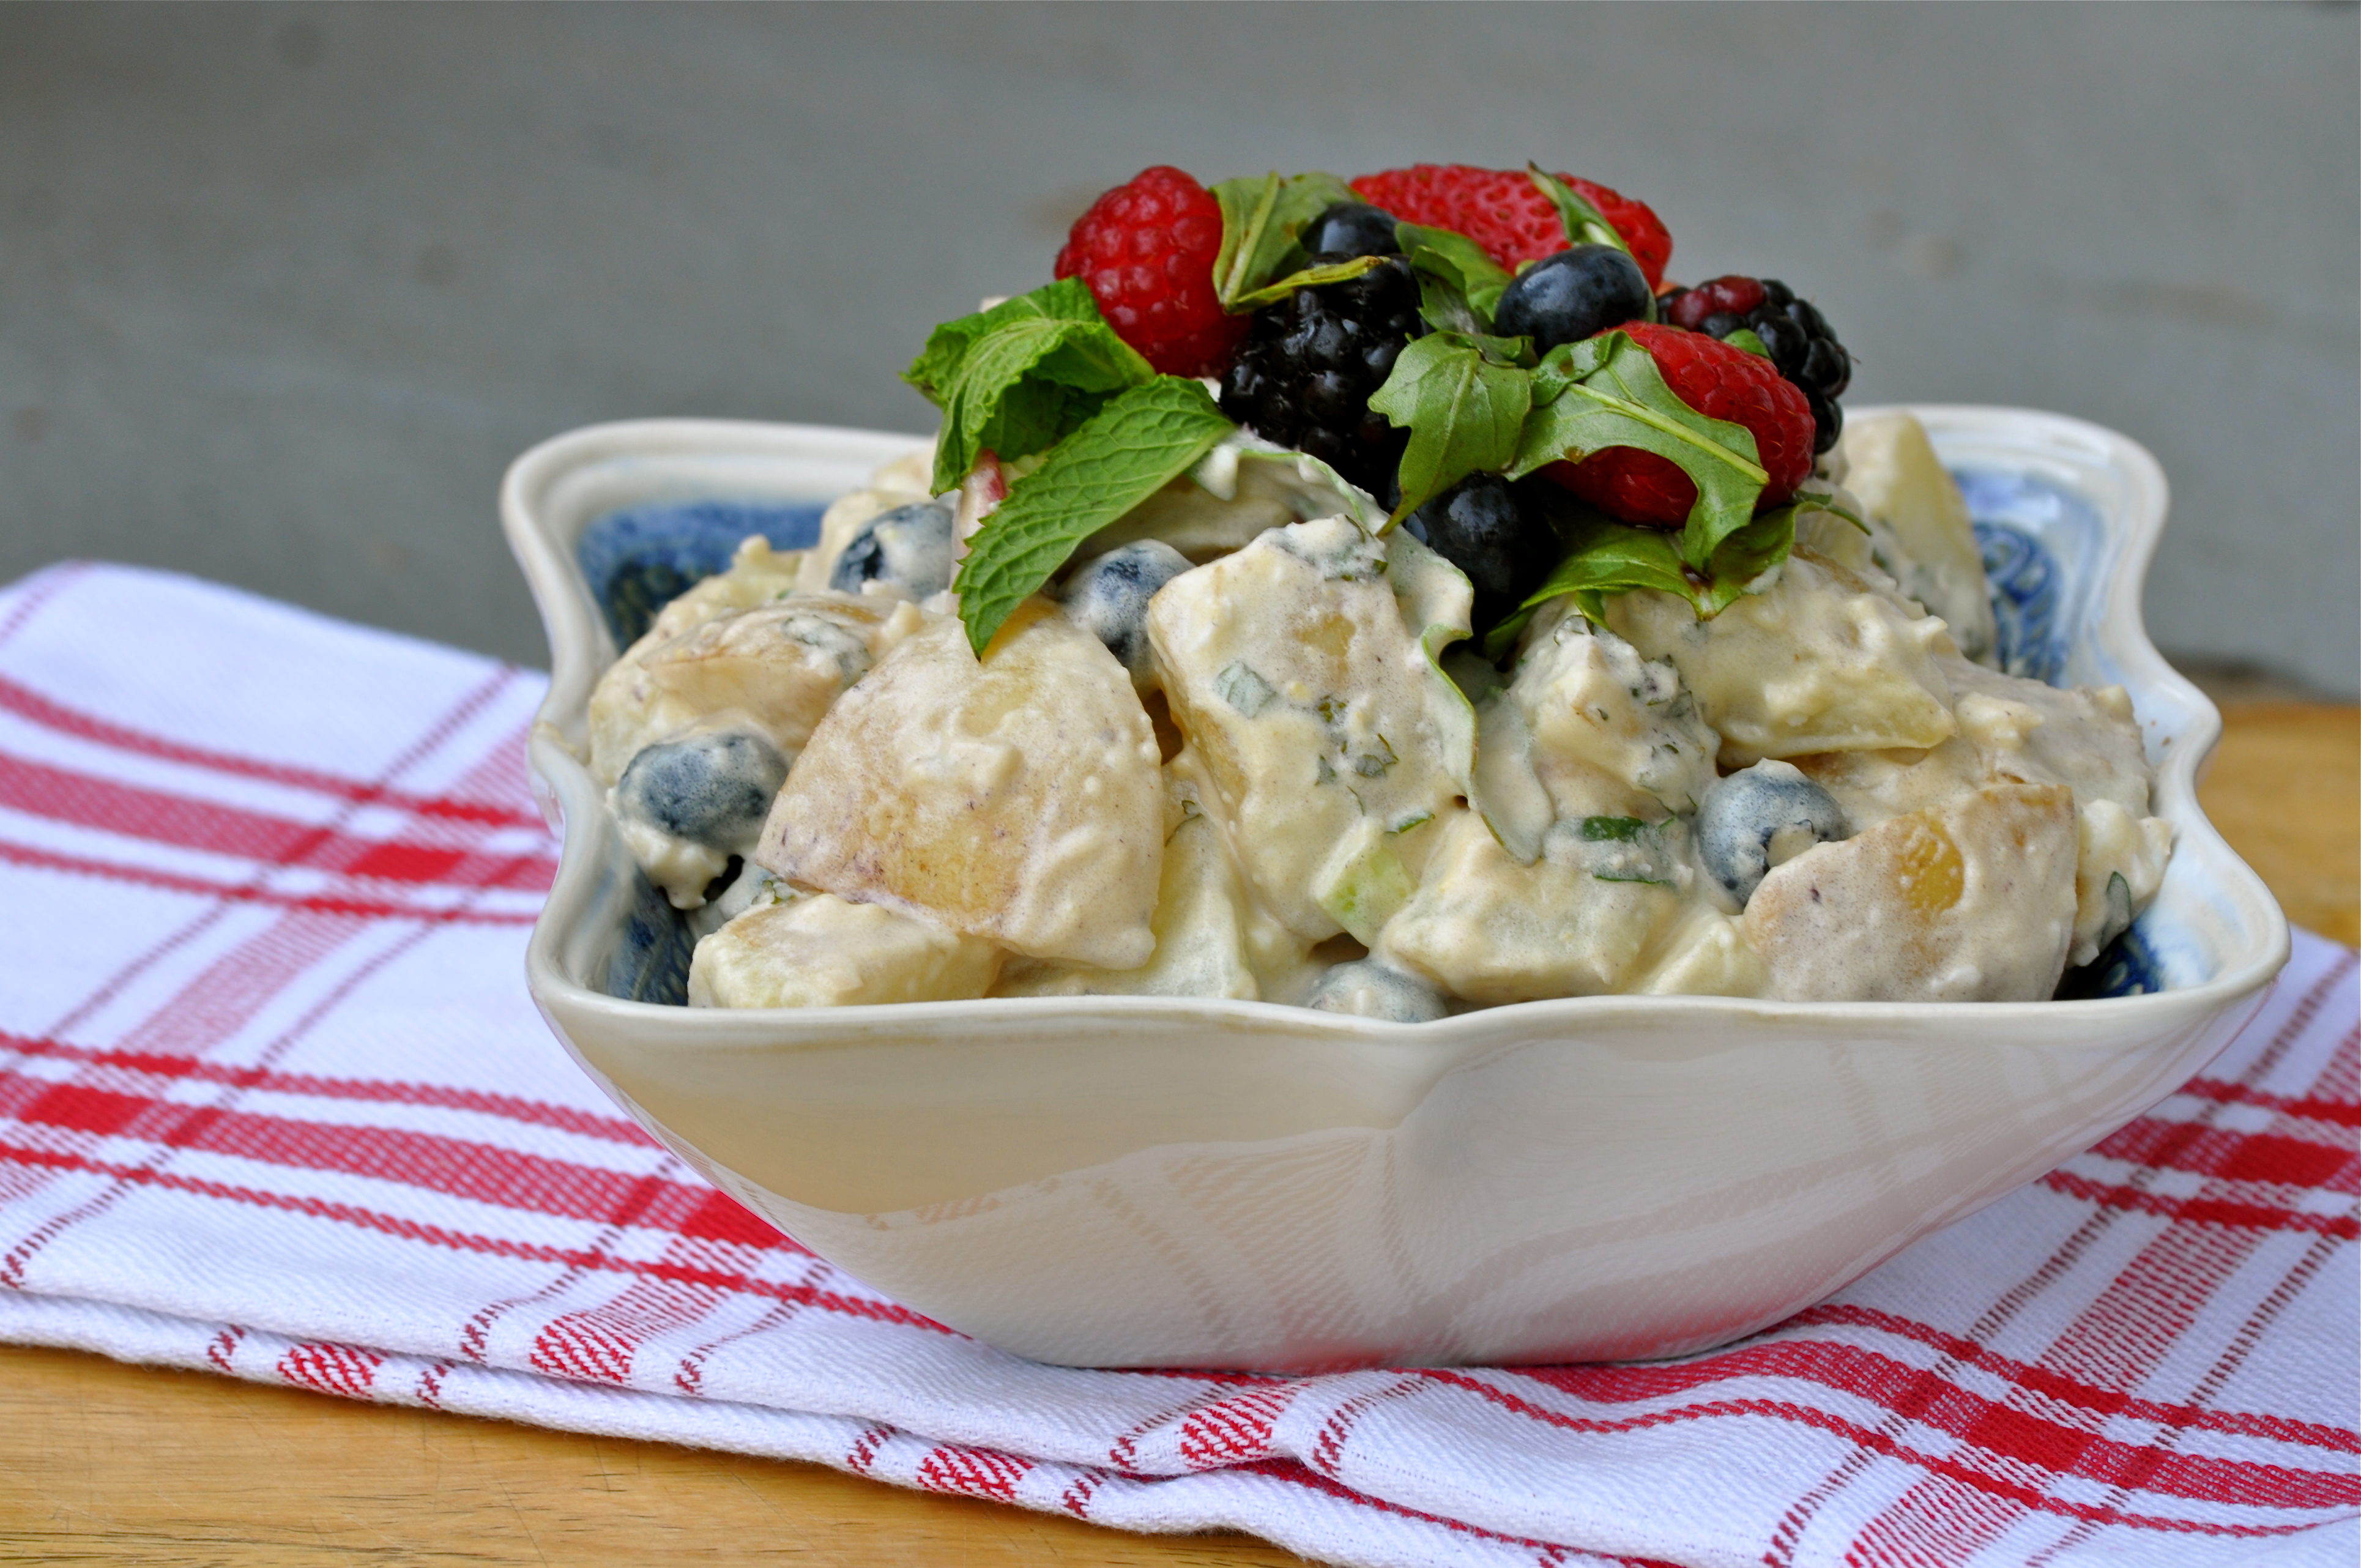
A classic summer yellow-fleshed potato salad, bound with a creamy hard-boiled egg dressing, elevated with the addition of assorted berries and arugula for an unexpected twist. Serves 8.

5 medium yellow-fleshed potatoes (about 2 lbs)

2 hardboiled eggs, peeled

1/2 cup mayonnaise

1/3 cup 35% whipping cream

1/4 cup sour cream

2 TBSP. Dijon mustard

1 TBSP. fresh lemon juice

4 green onions, thinly sliced (green parts only)

1/4 cup loosely packed, thinly sliced fresh mint

Salt, to taste

2 cups mixed berries (such as blueberries, strawberries, blackberries, raspberries)

1 cup firmly packed baby arugula leaves, stems removed

1 TBSP. balsamic vinegar

Scrub potatoes and dice into 3/4-inch (2 cm) pieces. Cook in large pot of salted boiling water until tender. Drain well; let cool slightly.

Meanwhile, in a large bowl, mash eggs with a fork. Whisk in mayonnaise, whipping cream, sour cream, mustard, lemon juice, onions, and mint until creamy. Add warm potatoes to dressing; season to taste with salt. Cover and refrigerate until serving.

To serve: In a medium bowl toss the berries, arugula, and balsamic vinegar together; reserve some of the berries and arugula. Fold berry mixture into potato salad. Serve in a bowl or on a platter; garnish with reserved berries and arugula.

Chef Michael’s Tip: There are many varieties of yellow-fleshed potatoes. They have a wonderful flavour and texture, perfect for potato salad. Look for Yukon Golds, Agria, and Kennebec potatoes – all of these are perfect for this salad.

Berry Delicious Potato Salad | Once Upon a Recipe

Disclaimer: I was generously provided with the ingredients (and some sweet Real Cream swag!) to make this recipe, but all opinions are my own.

Perfect for Summer | Caprese Pasta Salad

Caprese Pasta Salad | Once Upon a Recipe

Happy Monday, friends! I hope you all had an incredible weekend. I am still enjoying mine, as we were granted a long one here in Canada for the civic holiday. And the weather is absolutely glorious, so I can’t wait to get outside and soak up some summer sun. The fact that we’re already into August is mind-boggling to me!

With that said, here is a quick and easy pasta salad recipe that would be perfect for any summer BBQ or gathering with friends and family. I’ve made it no less than 4 times over the past couple of months. It is so simple due to its short ingredient list, it comes together in no time, and can easily feed a crowd. Leftovers taste pretty spectacular too.

Caprese Pasta Salad | Once Upon a Recipe

The recipe comes from Annie’s Eats, and is one of many gems that I’ve found on Annie’s blog. I barely changed a thing, except for upping the garlic a wee bit (I can’t help myself). If you’re not a fan of intense garlic flavor, what’s wrong with you? simply reduce the number of cloves. Adios!

Caprese Pasta Salad | Once Upon a Recipe

Caprese Pasta Salad (from Annie’s Eats)

Serves 10-12 people as a side dish. This recipe also doubles and triples nicely if you’re feeding a large crowd.

1 lb. pasta shapes of your choice
6 tbsp. extra-virgin olive oil
6 cloves garlic, minced or pressed
½ tsp. red pepper flakes
2 TBSP. balsamic vinegar
1 lb. cherry or grape tomatoes, halved or quartered
1 lb. fresh mozzarella (ie. mini bocconcini)
½ cup loosely packed fresh basil leaves, chopped
Salt and pepper, to taste

Cook the pasta according to package directions. Drain and rinse well with cold water. In the meantime, add the olive oil, garlic, and red pepper flakes to a small skillet. Over medium-low heat, allow the oil to infuse with the flavors for about 5-10 minutes. Be careful that the garlic doesn’t burn. Remove from heat and allow to cool slightly.

Combine the cooked pasta, olive oil mixture, tomatoes, mozzarella, basil, and balsamic vinegar in a large bowl and toss to coat. Season with salt and pepper to taste. Serve cold or at room temperature. Enjoy!

Caprese Pasta Salad | Once Upon a Recipe

Guest Post: Kristy @ Gastronomical Sovereignty | Rough & Rustic Stuffing

Hi friends! Special treat for you today – Kristy from Gastronomical Sovereignty is here to share a festive recipe. Kristy is one of my favorites. Check out more of her blog after this post and you’ll see why. Bonus: She’s a fellow Canadian. Cheers to that!

Good morning Amanda’s darling readers!

Anyone who knows me knows I love me some Christmas. The tree, the music, the presents, company, that glowing feeling that starts deep in your stomach and radiates through your every pore – that could be the wine. But still, I love me some Christmas! And best of all, at this time of year, I love a good, filling, rough & rustic stuffing.

from above christmas stuffing

There are lots of things you can stuff right now. Stockings. Packages. Feather down pillows. Your face. Random body parts that will remain un-named because not everyone appreciates me talking about vaginas on their blogs. Oops. Sorry Amanda! I said vagina. Oh no.
.
But most importantly – at least while we’re in the presence of family – birds! This year it’s just me and the boyfriend so we aren’t roasting a full turkey. Instead we’re thinking about just 2 breasts. Turkey breasts. What’s wrong with me?
.
You could stuff this stuffing inside a bird if you like but this recipe was simply baked in the oven all by itself. Is it still called stuffing if it isn’t stuffing something? Hm.
This was also less goopy than most stuffings I’ve had. You could add another 1 – 2 cups of liquid if you like your stuffing heavier but this is a nice light-feeling alternative to everything else we eat at Christmas dinner but still loaded with flavor to-boot! Boots are another thing you can stuff. With socks. Or presents. Or….
.
Rough & Rustic Stuffing

(printable recipe) – Serves 6.

.
Ingredients:
1 loaf of sourdough bread, roughly chopped into 1” pieces
1 cup onion, diced
1 cup carrot, skin on & diced
1 cup celery, sliced
1 cup mushrooms, sliced
2 cups apple, skin on, cored & diced
2 cups chicken, beef, or veggie stock
1 lb. chorizo sausage (approx. 3 large links), removed from casings
Handful of fresh parsley, roughly chopped
Handful of fresh sage, roughly chopped
2 TBSP. butter
2 pastured eggs, lightly beaten
Coarse sea salt & fresh cracked black pepper
.
What to Do:
Pre-heat your oven to 300°F. Place chopped bread on a couple of baking sheets. Place in oven and toast until golden, approx 30 minutes. Remove from heat and set aside.Turn the heat up to 350°F and grease a casserole dish with Tbsp of butter and/or non-stick spray. Set aside.Place a large pan over medium heat with 1 TBSP. of butter. Once hot, add the sausage and break up into small pieces. Cook until almost all the pink is gone, stirring often.
.
Add the onion, celery, carrot, mushroom and a good helping of salt and pepper. Allow for the veggies to soften, stirring regularly, until just barely fork tender, approx 10 minutes.
.
Pour in the apples, stock and herbs. Bring to just a boil, scraping any bits off the bottom of the pan. Mmm flavor! Remove from heat.
.
Toss the bread into the casserole dish and pour eggs over top. Mix well. Add the sausage/veggie/stock mixture. Make sure everything is combined.
.
Cover and place in oven. Bake for 45 minutes, remove the cover, and cook a further 10 minutes. Remove from the heat and allow to sit for 10 minutes.
.
Eat.
.
Buen provecho!
Kristy

All Choked Up | Grilled Artichokes with Lemon Garlic Aioli


Friends, can you believe that August is nearly half over? That these glorious, hot, sunshine and thunderstorm-filled days are whipping by us at break neck speed? And before we know it, we will be trudging through another long, cold, snowy winter? *sigh* My apologies for the pessimistic ‘tude that I’m rocking right now. Summer just ain’t long enough!


However, I do have some advice for making the best of the rest of these summer days. Ready?

1.Get outside. Spend as much time out there as you can! Eat outside, drink outside, be active outside (emphasis on eat and drink). Have a bonfire, roast marshmallows, and devour s’mores. Sit outside and read a book. Get out there and soak up summer!

2.Make these. Don’t ask questions, just do it. Preferably in combination with #1.


3.Go to the farmers’ market. Summer farmers’ markets are fabulous. Fresh produce in its prime. Delicious local goods. Supporting your community. All the things!

4.Eat more ice cream. This should not require an argument, but if you have your doubts, Em has you covered. And if you require any inspiration, look no further.


5.Sleep in. It is summer, after all. And while we might not be 16 anymore, with the glory of summer holidays to waste away by sleeping until 1pm, try to sneak in an extra hour or two of slumber and savor a lazy weekend morning. Preferably followed by pancakes and hot coffee.

6.Get away. Even if you can’t swing an exotic summer holiday, get out of town for a weekend. Enjoy a change of scenery! Go to the beach, the mountains, go camping. Just get out. Your mind will thank you.

7.Grill up some artichokes and then dip them in lemon garlic aioli and stuff them into your face. Seriously.

Artichokes are delicious (and beautiful!) things. I had never bought or eaten a whole artichoke prior to trying this recipe. Canned artichokes often find their way into my grocery basket for use in a spinach and artichoke dip or onto homemade pizza. But there’s more to artichokes than their lovely little hearts! They’ve got cute little leaves that you can dip into a tasty aioli and then pull the flesh from with your teeth. With simple flavors like lemon and garlic, and the wonderful char created by a hot grill, these are a great appetizer or side to any summer meal. Get grillin’ friends, and enjoy summer!


Grilled Artichokes with Lemon Garlic Aioli (barely adapted from Food For My Family)

For the artichokes:
3 whole artichokes
2 lemons
1/4 cup extra virgin olive oil
3 cloves garlic
1/2 teaspoon sea salt
Freshly ground black pepper

Fill a large bowl with water, and add the juice from one lemon, saving the rind. Cut the artichokes in half and immediately submerge in the water (to prevent browning). Bring a (very) large pot of water to a boil and add in the squeezed lemon rind. Transfer the artichokes to the boiling water. Boil for 20 minutes, stirring occasionally.

Fire up the grill. In a large bowl, add the juice from the other lemon, olive oil, garlic, salt and pepper. When the artichokes are done boiling, drain them on a paper towel and then toss them around in the bowl to coat them.

With the grill on medium heat, add the artichokes to the grill. Brush the artichokes with the remaining oil mixture in the bowl. Turn every five minutes until artichokes start to char (mine took about 15 minutes). Remove from heat.

For the lemon garlic aioli:
1/4 cup mayonnaise
2 cloves garlic, minced
Juice from 1/2 of a lemon
1 green onion, diced
1/2 teaspoon salt
Freshly ground black pepper

Mix together all ingredients in a small bowl. Refrigerate until ready to serve with the grilled artichokes.


Things might get messy. Have your napkins ready.

The photos in this post were taken with Instagram, an iPhone app. If you are an IG user and want to follow my daily foodie (etc.) life, you can find me at @onceuponarecipe.

Enough Said | Black Bean Chili and Cheddar Cornbread

There really is no explanation needed for the meal pictured above.

It’s Winter. It’s cold out, it gets dark much too early, and most often, leads to cravings for warm, hearty soups and stews. Now, I know that there are a kazillion chili recipes out there, and this might not look like anything special. But it was definitely the best pot of chili I’ve ever made, and so I thought I’d share what went into it. And the cornbread? Chili’s most reliable wingman.

About a year ago, I started adding cocoa into my chili after reading a recipe by Deb from Smitten Kitchen. It might sound strange at first, but the cocoa adds a beautiful richness to the chili. I haven’t made a batch without it since. Don’t be afraid – give it a shot! I promise the chili won’t taste like a chocolate bar. Even though that would be pretty awesome.

Can you believe that I used to hate cornbread?! I claimed that it was disgusting and dry…and then came to the realization that the last time I ate cornbread was at a rather questionable establishment, and that perhaps I should try making my own. Guided by reliable sources, such as Ree and Jenna, I realized that it ain’t so bad. In fact, it’s really good! Now me and cornbread are likethis. This particular cornbread recipe gets a little extra somethin’ from the addition of some sharp cheddar cheese. Served warm with butter and a drizzle of honey. Total magic. For realsies.

Friends, if you’re looking for a comforting meal this winter, give this dynamic duo a try. Maybe this weekend? I hear there’s a big football game on…or something like that…and chili is wicked sports party food! Alongside a pint (or four) of beer, you just can’t go wrong.

Black Bean Chili

2 TBSP. olive oil

1 onion, chopped

4 garlic cloves, crushed

1 medium zucchini, cut into small chunks

2 carrots, chopped small

1 cup mushrooms, sliced

4 TBSP. chili powder

2 TBSP. cumin

1 tsp. smoked paprika

2 TBSP. cocoa

Pinch of cayenne pepper (optional)

1 tsp. salt

Pepper to taste

1 large can diced tomatoes

2 cans black beans, drained and rinsed

1 can brown beans in tomato sauce

2 TBSP. tomato paste

In a large pot over medium-high heat, heat the olive oil and add the onions, cooking for a few minutes, until soft. Add in the garlic, zucchini, carrots, mushrooms and cook for a few minutes longer. Add in the spices, cooking for a minute more. Add the tomatoes, beans, and tomato paste and stir well to combine. Allow everything to simmer for at least 30 minutes (longer if possible), stirring occasionally. This is the perfect time to prepare the cornbread!

PS. I added the zucchini, carrots and mushrooms for extra bulk and nutrition, but feel free to substitute for whatever tickles your fancy.

Cheddar Cornbread  (adapted ever-so-slightly from Eat Live Run)

1 cup yellow cornmeal

1 cup all-purpose flour

2 tsp. baking powder

1 tsp. baking soda

1 tsp. salt

1/4 cup sugar

1 (heaping) cup grated sharp cheddar cheese

2 eggs

1 cup buttermilk*

1/4 cup butter, melted

Preheat your oven to 400°F. Whisk together the cornmeal, flour, cheese, baking powder, baking soda, salt and sugar. Add the buttermilk, eggs and melted butter and mix well to combine. Pour the batter into a greased 9-inch baking dish and bake for 30 minutes, or until golden brown. Serve immediately with butter and honey (and chili)!

*If you don’t have buttermilk, combine 1 cup of milk with 1 TBSP. white vinegar and allow to sit for a few minutes before adding to the rest of the ingredients. Instant buttermilk!

Summer Lovin’ | Warm Balsamic Vegetable Salad with Feta and Basil

Spring is here. I can feel it.

I can smell it.

I can taste it.

Vegetables and fruits are starting to taste the way they are supposed to. I’m starting to crave lighter meals rather than hearty stick-to-your-bones soups and stews that warm you to your core. And best of all, it is possible to BBQ again. Meaning: 1) My BBQ is not buried beneath 3 feet of snow, and 2) I’m not at risk for catching hypothermia while standing next to it.

Hallelujah.

Honey and I bought a BBQ off of Kijiji for $100 last summer. Most awesome purchase ever. Minus the fact that it didn’t work when we tried to use it for the first time. Honey is such a handyman, he fixed it and we were in BBQ Bliss shortly thereafter. I love the flavors that the BBQ brings out in food. Flavors that just can’t be replicated in an oven or on a ceramic stovetop. Grilling vegetables is one of my favorite things to do on the BBQ. Just a little olive oil, some salt and pepper, and the magic of an open flame. We often eat our veggies this way throughout the summer.

And then I discovered this salad.

Veggies are grilled on the BBQ, then cut up into bite size chunks, tossed with a little balsamic vinegar and fresh basil, and topped with feta cheese. Oh. My. Mouthwateringly delicious. Please try this at your next available opportunity. And if you don’t own a BBQ, roast your veggies in the oven or cook on your stovetop, or on a little countertop grill. But I’m telling you, the BBQ = Bliss. You heard it here first.

Warm Balsamic Vegetable Salad with Feta and Basil 

Serves 4.

1/2 pound of asparagus

1/2 red pepper, sliced into 4 parts

1/2 yellow pepper, sliced into 4 parts

1 zucchini, sliced in half, then lengthwise into quarters

6 big white mushrooms

A splash of olive oil

Salt and pepper, to taste

1/2 cup chopped fresh basil

2 TBSP. balsamic vinegar

1/4 cup of crumbled feta cheese

Toss your prepared veggies in the olive oil and sprinkle generously with salt and pepper. Heat your grill to medium high and throw the veggies on. Watch them closely, turning every couple of minutes until al dente. Grill marks = beauty. Turn your grilled veggies onto a cutting board and chop them into bite-size pieces. In a large bowl, combine the chopped veggies with the basil and balsamic vinegar. Sprinkle with feta cheese. Chow down with still warm!

The beauty of this salad is that you can make as much or as little of it as you like. Just adjust the balsamic vinegar, basil, and feta accordingly. You can also change up the veggies if you prefer.

Creamy and Dreamy Amore | Beet Risotto

I wish I could tell you that the beets used in this recipe came from my garden. That I planted them, nourished them to grow, gave them my love, and harvested them myself. But you see, where I live, we are still shoveling snow. Snow that fell on April 14 to be exact. All 10 cm of it. There ain’t no vegetables growin’ round these parts. But I want you to know, that if I lived in a climate that was more conducive to growing anything for more than a few months out of the year, I definitely would have grown these myself.

Well…I would have tried to grow them myself. But unfortunately, I have a black thumb, the deathly version of it’s lively counterpart, the green thumb. I have a curse. I cannot keep plants or flowers alive. They wither as soon as they set root or stem on my property. I will never have the pleasure of telling people that the delicious vegetables they are tasting came from my garden. Thank goodness for farmer’s markets, or else I would be forever destined for a life of tasteless grocery store produce! Depressing eh?

Honey’s lovely sister (and fellow foodie) emailed me a few weeks ago with this recipe for beet risotto. I knew I had to try it as soon as possible when she described it as tasting like “f—ing amazing creamy lovestyle italian amore.” Whoa. Yes please.

So last night, with fingers stained red with beet juice, I tasted this heavenly dish, and totally echoed her sentiments. And added in a hell yeah. Now I don’t want to be pushy, but you might want to go to the store right now (or your garden, if you don’t live in Santa’s backyard or have a black thumb like me), and buy these ingredients, and make this for dinner. Tonight.

Because we can all use a little extra amore.

Beet Risotto

2 beets (about 3″ in diameter), peeled and diced small

1 onion, chopped small

1/4 cup butter

1 cup arborio rice

3 cups stock (chicken or vegetable)

1 TBSP. balsamic vinegar

1/4-1/2 cup goat cheese

Salt and pepper, to taste

Melt the butter over medium heat in a heavy-bottomed saucepan. Add the beets and onion, and cook for 8 minutes (stir to allow the onion to caramelize). Mix in the rice, broth, and balsamic vinegar. Increase the heat. Bring to a boil, and then reduce the heat to medium-low. Cover and simmer until the rice is tender and the risotto is creamy (like amore, as honey’s sister says), stirring occasionally (about 15 minutes). Season with salt and pepper. Sprinkle with the goat cheese. If you are not a goat cheese fan, you could substitute feta cheese, but trust me, the goat cheese really enhances the flavor of the beets. Enjoy!

Less Is More | Chickpea Salad with Lemon, Parmesan, and Herbs

Dear Life,

You have been almost unbearably stressful lately. What did I ever do to you? I try to show you a good time as often as possible – I play fun sports like frisbee and soccer, I rock out at super awesome concerts, I bake delicious things to eat. And you just throw stressful experiences back in my face! Clearly I’ve done something to upset you, but I’m not sure what it is. Can we call a truce and be friends again? I’ll cook and bake you lots more wonderful things if you’re nice to me again.

Love,

Amanda

Sorry about that. I just had to have a little chat with life there for a moment. But I’m back to share a simple yet tongue-pleasing recipe with you. With Spring finally starting to show her face a little bit, I find myself craving lighter, fresh-tasting dishes. When I opened up this month’s Bon Appétit magazine and found this chickpea salad recipe, I immediately wanted to give it a try. You need just a handful of ingredients, most of which you might have sitting in your kitchen right now. The only thing I was missing was the fresh herbs, but I had the dried version of both, and considering the state of the fresh herbs around here at this time of year, dried was probably the best way to go. I can’t wait to make this again in a couple of months, when fresh basil is lush, fragrant, and easy to find. At least fresh parmesan is always in season.

Chickpea Salad with Lemon, Parmesan, and Herbs (from Bon Appétit magazine, April 2011)

1 can chickpeas, rinsed and drained

2 TBSP. chopped fresh basil (or 1 tsp. dried)

2 TBSP. chopped fresh Italian parsley (or 1 tsp. dried)

2 TBSP. fresh lemon juice

4 tsp. extra-virgin olive oil

1 garlic clove, pressed

1/3 cup freshly grated Parmesan

Salt and freshly ground black pepper, to taste

Combine all ingredients together in a bowl and toss gently. Season with salt and pepper. Enjoy immediately, or make ahead and refrigerate for several hours to allow the flavors to mingle and say hello to one another. This salad can be whipped up in no time. Happy eating!

Beans, Beans, the Musical Fruit | Black Bean and Corn Salad

 It is a miracle that I am able to post this recipe right now. That I can type these words to you on this laptop. You see, the sweet little puppy mentioned a couple of weeks ago continues to wreak havoc on my life. In fact, I think she came into my life to teach me how to be a more patient person. Unfortunately it is a rather difficult and damaging process. Damaging to my material possessions that is. For one thing, the carpet in our condo is going to need to be steam-cleaned about 40 times over in order to remove the invisible stains of approximately 2956 “accidents”. Shoes have been chewed, scarves and mittens have been ripped, tables and chairs have been munched on. Several books are missing parts of covers. My tea towels will never be the same. All of this, I have been able to take in stride. Quite easily I think.

However…there was an incident last night that almost put me over the edge. You see, my parents brought us back a bottle of delicious pineapple wine from a recent trip to Hawaii. Last night, honey and I decided to enjoy it with our dinner. We were feeling rather badass, so we decided to just drink the wine straight from the bottle. We were eating dinner in front of the TV (yes, we do that), and had left the bottle of wine sitting on the kitchen table. A certain little munchkin around here has a tendency to jump up on the coffee table if any food or beverages are within her sight. How tricky we were, leaving it on the kitchen table instead. And then there was a crash. I jumped up and ran the approximately 10 feet from the couch to the kitchen table to find that the aforementioned munchkin had jumped up onto the kitchen table and knocked the bottle of wine over, spilling it all over the table, floor, and…my laptop.

Now, I realize that it is dumb to leave your laptop sitting open on the kitchen table. But I do dumb things, rather often. Anyways, after one meltdown and many failed attempts at getting my laptop to start up again, honey advised me to shut it down, leave it overnight, and hope for the best. I’m happy to report that my laptop is working, although my keys are currently making a nice crunching noise with each keystroke, and my space bar wants to stick down every time I press on it. Small steps, I suppose. *sigh* The other miracle was that the wine bottle managed to stay half full following the catastrophe, as it landed on it’s side. Drinking the remainder of the wine was very helpful indeed. And now that I’ve wasted your time with this pointless story, I give you a delicious, fresh salad recipe, great for curing the winter blues. It has some fantastic colors going on, and is so simple and tasty. The original recipe comes from one of the Best of Bridge cookbooks. Happy eating!

Black Bean and Corn Salad

2 cans of black beans, rinsed and drained

1 can of corn, drained

1 red pepper, chopped small

1/2 cup cilantro, chopped

Juice and zest of two limes

1/4 cup olive oil

2 TBSP. cumin

1 tsp. chili powder

Salt and pepper to taste

Combine the black beans, corn, red pepper, and cilantro in a large bowl or container. Combine the remaining ingredients in a separate bowl, and then pour over the black bean mixture. Toss well. Taste and add more salt or pepper if needed. This salad tastes great right away, but has even better flavor if you give it a couple of hours to mingle in the fridge.

An Easy Side | Orzo with Parmesan and Basil

I’m dreaming of summer. Cool refreshing mornings, warm breezy nights, deliciously hot days. Amazing garden vegetables, fresh herbs, fruit that is actually in season! *sigh* Sadly, I will have to keep dreaming for another few months or so. Although, apparently the groundhog didn’t see his shadow, which means spring is on its way…right? I get confused by the groundhog theory. Anyway…

The first time I had orzo was a few years ago, when my mom made this recipe. Orzo is such a fun pasta – about the size of rice, but with the bite of pasta. It makes a great pasta salad (which I have another great recipe for), a fantastic side dish, and also goes well in soups. Now, this orzo with parmesan and basil tastes best with fresh basil, but sadly, the “fresh” basil currently available at my local grocery store tends to be half brown and less than delightful. Not to fret if you have the same problem – dried basil does the trick when necessary. Whether you use fresh or dried, give this recipe a try. It really is a fantastic example of the amazing orzo! Happy eating!

Orzo with Parmesan and Basil (a la my mama)

3 TBSP. butter

1 1/2 cups orzo pasta

3 cups broth (chicken or vegetable)

6 TBSP. fresh basil (or 2 tsp. dried)

1/2 cup fresh parmesan

Salt and pepper to taste

Melt the butter over medium high heat. Add the orzo and saute for several minutes, until the orzo starts to become golden brown. Add the broth, cover and simmer for about 20 minutes, or until the orzo has absorbed the broth. Remove from heat, add the basil and parmesan, and season with salt and pepper to your liking. Add more parmesan if you want it to be really gooey and cheesy.

This orzo is SO good. It will serve 4 very healthy portions (although honey and I can eat one batch to ourselves – piggish, right?), but if you’re having company, make sure you double the recipe. Enjoy!


%d bloggers like this: