Fresh Bean Salsa

Fresh Bean Salsa | Once Upon a Recipe

High five friends, it’s Friday!

I say it every week, but I’m so glad that the weekend is here. I have fun plans with friends, a birthday party for my little bro (who’s not so little anymore, btw), and sleeping in on the agenda. There is nothing I love more than not having to wake up to the sound of an alarm. I will also endeavour to keep up with my 2014 goal of reading one book per month. I realize that reading a dozen books in a one year period doesn’t seem like much, but I’m going for achievable here. I’ve read a few great posts on book recommendations, which have directed me to some great reads (if you’re also looking for inspiration, try here, here, and the comments section of this post).

Fresh Bean Salsa | Once Upon a Recipe

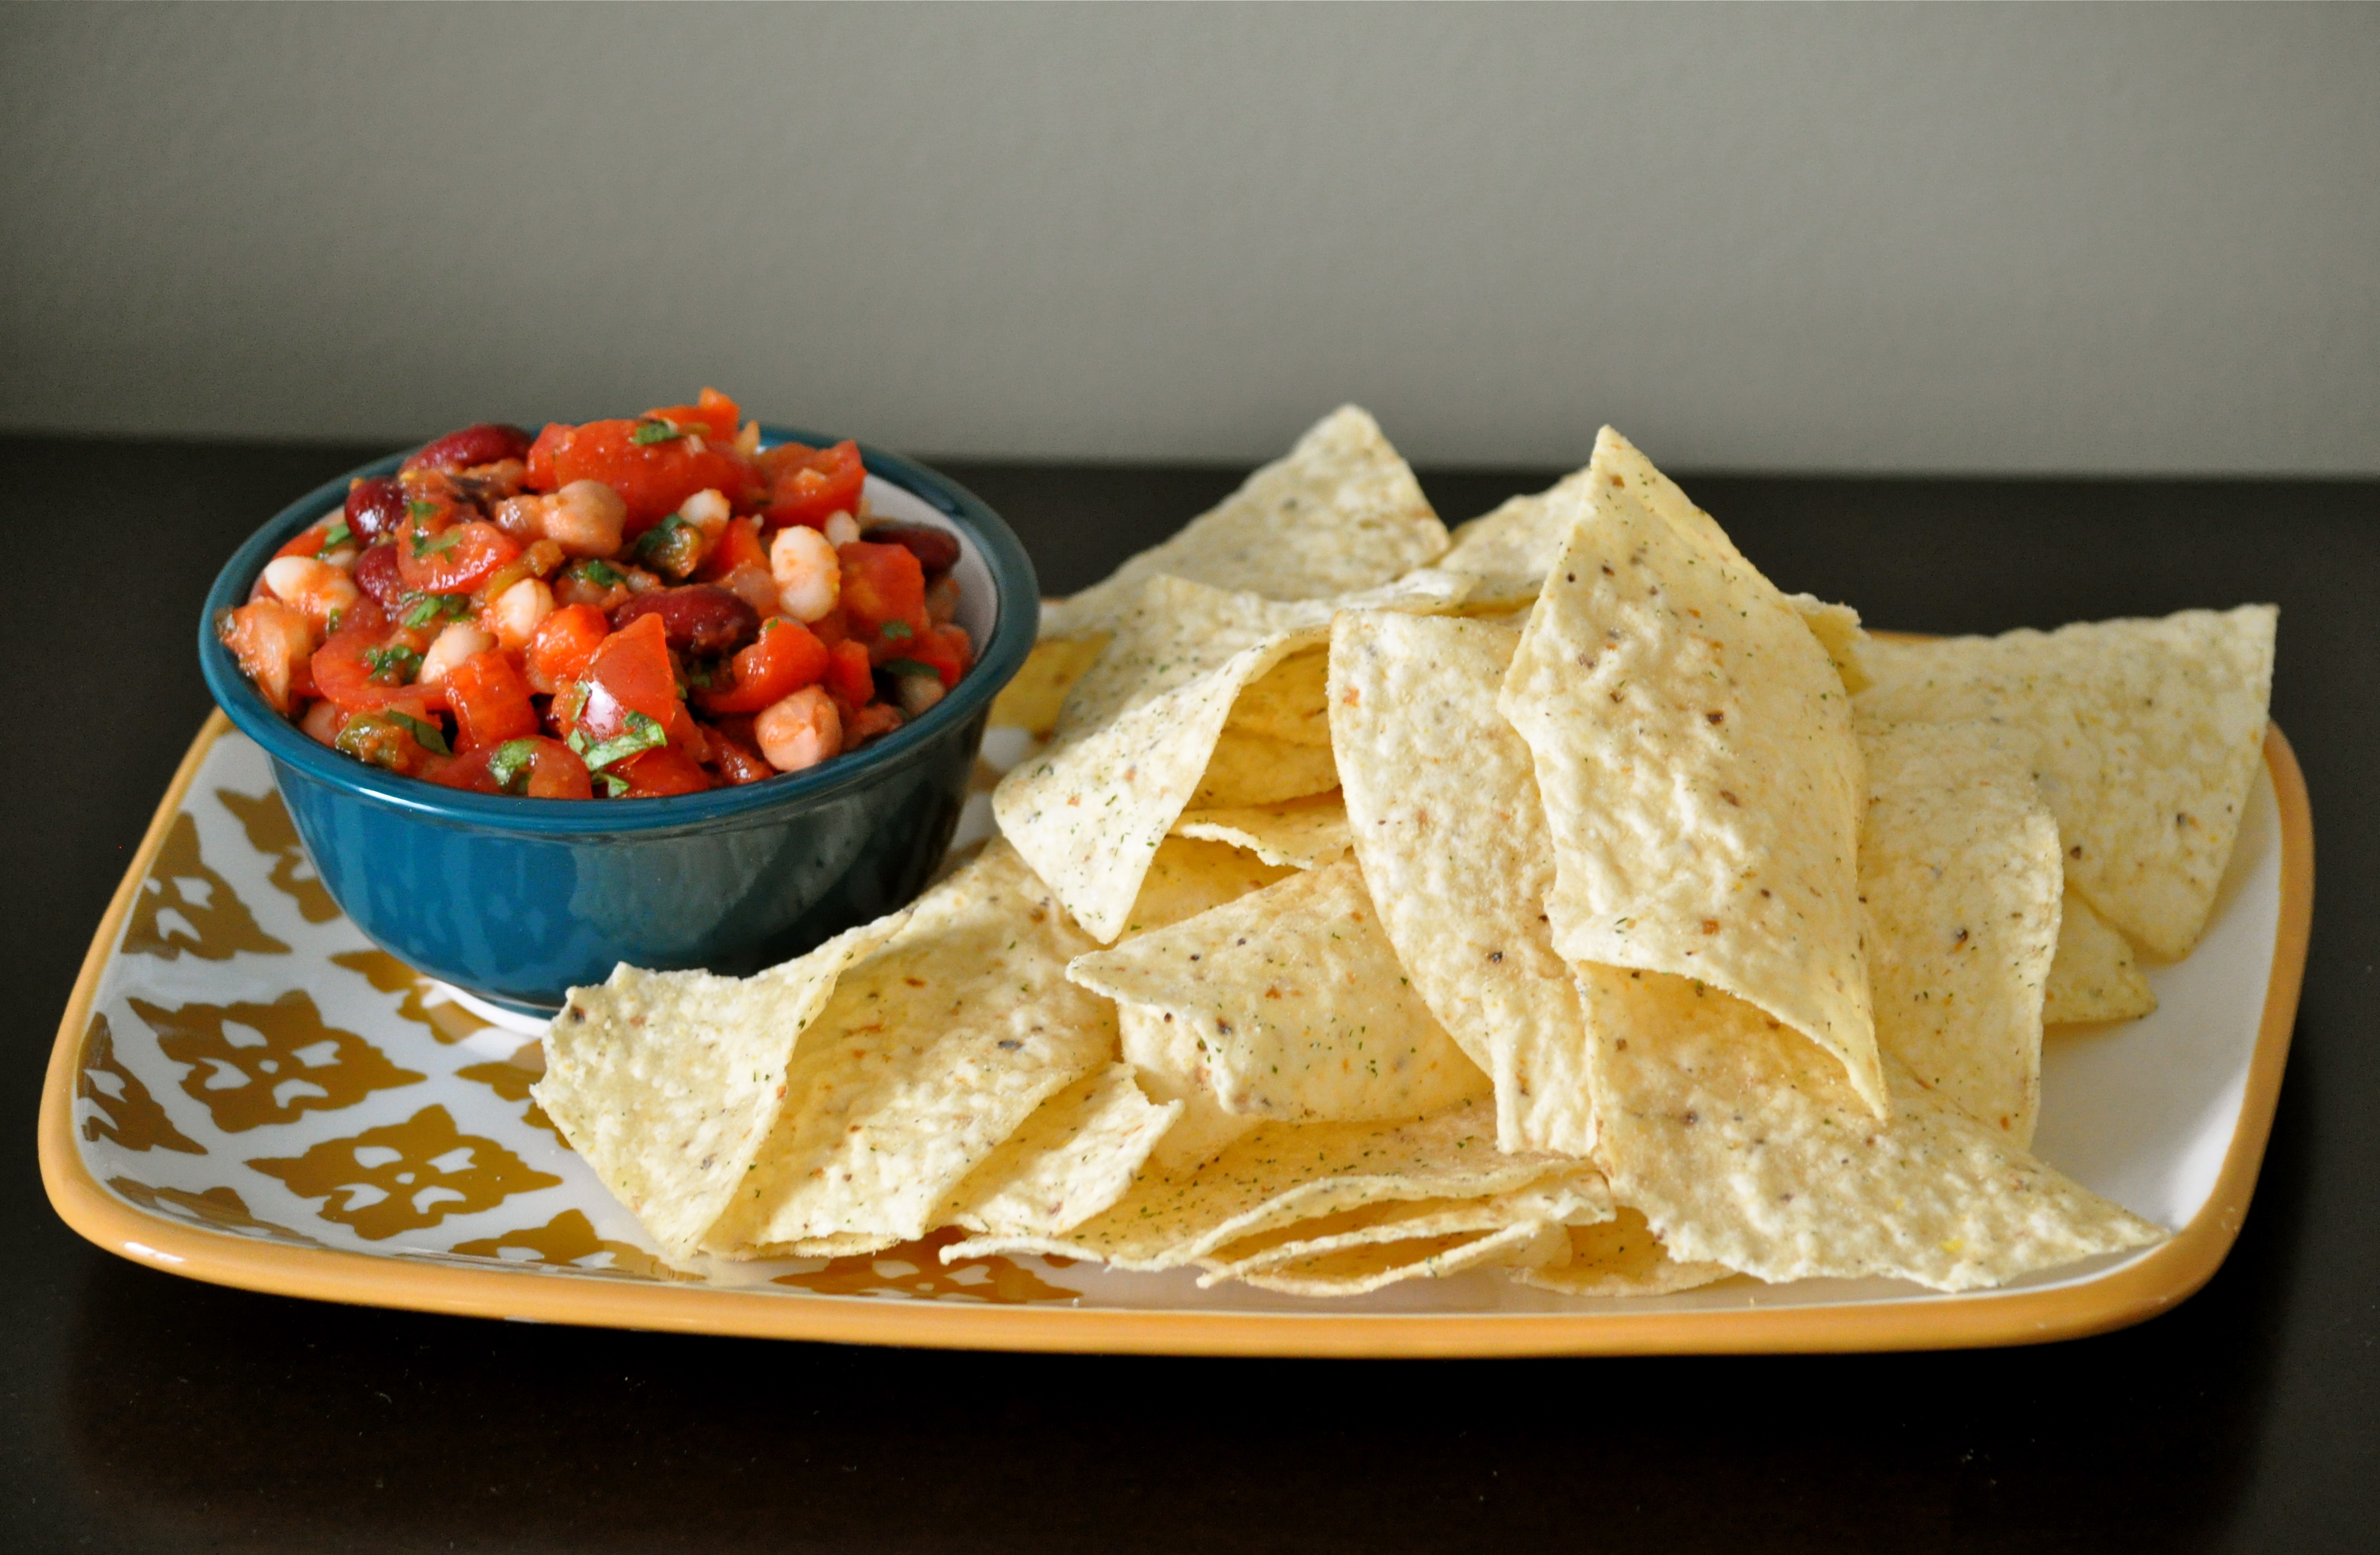
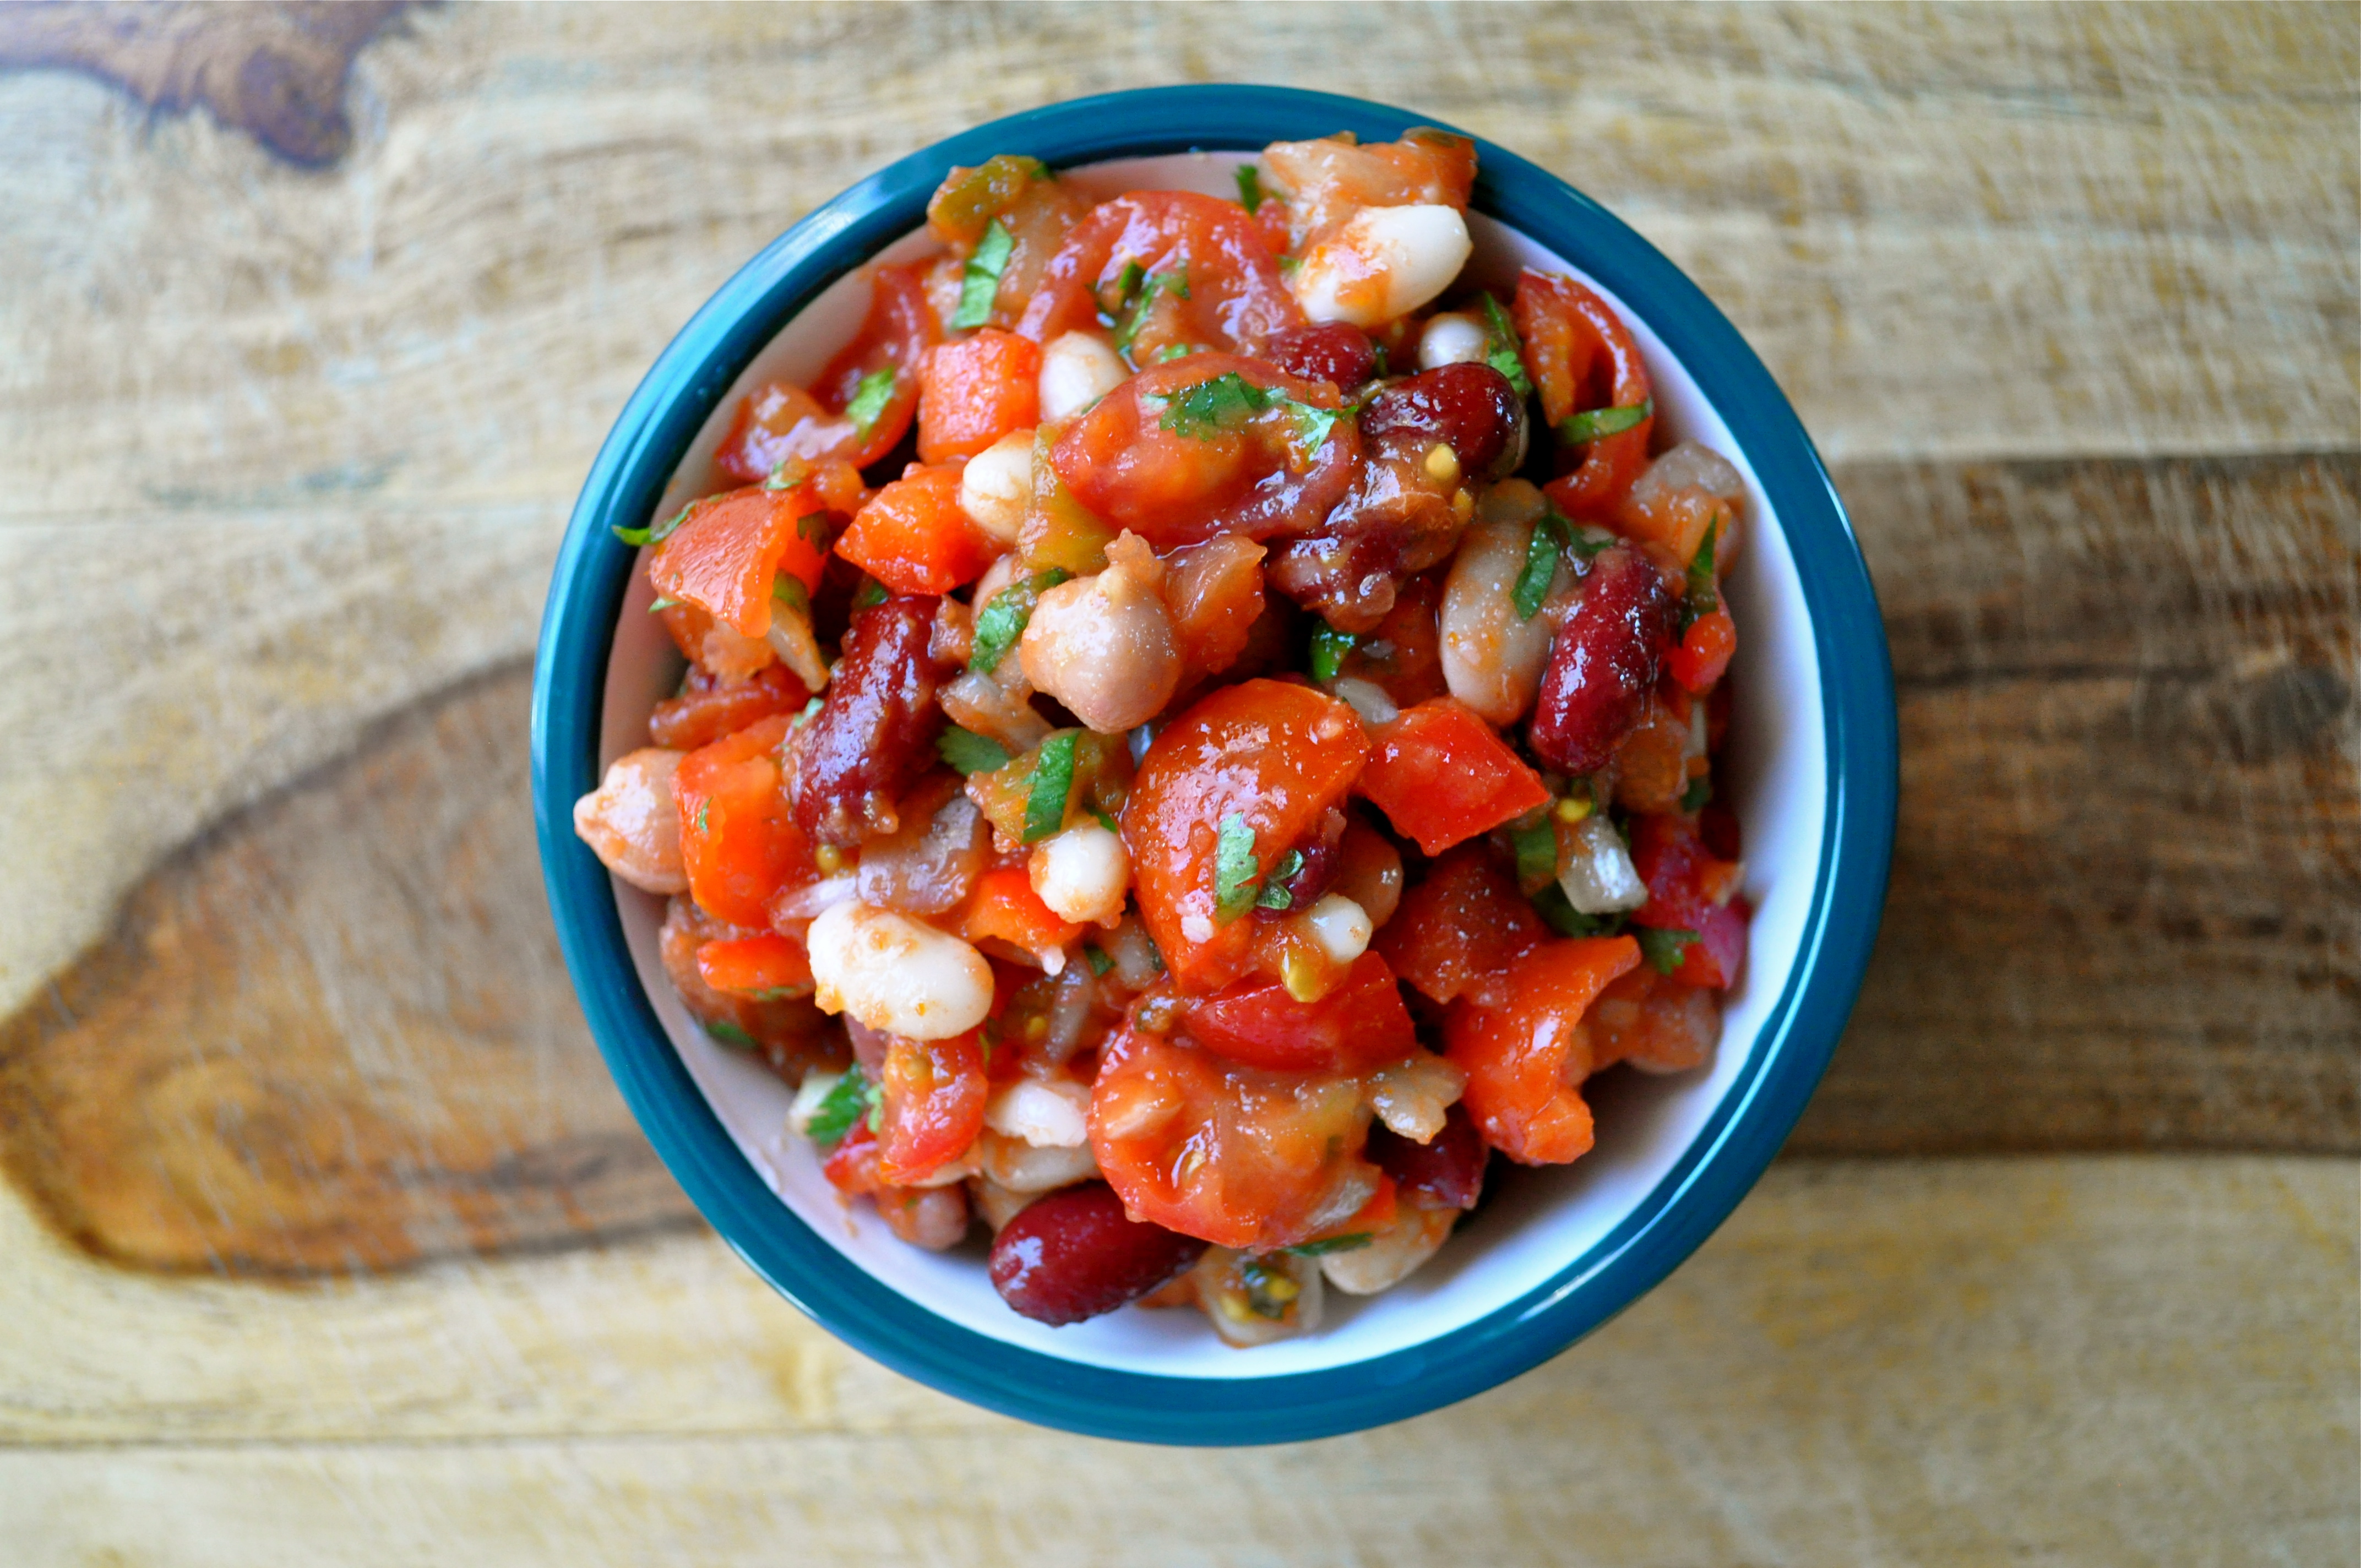
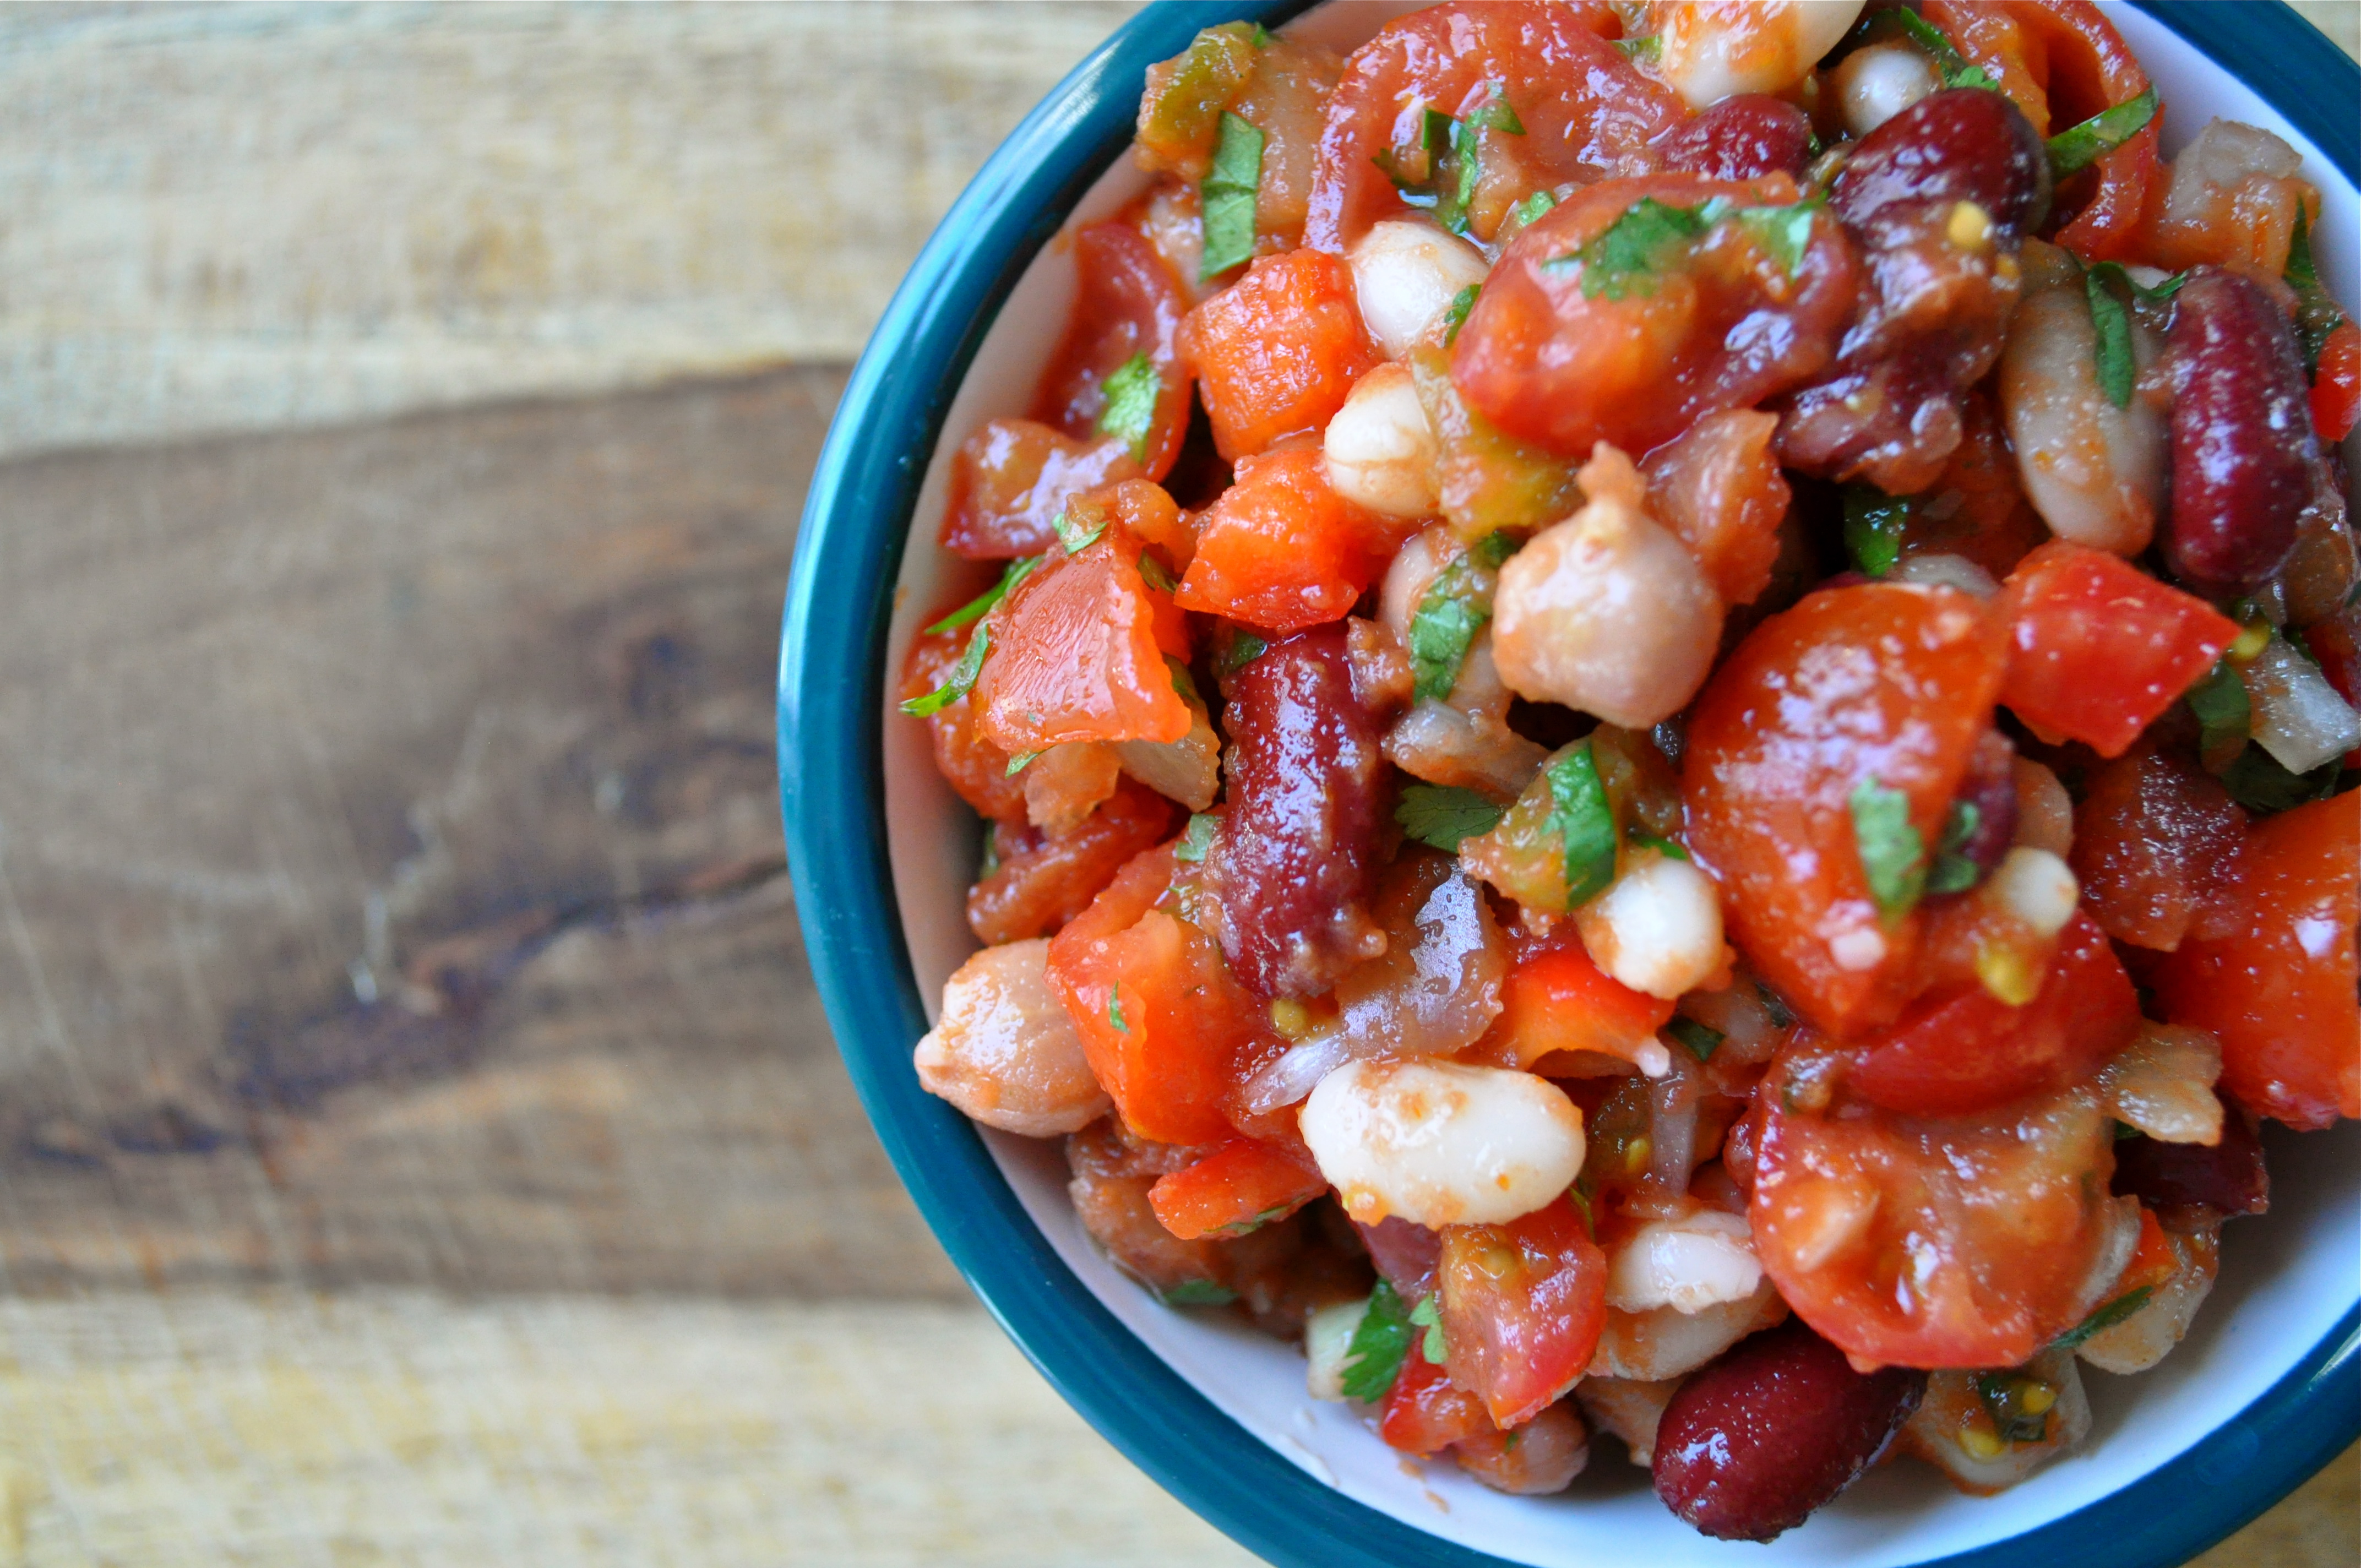
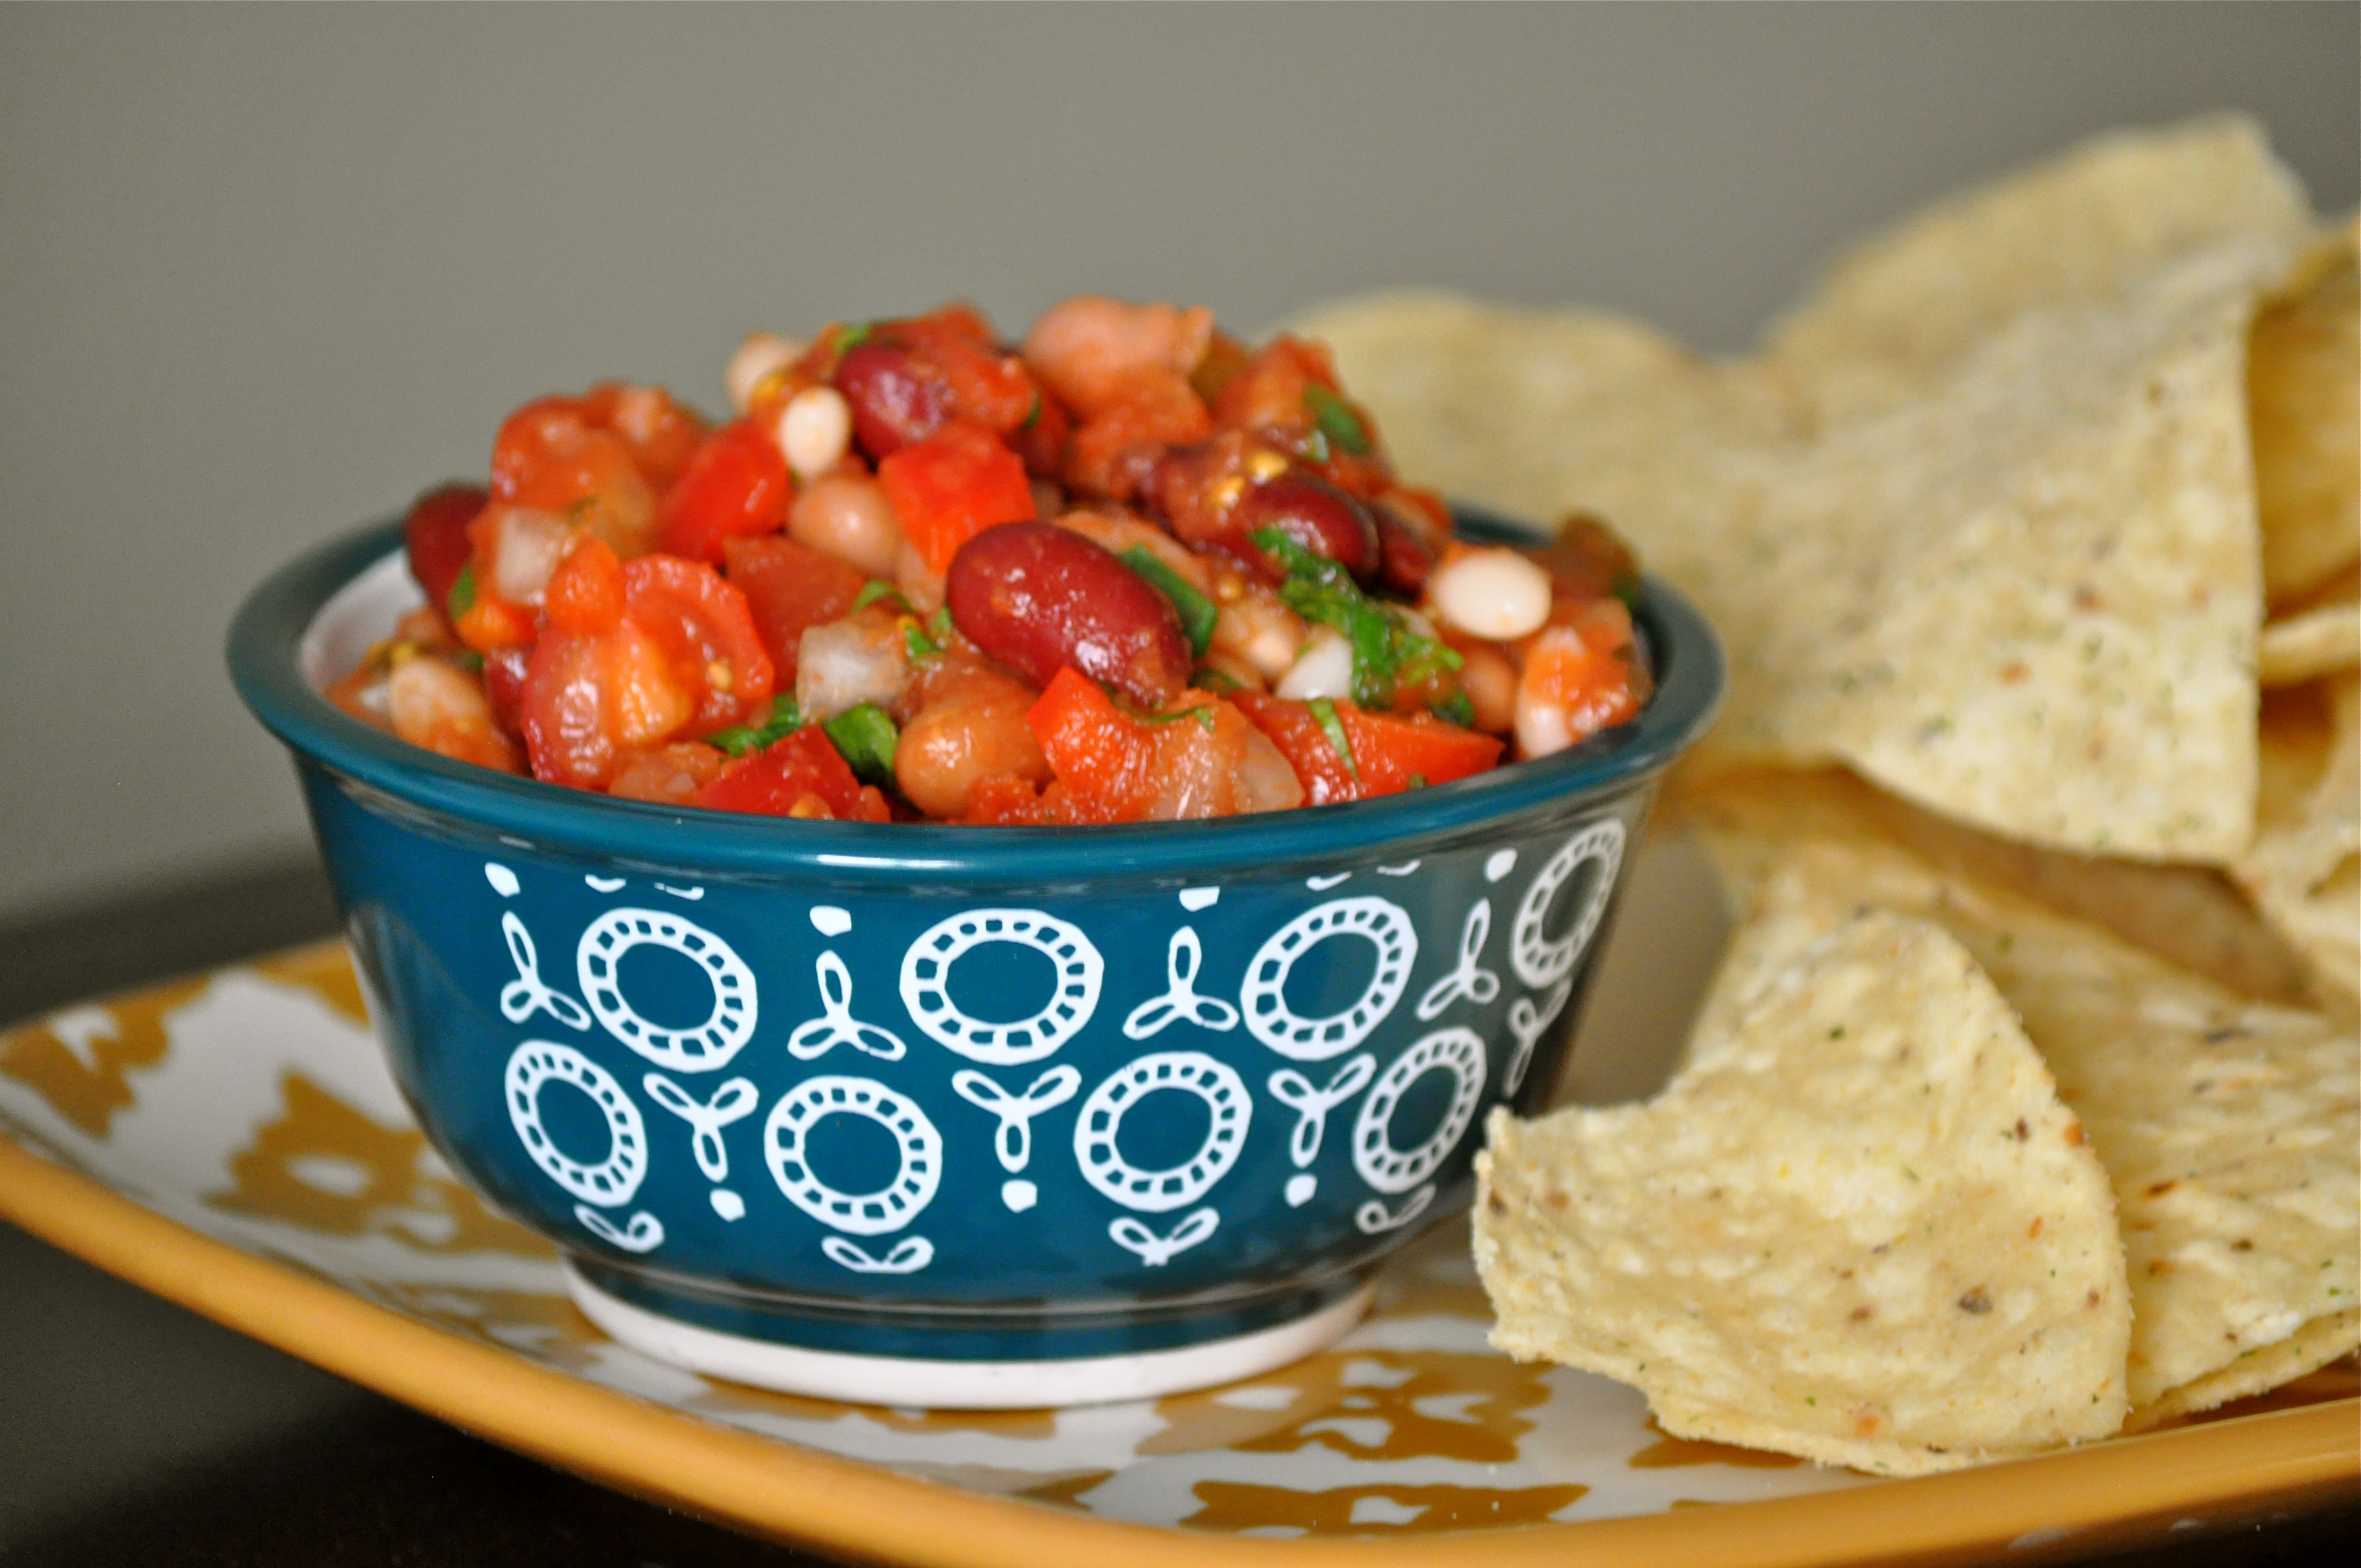
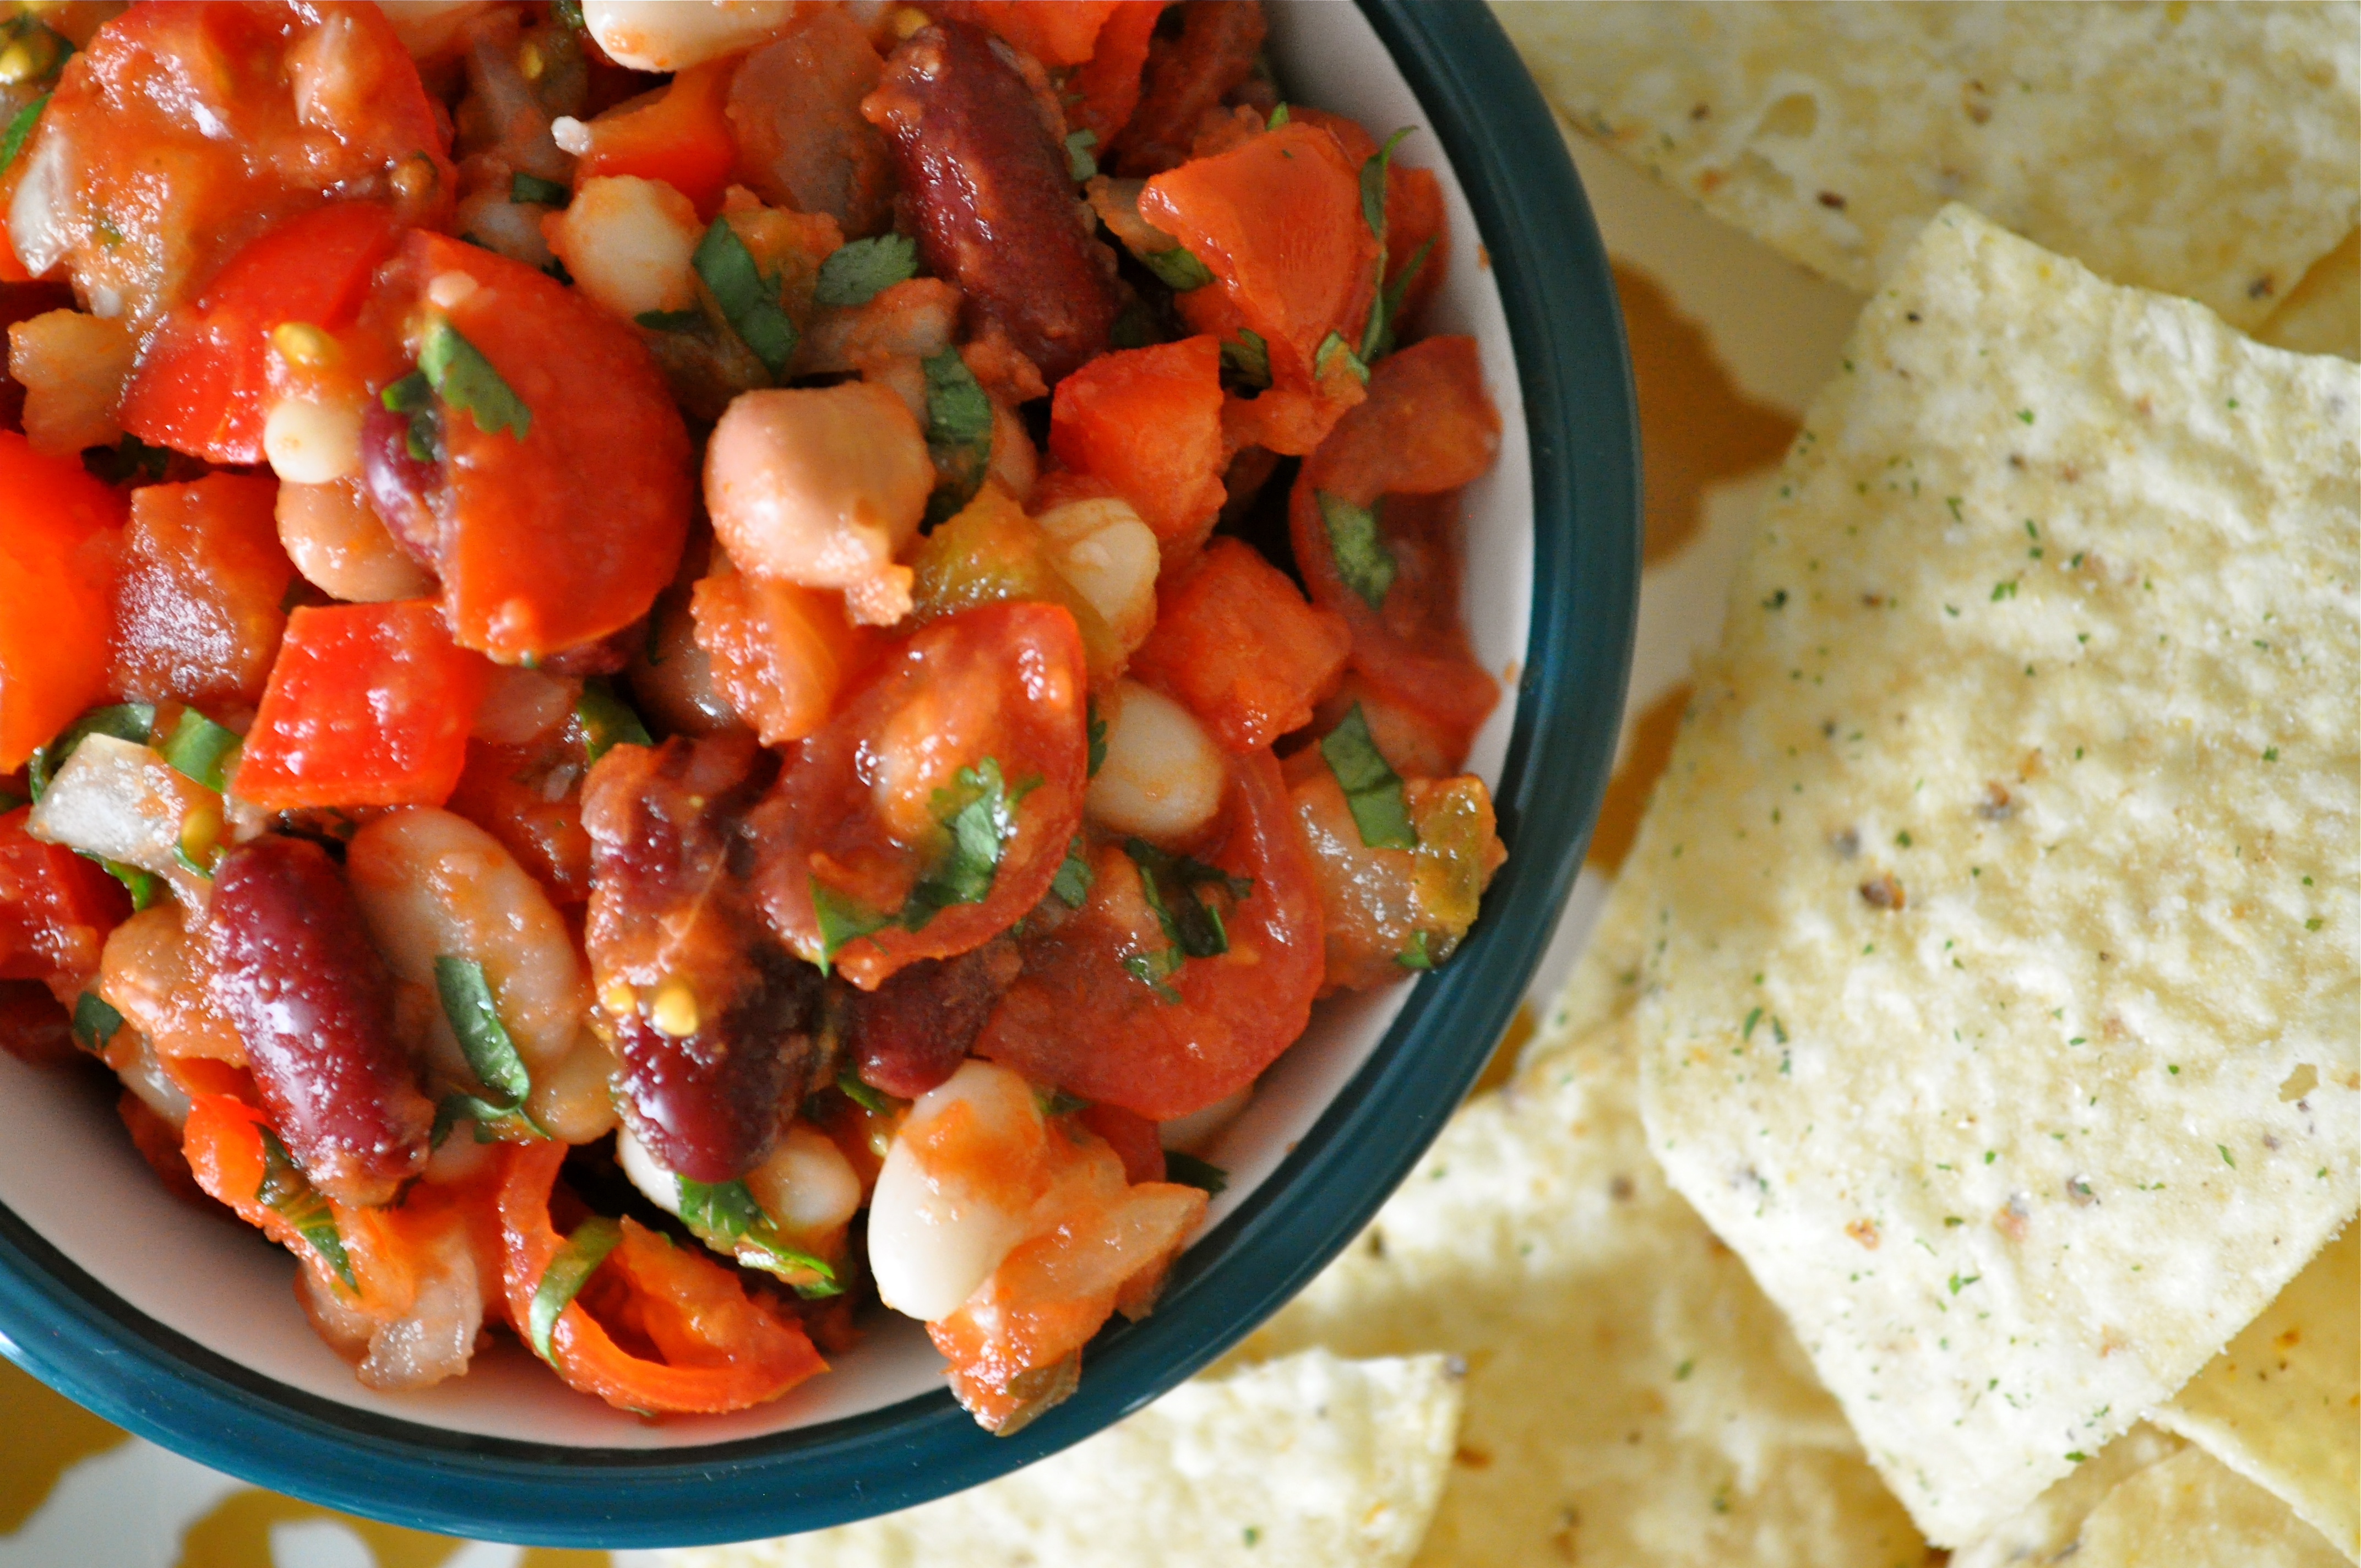
Annnnnyways, today I bring you a very humble bean salsa recipe. My friend, Jill started bringing this salsa to get togethers a while back. It always got rave reviews, so I asked for the recipe. Then I started taking it places and it got more rave reviews. It’s super simple, yet extremely flavorful and healthy. All it takes is a little chopping, a little mixing, and a little time for the flavors to mingle together, and you’ve got yourself a great snack, appetizer, or even side dish. My favorite way to enjoy this salsa is with Hint of Lime tortilla chips (either Tostitos or Old Dutch), but I bet it would taste great on nachos (add after baking the nachos so the chips don’t get mushy) or alongside your favorite Mexican dish. I’ve even thrown leftovers on top of a salad. Use your imagination folks!

Fresh Bean Salsa | Once Upon a Recipe

Fresh Bean Salsa | Once Upon a Recipe

Fresh Bean Salsa

This bean salsa tastes best if you give it a chance to chill out in the fridge for at least a couple of hours. It will keep well in an airtight container in the fridge for up to three days. You can use the salsa of your choice. 

2-19 ounce cans of mixed beans, drained and rinsed

1 red pepper, chopped

1 small onion, chopped

1 large tomato, chopped

1 cup prepared salsa of your choice

Salt and pepper, to taste

Fresh cilantro, chopped

Chop. Mix. Allow to sit in the fridge for a couple of hours (or overnight, if possible). Enjoy with tortilla chips!

Fresh Bean Salsa | Once Upon a Recipe

Have the most marvelous weekend!

Coconut Chana Saag (Vegan, GF)

Coconut Chana Saag | Once Upon a Recipe

Hello friends!

How is 2014 treating you so far? Made any resolutions yet? Come up with any goals for the new year? Or maybe you’re easing into January by slowly decreasing your chocolate/cookie/wine intake in preparation for new healthy habits.

Coconut Chana Saag | Once Upon a Recipe

Personally, I’m easing into 2014 gently. There are still cookies and salted caramel bark in my freezer that need to be eaten, yo! And champagne in my fridge that needs drankin’. However, despite the way I present myself and my eating habits on this blog (cookies and cakes and sweet things galore), I actually eat fairly healthy on the regular.

One of my goals for 2014 is to give you, my dear readers, a more accurate representation of the way I typically eat. Generally speaking, I try to focus on the 80/20 rule – 80 percent of the time I try to eat healthy and wholesome – veggies, fruits, lean proteins, and whole grains, and 20 percent of the time I allow myself to indulge. Some days, the scale tips more in favor of indulging, and other days, it tips more in favor of eating healthy. It’s all about balance, friends.

Coconut Chana Saag | Once Upon a Recipe

Coconut Chana Saag | Once Upon a Recipe    Coconut Chana Saag | Once Upon a Recipe

This recipe for Coconut Chana Saag is wonderfully reflective of the way I tent to eat. Simple ingredients, easy preparation, and lots of flavor. I was gifted a new cookbook for Christmas – Isa Does it by Isa Chandra Moskowitz. Isa Does It is full of easy and delicious vegan recipes, and I have already bookmarked about 20 recipes to try. If any of them are half as delicious as this Coconut Chana Saag, I have a very tasty 2014 ahead. And so do you!

Coconut Chana Saag | Once Upon a Recipe

Coconut Chana Saag (slightly adapted from Isa Does It by Isa Chandra Moskowitz)

This Coconut Chana Saag comes together quickly and easily. I served it over brown basmati rice, but you could also use quinoa, jasmine rice, or your favorite grain. Store leftovers in a sealed container and refrigerate, then enjoy throughout the week! Serves 6.

2 TBSP. coconut oil

1 medium onion, diced

4 cloves garlic, minced

A knob of fresh ginger, minced (about 2 TBSP.)

2 TBSP. curry powder (I used Moghul curry powder)

1 tsp. salt

Freshly ground pepper, to taste

1/2 tsp. crushed fennel seeds

1/4 tsp. garam masala

1/2 tsp. ground cumin

A pinch of cayenne pepper

1 24-ounce can whole tomatoes

2 15-ounce cans of chickpeas, drained and rinsed

8 ounces of baby kale

1 14-ounce can of lite coconut milk

1/4 cup fresh cilantro, chopped (plus more for serving)

Juice of 1 lime

Cooked brown basmati rice (for serving)

Heat the coconut oil in a large pot over medium-high heat. Add the onion and saute for about 7 minutes, until lightly browned. Add the garlic and ginger, and saute until fragrant (about 30 seconds). Add the curry powder, salt, pepper, fennel seeds, garam masala, cumin, and cayenne and mix well. Allow the spices to roast for about a minute.

Add the tomato juice from the can, and scrape the bottom of the pan to deglaze. Add the tomatoes from the can, squishing them with your fingers or mashing with a wooden spoon. Add the chickpeas and mix well. Cover the pot and increase the heat to medium-high. Let simmer for about 10 minutes, stirring occasionally. Add the kale and stir until wilted, and then simmer for about 5 minutes more.

Add the coconut milk, cilantro, and lime juice and heat through. Taste for seasoning. Allow to sit for 10-20 minutes (if possible), so that the flavors can mingle. It tastes even better the next day. Serve over brown basmati rice and add more fresh cilantro, if desired.

Have a great week! 🙂

Starting Fresh | My Favorite Green Juice

My Favorite Green Juice | Once Upon a Recipe

Happy New Year, friends! I hope you had a wonderful Christmas filled with good food and good people. I’ll also high-five you if you had one too many cocktails last night while ringing in the new year.

As per ushe, the new year brings new goals and new resolutions. Without fail, I make a resolution to take better care of myself/eat healthier/exercise more/yada yada yada every. single. year. And this year is no different!

I’ve been juicing semi-regularly since the Summer, when I bought my juicer. But my goal for January is to make fresh juice more of a regular habit. I have tried a few different green juice recipes, but this one is my current favorite/go-to juice.

My Favorite Green Juice | Once Upon a Recipe

Look at all of that good stuff up there! The spinach gives you a dose of greens, the apples lend a little sweetness, and the lemon and ginger give it a little punch. If you’re new to green juice, this is a great recipe to start with since it’s not overpowering in the green department. You can also sub in different fruits and veggies, depending on what you have on hand. For example, kale makes a great substitute for the spinach, and pears are a great replacement for the apples.

My Favorite Green Juice | Once Upon a Recipe   My Favorite Green Juice | Once Upon a Recipe

A glass of this green juice will most definitely start your day (and year) off on the right foot. Let’s all jump into health this year. Green juice balances out wine, chocolate, and cookies, which basically means you can consume more of all of the above. Winning!

My Favorite Green Juice

This recipe will make about 30 ounces of juice, depending on your juicer. Perfect to enjoy a glass the day that you make it, and sip on the second glass the next day. Sharing is also an option. Serves 2. 

2 big handfuls of baby spinach

1 large cucumber

2 stalks of celery

2 Granny Smith apples

Half a lemon, peel removed

A chunk of ginger

Be sure to wash all of the fruit and vegetables well and cut into pieces that will fit into your juicer. Get your juice on! Enjoy immediately over ice. Store any remaining juice in an airtight container in the fridge. Consume within 24 hours.

My Favorite Green Juice | Once Upon a Recipe

Happy 2014 my dear readers! I hope this next year is filled with much love, adventure, health, and happiness for all of you. Cheers! xo

One Last Taste of Summer | Beet Lemonade

Beet Lemonade | Once Upon a Recipe

Hi friends! As I mentioned, I bought a juicer! Finally. After months of humming and hawing, and lots of helpful advice from friends and fellow bloggers, I bit the bullet and went for it. And I’m in love.

For reals. I can’t get enough juice! I have to admit, I was a bit worried at first. For one thing, up until this month, there wasn’t a single fresh juice bar around these parts. So going out and buying a fresh kale, cucumber, and apple juice to test the waters was not an option. However, I was looking for a way to get more fruits, and more specifically, vegetables into my diet. And crap! You can squeeze a lot of vegetables into a glass of juice!

Beet Lemonade | Once Upon a Recipe

After much deliberation, I bought this juicer from Amazon. It fit my budget and had good reviews. I’ve been very happy with it so far. Definitely a great juicer to start with. Green juices are my favorite – it’s amazing how much an apple can sweeten things up! Plus, when something is this green, I feel like I’m healthier just looking at it!

Beet Lemonade | Once Upon a Recipe

With Fall knockin’ at the door (Hip hip hooray! Boots! Scarves! Sweaters! Pumpkin everything!), I am trying to find ways to enjoy these last days of Summer. It’s been gorgeous here with hot temperatures that practically demand a refreshing beverage. I would drink beer all the live-a-long day, but unfortunately…well, you know. The solution? A healthy cocktail with fresh juice. Yep, I’m totally putting beets in your lemonade. Let’s do it!

Beet Lemonade | Once Upon a Recipe   Beet Lemonade | Once Upon a Recipe

Lemon juice gets a little sweetness kick from beet juice and honey syrup, and gin brings some fun to the party. Gin kinda has a reputation for that, doesn’t it? This lil’ cocktail is pretty tasty, folks. So why not juice up a little health, add a shot of booze, and call it even? Now that’s some Summer winning!

Beet Lemonade | Once Upon a Recipe

Beet Lemonade

This drink was inspired by an article I read in a local food magazine. The original recipe used a roasted beet puree in place of the fresh beet juice. If you’d like to make beet lemonade to serve a crowd, simply multiply the amounts listed below by the number of people you wish to serve and add to a pitcher of ice.

2 ounces fresh beet juice

2 ounces fresh lemon juice

1 ounce honey syrup*

2 ounces gin

Sparkling water (optional)

*To make the honey syrup, combine equal parts honey and boiling water, and allow to cool. (For example: for one ounce, combine 1 TBSP. honey and 1 TBSP. boiling water). Combine the remaining ingredients and pour over ice. Feel free to add more honey syrup if the lemonade is too tart for your liking. As the end result is rather…beety – adding sparkling water will cut the intensity a bit, if needed. Enjoy!

Beet Lemonade | Once Upon a Recipe

How are you spending the last days of Summer?

The Deadly Sins of Grocery Shopping | Warm Goat Cheese Salad with Sweet Onion Vinaigrette

Can I tell you something that I’m really bad at? And by bad I mean that I don’t do it “right”.

Grocery shopping.

It seems a bit ironic, considering how much time I spend in the kitchen. One would think I would be very organized. But the truth is, I fly by the seat of my pants when it comes to grocery shopping.

In fact, I tend to frequently commit several of the “deadly sins” of grocery shopping. [Dun dun duuunnn!] There, I said it. My name is Amanda and I stink at grocery shopping.

Now, don’t get me wrong. The good intentions are there. I start with a list, the first rule of smart grocery shopping. Nevermind the fact that I am usually scrawling my list down on a scrap of paper at my desk at work before leaving for the day. With little memory of what might already be lurking within my fridge and cupboards. “I think there’s sour cream somewhere in there…oh, whatever, I’ll grab some just in case.” (Which ultimately leads to the discovery of three containers of moldy sour cream taking up precious real estate in my fridge a month later). And nevermind that fact that I rarely have an actual meal plan at this point, other than the meal ideas floating around in my head. But I have a list.

Unfortunately, it all goes a bit downhill from there. First of all, I rarely go grocery shopping when I’m not hungry. In fact, I’m typically starving as I stalk the aisles for satisfying solutions. (This mad hunger typically results in me tearing open a box of cereal in the car and shoving handfuls of it in my mouth as I make the 5-minute drive home). But hungry grocery shopping can be so fun! The sense of adventure! The magnified desire to try totally unnecessary, typically expensive new things!

Secondly, coupons? What now? I know that I could supposedly cut my grocery bill in half by poring over the flyers that show up on my doorstep each week. But honestly, I don’t have the patience for it. Those flyers go straight from my mailbox into the recycle bin. I show them no mercy.

Thirdly, I spend way too much time in there. I saunter through the aisles, checking things out, and give myself way too much time to find completely unnecessary things. Completely. Unnecessary. Me and impulse buys are likethis. Which leads me to commit yet another sin: not sticking to my list.

Did I mention that sometimes I look up recipes while I’m strolling the aisles? Damn you iPhone, why do you make it so easy?!

Clearly, I’m far from perfect. But I totally pulled my act together last week when I came across this salad recipe in a cookbook lent to me by a coworker called Whitewater Cooks at Home. I am a big lover of goat cheese, so the thought of creamy goat cheese coated in bread crumbs and then fried until golden brown caught my attention, and everything else was just gravy. So I made myself a list, I went to the grocery store, and I came out only with what I needed. Success!

And then I went home and I made this salad. I ate nearly the entire thing because while I had planned well for the salad, I had not made any plans for what would accompany it. Small steps, right? Dinner was followed by watching Harry Potter and eating these cookies. Does that sound like a perfect evening or what?

Warm Goat Cheese Salad with Sweet Onion Vinaigrette (adapted from Whitewater Cooks at Home)

This salad does not have quite enough heft to be eaten as a meal, but makes for a wonderful side dish or starter salad. Or feel free to give it some oomph by adding a grilled chicken breast or another form of protein. 

For the salad:

8 cups of mixed greens

2/3 cup Panko breadcrumbs

1 1/2 tsp. dried basil

1/2 tsp. salt

1/2 tsp. freshly cracked black pepper

1 egg mixed with 1 TBSP. water

6 oz. soft goat cheese

1/2 cup dried cherries

1/4 cup pinenuts, toasted

For the dressing: 

2 TBSP. olive oil

1/2 cup sweet white onion, diced finely

1/4 cup white wine vinegar

2 TBSP. maple syrup

1/3 cup olive oil

Salt and pepper, to taste

1/4 cup vegetable oil, for frying

Mix together the breadcrumbs, dried basil, salt, and pepper in a small bowl. Put the egg mixture into another small bowl. Roll the goat cheese into small balls (about 1 TBSP. each), for a total of 12 balls of cheese. Dip the cheese balls into the egg mixture, then into the breadcrumb mixture, pressing the breadcrumbs into the cheese to coat it. Cover and refrigerate for at least one hour (longer if possible).

Prepare the dressing by heating the 2 TBSP. of olive oil and sautéing the onion until softened and golden brown. Add in the white wine vinegar and maple syrup and reduce for a couple of minutes. Remove from the heat and whisk in the 1/3 cup olive oil. Season to taste with salt and pepper. Set aside.

Heat the vegetable oil in a frying pan over medium-high heat. It’s important to get the oil hot here, so that you can quickly brown each cheese ball on all sides without melting the cheese! Go for it – you can do it! When done frying, place the balls on a plate lined with a paper towel while you assemble the rest of the salad.

To assemble the salad, toss the greens with the dressing (you may not need all of the dressing) and divide the greens between 4 plates. Place 3 balls of cheese on each plate and sprinkle with the dried cherries and pine nuts. Serve immediately.

PS. It is totally important to eat salads the week before you run a half marathon. At least, I’m pretty sure it is. I’m off to the mountains on Saturday to run mine (eek!) so I’ll let you know the final verdict next week! xoxo

PPS. Are you a “good” grocery shopper? Tell me your secrets!

Some Things and a Pizza (Zucchini, Tomato, Feta, and Balsamic)


Well hello there strangers. Long time no see. Don’t worry, I’m not blaming you. I take full responsibility for our lack of chatting lately, and the lack of sharing going on around here. You see, I’ve been on holidays for the last week and a half. I wish I could say that I’ve been on a beach or lounging lakeside somewhere far away from here, sipping on cocktails and exerting myself as little as possible. But no, this summer I’m having a little staycation right within my humble abode. As lovely as vacations are, staycations can be rather delightful as well. Staycations allow a person to forego the stress of packing, gratuitous spending, long days of traveling, and instead allow one to do things that need doing around the house (ie. tackling that dang room, which for the record, I still haven’t tackled), relax less than should be necessary while on holidays, and be productive with important projects, such as one’s food blog. While I am definitely succeeding with the first two things, clearly I have missed the mark on that last one. #epicfail


Trust me, I had the best of intentions going into this staycation of mine. I had envisioned baking or cooking up something fabulous on a daily basis, sharing a recipe with you every other day, and basically overstaying my welcome on the interwebs over these couple of weeks. But the thing about staycations is, they allow you to really live, and put responsibility aside when other things come up – things like invitations for patio drinks at 2pm/4pm/8pm on a beautiful summer day, a sporadic trip to the park to sit and read a good book, sleeping in way later than necessary, random backyard/living room yoga, or quick little road trips to visit friends that you just don’t see often enough. My mantra for my holidays? You only live once. YOLO! And sometimes, when you’re in the thick of YOLO’ing, blogging takes a back seat for a short while. PS. If you require further deets about YOLO’ing, Joy and Tracy got ya covered.


However, I did manage to whip up this simple and delicious summer pizza, and after taking the first bite, I snapped a couple of photos so that I could share it with you. But first, a couple of things…

First of all, I joined Pinterest. Finally! I realize I’m a bit behind the eight ball on this one, but better late than never. Too be honest, I was a little stumped by Pinterest when I first checked it out a few months ago (pins? boards? say what?), but a friend gave me a quick tutorial last week (thanks J!) and I am officially obsessed. OBSESSED. If you wish to follow me, you can search for me under onceuponarecipe.

Secondly, I caved on another social media front and now Once Upon a Recipe has a Facebook page! Check it out here.


And now, onto the good stuff, a fabulous pizza that I created last week. What started out as a venture to use up some of the market produce that was on its last legs in my fridge ended with one of the most delicious pizzas I’ve created in a long time. I don’t really want to call it a recipe, but here are some guidelines for you.

Zucchini, Tomato, and Feta Pizza with Balsamic Reduction

Start off with a pizza dough of your choice. I used some fresh dough from my local Italian market, but if you want to make your own, go for it! I have a great recipe for whole wheat pizza dough that you can find here.

Preheat your oven to 425°F. Spray a large baking sheet with non-stick spray and sprinkle lightly with cornmeal. The cornmeal will help create a nice crispy crust! Stretch out your dough to the desired thickness (I made mine quite thin), and brush with olive oil. Cover with thinly sliced veggies of your choice – I used zucchini and grape tomatoes, as well as thinly sliced fresh mozzarella. Sprinkle with crumbled feta cheese, and season with good sea salt (I used fleur de sel) and freshly ground black pepper. Bake for 16-20 minutes, or until the crust is golden brown and the cheese is bubbly.

You can eat this pizza as is, and it will be delicious. But if you want to take it over the top, make a quick balsamic reduction (pour 1/4 cup of balsamic vinegar into a small saucepan and allow to reduce to about half over medium heat), and drizzle it over the hot pizza. OMG. YOLO, indeed.


More recipes coming up soon friends, pinky swear! xoxo

All Choked Up | Grilled Artichokes with Lemon Garlic Aioli


Friends, can you believe that August is nearly half over? That these glorious, hot, sunshine and thunderstorm-filled days are whipping by us at break neck speed? And before we know it, we will be trudging through another long, cold, snowy winter? *sigh* My apologies for the pessimistic ‘tude that I’m rocking right now. Summer just ain’t long enough!


However, I do have some advice for making the best of the rest of these summer days. Ready?

1.Get outside. Spend as much time out there as you can! Eat outside, drink outside, be active outside (emphasis on eat and drink). Have a bonfire, roast marshmallows, and devour s’mores. Sit outside and read a book. Get out there and soak up summer!

2.Make these. Don’t ask questions, just do it. Preferably in combination with #1.


3.Go to the farmers’ market. Summer farmers’ markets are fabulous. Fresh produce in its prime. Delicious local goods. Supporting your community. All the things!

4.Eat more ice cream. This should not require an argument, but if you have your doubts, Em has you covered. And if you require any inspiration, look no further.


5.Sleep in. It is summer, after all. And while we might not be 16 anymore, with the glory of summer holidays to waste away by sleeping until 1pm, try to sneak in an extra hour or two of slumber and savor a lazy weekend morning. Preferably followed by pancakes and hot coffee.

6.Get away. Even if you can’t swing an exotic summer holiday, get out of town for a weekend. Enjoy a change of scenery! Go to the beach, the mountains, go camping. Just get out. Your mind will thank you.

7.Grill up some artichokes and then dip them in lemon garlic aioli and stuff them into your face. Seriously.

Artichokes are delicious (and beautiful!) things. I had never bought or eaten a whole artichoke prior to trying this recipe. Canned artichokes often find their way into my grocery basket for use in a spinach and artichoke dip or onto homemade pizza. But there’s more to artichokes than their lovely little hearts! They’ve got cute little leaves that you can dip into a tasty aioli and then pull the flesh from with your teeth. With simple flavors like lemon and garlic, and the wonderful char created by a hot grill, these are a great appetizer or side to any summer meal. Get grillin’ friends, and enjoy summer!


Grilled Artichokes with Lemon Garlic Aioli (barely adapted from Food For My Family)

For the artichokes:
3 whole artichokes
2 lemons
1/4 cup extra virgin olive oil
3 cloves garlic
1/2 teaspoon sea salt
Freshly ground black pepper

Fill a large bowl with water, and add the juice from one lemon, saving the rind. Cut the artichokes in half and immediately submerge in the water (to prevent browning). Bring a (very) large pot of water to a boil and add in the squeezed lemon rind. Transfer the artichokes to the boiling water. Boil for 20 minutes, stirring occasionally.

Fire up the grill. In a large bowl, add the juice from the other lemon, olive oil, garlic, salt and pepper. When the artichokes are done boiling, drain them on a paper towel and then toss them around in the bowl to coat them.

With the grill on medium heat, add the artichokes to the grill. Brush the artichokes with the remaining oil mixture in the bowl. Turn every five minutes until artichokes start to char (mine took about 15 minutes). Remove from heat.

For the lemon garlic aioli:
1/4 cup mayonnaise
2 cloves garlic, minced
Juice from 1/2 of a lemon
1 green onion, diced
1/2 teaspoon salt
Freshly ground black pepper

Mix together all ingredients in a small bowl. Refrigerate until ready to serve with the grilled artichokes.


Things might get messy. Have your napkins ready.

The photos in this post were taken with Instagram, an iPhone app. If you are an IG user and want to follow my daily foodie (etc.) life, you can find me at @onceuponarecipe.

What The What? | Lentil and Oat Cookies

What the what?!

There are moments in life that prompt this question. Consider it the G-rated cousin to the more popular phrase: “What the f&@#”?!

What the what?! popped into my head a several times over this past week. Let me explain.

1.On the weekend I was standing in line at the grocery store. Sundays afternoons are a busy time at the grocery store, and nearly every Sunday I ask myself why I choose to come at this time. The place is crowded, lines are long, and people are just…weird. More than normal. I was two people back in an obnoxiously long line at the check-out when I witnessed the guy who was about to pay for his groceries say to the cashier “Hold on, I just have to run to the bathroom.” Umm…what the what?! Dude, do you really think that this is the most opportune time to go and relieve yourself?! Apparently so. Three minutes later, he returned and paid for his groceries and left, whistling on his way out.

2.I share laundry facilities with the people that live in the basement suite below me. Sharing laundry facilities with strangers is not recommended. I’ve been trying to determine why these people are always using the washer and dryer (seriously, at least 6 out of 7 days per week). Either they’re hiding a family of 8 down there or they each own approximately one pair of socks and underwear, one shirt, and one pair of pants. Those are the only explanations I can think of for why 2 twenty-somethings would need to be doing laundry so often. As a result, I find myself doing laundry marathons on the rare occasions that I find the washer and dryer free. Good times. But not really.

3.Children are strange creatures. I took my little sister swimming recently to the local YMCA. I was floating on a floaty-raft-thing, minding my own business, when a wee little 7-ish year old boy backed into me (read: his fault). He turned around, scowled (viciously) at me, shook my floaty-raft-thing violently for about 5 seconds, then shoved it as hard as he could before turning around and carrying on. What the what?!

4.It is still snowing here. Apparently Mother Nature isn’t aware that it’s SUPPOSED TO BE SPRING TIME. Pay attention for crying out loud.

5.Yesterday, the girl next to me in my yoga class farted during Warrior 2. She acted like nothing happened. This has always puzzled me, because if I ever farted in yoga class I’d t0tally start laughing. Maybe even sum up the courage to say excuse me. I realize that it would be totally embarrassing, but just ignoring it when everyone knows exactly where that sound came from just seems worse. In fact, I almost started laughing. I’m incredibly mature.

6.I saw this recipe for lentil oat cookies a few weeks ago on the Food Network. And I thought “Lentils in cookies?! What the what?!” But let me tell you, it totally works. These taste like an oatmeal cookie with an extra oomph of health. Very hearty and satisfying. And a great way to use up leftover lentils!

Lentil and Oat Cookies (adapted from Bal Arneson, Spice Goddess)

1 cup butter, softened

1 cup brown sugar, packed

1 cup lentils, cooked and crushed with a fork

1 egg

1 tsp. vanilla

1 cup whole wheat flour

1 cup large flake oats

1 cup pumpkin seeds

1/2 cup slivered almonds

1/2 cup coconut

1/2 cup raisins

1/2 cup dark chocolate chips

Preheat the oven to 375°F. Prepare your cookie sheets by lining them with parchment paper, a Silpat, or spraying with non-stick spray.

In a large bowl, cream the lentils, butter, and brown sugar together and then add the egg and mix well. Add the flour, baking soda, and vanilla. Stir in the oats, almonds, pumpkin seeds, coconut, raisins, and chocolate chips and mix well. Feel free to choose mix-ins that suit your tastes (ie. different nuts, dried cranberries, etc.).

Drop cookies by the spoonful onto the prepared baking sheet and flatten. Bake the cookies for 13 to 15 minutes, or until lightly browned, and allow to cool on a baking rack. This recipe makes a large amount of cookies, but leftovers do freeze well!


Hope you’re having a great week friends!

Enough Said | Black Bean Chili and Cheddar Cornbread

There really is no explanation needed for the meal pictured above.

It’s Winter. It’s cold out, it gets dark much too early, and most often, leads to cravings for warm, hearty soups and stews. Now, I know that there are a kazillion chili recipes out there, and this might not look like anything special. But it was definitely the best pot of chili I’ve ever made, and so I thought I’d share what went into it. And the cornbread? Chili’s most reliable wingman.

About a year ago, I started adding cocoa into my chili after reading a recipe by Deb from Smitten Kitchen. It might sound strange at first, but the cocoa adds a beautiful richness to the chili. I haven’t made a batch without it since. Don’t be afraid – give it a shot! I promise the chili won’t taste like a chocolate bar. Even though that would be pretty awesome.

Can you believe that I used to hate cornbread?! I claimed that it was disgusting and dry…and then came to the realization that the last time I ate cornbread was at a rather questionable establishment, and that perhaps I should try making my own. Guided by reliable sources, such as Ree and Jenna, I realized that it ain’t so bad. In fact, it’s really good! Now me and cornbread are likethis. This particular cornbread recipe gets a little extra somethin’ from the addition of some sharp cheddar cheese. Served warm with butter and a drizzle of honey. Total magic. For realsies.

Friends, if you’re looking for a comforting meal this winter, give this dynamic duo a try. Maybe this weekend? I hear there’s a big football game on…or something like that…and chili is wicked sports party food! Alongside a pint (or four) of beer, you just can’t go wrong.

Black Bean Chili

2 TBSP. olive oil

1 onion, chopped

4 garlic cloves, crushed

1 medium zucchini, cut into small chunks

2 carrots, chopped small

1 cup mushrooms, sliced

4 TBSP. chili powder

2 TBSP. cumin

1 tsp. smoked paprika

2 TBSP. cocoa

Pinch of cayenne pepper (optional)

1 tsp. salt

Pepper to taste

1 large can diced tomatoes

2 cans black beans, drained and rinsed

1 can brown beans in tomato sauce

2 TBSP. tomato paste

In a large pot over medium-high heat, heat the olive oil and add the onions, cooking for a few minutes, until soft. Add in the garlic, zucchini, carrots, mushrooms and cook for a few minutes longer. Add in the spices, cooking for a minute more. Add the tomatoes, beans, and tomato paste and stir well to combine. Allow everything to simmer for at least 30 minutes (longer if possible), stirring occasionally. This is the perfect time to prepare the cornbread!

PS. I added the zucchini, carrots and mushrooms for extra bulk and nutrition, but feel free to substitute for whatever tickles your fancy.

Cheddar Cornbread  (adapted ever-so-slightly from Eat Live Run)

1 cup yellow cornmeal

1 cup all-purpose flour

2 tsp. baking powder

1 tsp. baking soda

1 tsp. salt

1/4 cup sugar

1 (heaping) cup grated sharp cheddar cheese

2 eggs

1 cup buttermilk*

1/4 cup butter, melted

Preheat your oven to 400°F. Whisk together the cornmeal, flour, cheese, baking powder, baking soda, salt and sugar. Add the buttermilk, eggs and melted butter and mix well to combine. Pour the batter into a greased 9-inch baking dish and bake for 30 minutes, or until golden brown. Serve immediately with butter and honey (and chili)!

*If you don’t have buttermilk, combine 1 cup of milk with 1 TBSP. white vinegar and allow to sit for a few minutes before adding to the rest of the ingredients. Instant buttermilk!

A Healthy Dose of Optimism | Lentil and Mushroom Bourguignon


Life is full of good days and bad days, and in-between days. Some days you might have difficulty putting one foot in front of the other, other days you might have limitless energy. Some days are productive, others less so. Some days might bring good moods, others might bring sour moods. Some days you might have tunnel vision, other days you’re capable of seeing the bigger picture. That’s just how life works.

But for those less-than-optimal days, I have a suggestion. Actually, Jessica does. Please take a moment to watch.


Seriously, don’t even try to tell me that you’re not smiling right now.

Or giggling.

Or thinking about what you like about your life.


The part where she claps authoritatively after saying “I like my whole house!”…I just can’t not giggle. It’s impossible. Thank you Jessica, for that little dose of optimism – that reminder of all of the good things in my life. I like my haircuts too…well, usually…

Now that we’re smiling, let’s make some dinner, shall we? I think this hearty lentil and mushroom bourguignon will leave you smiling too…with a happy belly to boot.


Lentil and Mushroom Bourguignon (adapted from Treehugger)

1 TBSP. olive oil
1 small onion, finely chopped
2 TBSP. butter
4 garlic cloves, crushed
1 tsp dried thyme
2 large portobello mushrooms, sliced
3 cups cremini mushrooms, sliced
1 cup cooked brown lentils
1 cup red wine
1 TBSP. flour
2 cups vegetable broth
1 TBSP. tomato paste
Salt and pepper to taste
Sour cream and parsley for garnish (optional)

In a large skillet, heat the olive oil and sauté the onion for 2 to 3 minutes, until soft. Add the butter, garlic, thyme and mushrooms and cook until the mushrooms release their liquid, soften and then just start to brown. Add the lentils and cook for 1 or 2 minutes, then add the wine and cook for a few minutes more, scraping the bottom of the skillet, until the wine has almost cooked off. Sprinkle the flour over the lentil and mushroom mixture and stir to blend, then add the broth and tomato paste. Bring to a simmer and cook, stirring often, for about 10 minutes, or until the sauce is thick and dark and the mushrooms are tender. Serve hot over buttered egg noodles.


Have a great week friends! And remember, you can do anything good. 🙂

%d bloggers like this: